Change what appears on the Navigation Bar
The Outlook Navigation Bar allows you to switch between the various areas of Outlook, such as Mail, Calendar, Contacts, Tasks, and Notes. You can also change the order of the Outlook views on the navigation bar.
Customize the Navigation Bar

-
On the Navigation Bar, click
 .
. -
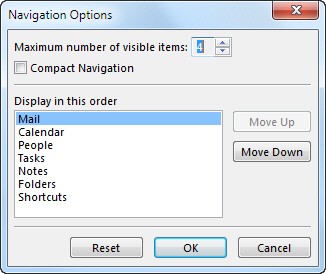
Click Navigation Options.
-
To change how many views appear, change the number for Maximum number of visible items.
-
To change the view order, click a view, and then click Move Up or Move Down.

-
You can also drag the visible view names on the Navigation Bar to rearrange the order.
Note: In Outlook 2013 and Outlook 2016, you can open Journal by pressing Ctrl+8. It never appears on the Navigation Bar.
Compact view
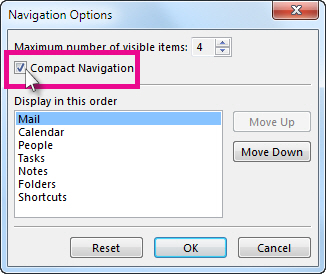
To maximize the vertical height of the Outlook window, you can use Compact Navigation. This removes the Navigation Bar and lists the views at the bottom of the folder pane.
-
On the Navigation Bar, click
 .
. -
Click Navigation Options.
-
Check the Compact Navigation box.

Resize the Navigation Pane
-
Point to the right border of the Navigation Pane, and when the pointer becomes a double-headed arrow
 , drag the border to the left or right.
Change the buttons on the Navigation Bar
You can change the number and order of the large navigation buttons that appear at the bottom of the Navigation Pane in the Navigation Bar.
To change the order of the buttons, do the following:
-
At the bottom of the Navigation Pane, click Configure buttons
 , and then click Navigation Pane Options.
 -
In the Display buttons in this order list, click the button that you want to change, and then click Move Up or Move Down.
Note: To restore the default button arrangement, click Reset.
To change the number of buttons, do the following:
-
At the bottom of the Navigation Pane, click Configure buttons
 , and then click Show More Buttons or Show Fewer Buttons.
To add or remove buttons, do the following:
-
At the bottom of the Navigation Pane, click Configure buttons
 , click Add or Remove Buttons, and then click the button that you want.
Notes:
-
To quickly see more or fewer buttons or folders, point to the horizontal splitter bar between the folders and the buttons, and drag the bar up or down when the pointer turns into a double-headed arrow
 . If you drag the horizontal splitter bar to the bottom of the Navigation Pane, all the large buttons become small buttons and appear as a single row of icons at the bottom of the Navigation Pane.
 -
To maximize the folder pane space, drag the horizontal splitter bar to the bottom of the Navigation Pane, and then use the small buttons to switch folder panes.
-
To see all your folders, and not just your e-mail folders, change the Folder List button into a large button, and then either move it above the Mail button or remove the Mail button from the Navigation Pane.
-
Minimize the Navigation Pane
You can increase the amount of work space in your Outlook window by using the minimized Navigation Pane. The minimized Navigation Pane collapses into a vertical bar of buttons that still provides access to your most used folders and views.
To hide or show the minimized Navigation Pane, do the following:
-
In the upper corner of the Navigation Pane or minimized Navigation Pane header, click Minimize the Navigation Pane
 or Expand the Navigation Pane
  .
.
To see your folders from the minimized Navigation Pane, click the Folders button.
Note: When you expand the minimized Navigation Pane, the Navigation Pane is reset to the same width as it was previously. If you exit Outlook with the Navigation Pane minimized, it appears minimized when you restart Outlook.
Microsoft Office Tutorials: Change What Appears On The Navigation Bar >>>>> Download Now
ReplyDelete>>>>> Download Full
Microsoft Office Tutorials: Change What Appears On The Navigation Bar >>>>> Download LINK
>>>>> Download Now
Microsoft Office Tutorials: Change What Appears On The Navigation Bar >>>>> Download Full
>>>>> Download LINK LH