Set or change permissions for a public folder
If you've created a public folder, or you want to grant or restrict access to a folder to specific users or groups, here's how to set permissions for public folders.
Important: You need a Microsoft Exchange Server and an Exchange email account to use public folders with Outlook. Most home and personal email accounts don't use Exchange Server.
-
In the Folder Pane, right-click the public folder to set permissions, and then click Properties.
Note: If you can't see Public Folders in the Folder Pane, press Ctrl+6.
-
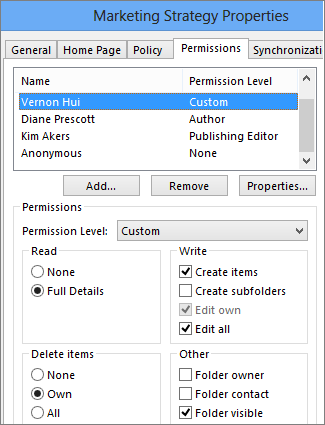
On the Permissions tab, under Permissions, choose a permissions level from the list.
Permissions descend from Owner, with all the rights, to Contributor, with the fewest rights.
-
After you choose a permissions level, you can fine-tune the permissions by selecting buttons or checking and unchecking boxes. If you do that, the Permission Level for the user or group will change to Custom.
In the example shown here, Diane and Kim have the built-in Author and Publishing Editor permission levels. Vernon was assigned to the Editor level, which was then customized to allow him to delete his own items.

-
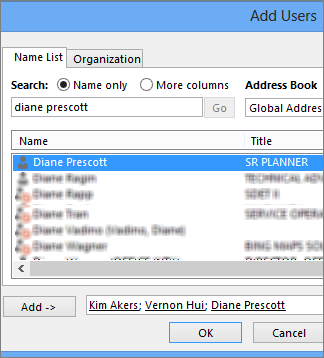
To find the users or contact groups you want to assign to that permissions level, click Add.
-
In the Global Address List, select the users and contact groups you want, clicking Add after selecting each one. As you add users or groups, they appear in the box to the right of the Add button.

-
Set different permissions for other users or groups by repeating steps 2 through 5.
-
Click OK.
More about permissions and Outlook folders
To learn more about setting permissions and how they work, read the "Do I have to apply permissions to share my files with other users on my computer?" section in the What to know before applying permissions to a file or folder article.
To learn more about Outlook folders, see Create and share a public folder and Switch between Outlook folders.
No comments:
Post a Comment