Make summary data easier to read by using a crosstab query
To make summary data in Access easier to read and understand, consider using a crosstab query. A crosstab query calculates a sum, average, or other aggregate function, and then groups the results by two sets of values— one set on the side of the datasheet and the other set across the top. On the ribbon, click Create, and then in the Queries group, click Query Wizard. In the New Query dialog box, double-click Crosstab Query Wizard.
If one set of headings has date values, the wizard will help you group the records by standard intervals – such as months or quarters.
In this article
Note: Crosstab queries aren't available in an Access web apps, and are only partially supported in a web database: they can't be used by any web objects.
Overview
A crosstab query is a type of select query. When you run a crosstab query, the results display in a datasheet that has a different structure from other types of datasheets.
The structure of a crosstab query can make it easier to read than a simple select query that displays the same data, as shown in the following illustration.
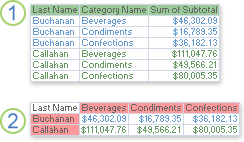
1. This select query groups summary data vertically by employee and category.
2. A crosstab query can display the same data, but groups the data both horizontally and vertically so that the datasheet can be more compact and easier to read.
When you create a crosstab query, you specify which fields contain row headings, which field contains column headings, and which field contains values to summarize. You can use only one field each when you specify column headings and values to summarize. You can use as many as three fields when you specify row headings.
You can also use an expression to produce row headings, column headings, or values to summarize. See SQL Aggregate Functions for more information.
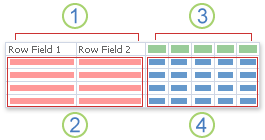
1. One, two, or three columns on this side contain row headings. The names of the fields that you use as row headings appear in the top row of these columns.
2. The row headings appear here. The number of rows in the crosstab datasheet can grow quickly when you use more than one row heading field, because each combination of row headings is displayed.
3. The columns on this side contain column headings and summary values. Note that the name of the column heading field does not appear on the datasheet.
4. Summary values appear here.
Methods for creating your crosstab query
Use the Crosstab Query Wizard The Crosstab Query Wizard is usually the fastest and easiest way to create a crosstab query. It does most of the work for you, but there are a few options that the wizard does not offer.
The wizard has these benefits:
-
It is easy to use. To use it, you start the wizard, and then answer a series of guided questions.
-
It can automatically group dates into intervals. If you use a field that contains date/time data for column headings, the wizard also helps you group the dates into intervals, such as months or quarters.
Tip: If you want to use values from a Date/Time field for column headings, but want to group the dates into intervals that the wizard does not provide, such as fiscal year or biennium, do not use the wizard to create your query. Instead, create the crosstab query in Design view, and use an expression to create the intervals.
-
It can be used as a starting point. You can use the wizard to create the basic crosstab query that you want, and then fine-tune the query's design by using Design view.
However, by using the wizard, you cannot:
-
Use more than one table or query as a record source.
-
Use an expression to create fields.
-
Add a parameter prompt.
-
Specify a list of fixed values to use as column headings.
At the last step of the wizard, you can choose to modify the query in Design view. This allows you to add query design elements that the wizard does not support, such as additional record sources.
Work in Design view Design view allows you more control over your query design. It supports the features that are not available in the wizard.
Consider using Design view to create your crosstab query if you want to:
-
Have more control over the process. The wizard makes some decisions for you.
-
Use more than one table or query as a record source.
-
Add a parameter prompt to your query.
-
Use expressions as fields in your query.
-
Specify a list of fixed values to use as column headings.
-
Practice using the design grid.
Write a query in SQL view You can write a crosstab query in SQL view, if you prefer. However, you cannot specify parameter data types by using SQL view. If you want to use a parameter in your crosstab query, you must specify the parameter data type by modifying your query in Design view.
Tip: Remember — you are not limited to using only one method for creating a crosstab query. You can use the wizard to create the query, and then use Design view to modify the query design.
Create a crosstab query by using the Crosstab Query Wizard
Using the Crosstab Query Wizard requires that you use a single table or query as the record source for your crosstab query. If a single table does not have all the data that you want to include in your crosstab query, start by creating a select query that returns the data that you want. For more information about creating a select query, refer to the See Also section.
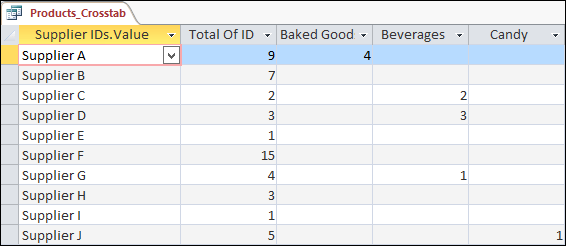
For this example, we'll create a crosstab query using the Products table from the Northwind sample database. We want to display a count of the number of products in each category from all the suppliers.
-
On the Create tab, in the Queries group, click Query Wizard. Note, if you're using Access 2007, click Create > Other > Query Wizard.

-
In the New Query dialog box, click Crosstab Query Wizard, and then click OK.
The Crosstab Query Wizard starts.
-
On the first page of the wizard, choose the table or query that you want to use to create a crosstab query. For this example, select the Products table and then click Next.

-
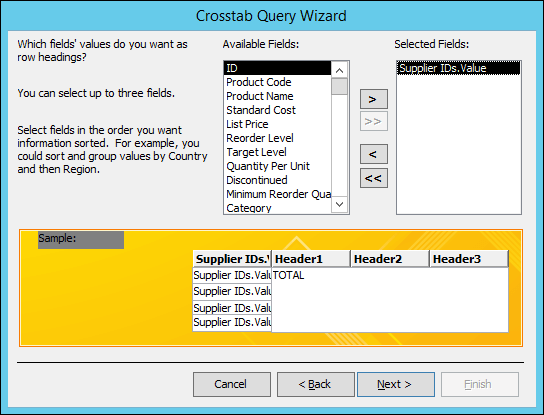
On the next page, choose the field that contains the values that you want to use as row headings. You can select up to three fields to use as row headings sources, but the fewer row headings you use, the easier your crosstab datasheet will be to read. If you choose more than one field to supply row headings, the order in which you choose the fields determines the default order in which your results are sorted.
For this example, select Supplier IDs.Value and then click the button labeled with a > symbol. Notice that Access displays the field name along the left side of the sample query preview at the bottom of the dialog box. Click Next to continue.
-
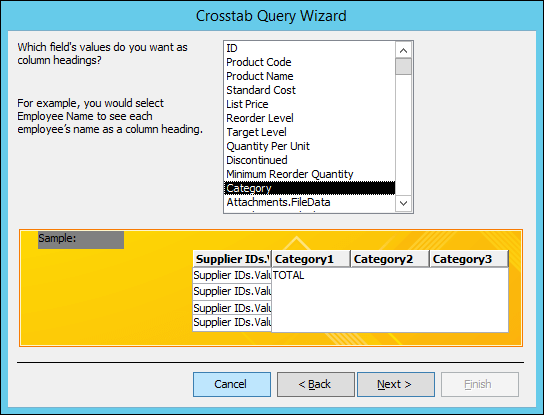
On the next page, choose the field that contains the values that you want to use as column headings. In general, you should choose a field that contains few values, to help keep your results easy to read. For example, using a field that has only a few possible values (such as gender) might be preferable to using a field that can contain many different values (such as age).
If the field that you choose to use for column headings has the Date/Time data type, the wizard adds a step that lets you specify how to group the dates into intervals, such as months or quarters.
For this example, select Category and notice that Access displays category sample names along the top of the sample query preview at the bottom of the dialog box. Click Next to continue.
-
If you choose a Date/Time field for column headings, the next page of the wizard asks you to specify the interval to use to group the dates. You can specify Year, Quarter, Month, Date, or Date/Time. If you do not choose a Date/Time field for column headings, the wizard skips this page.
-
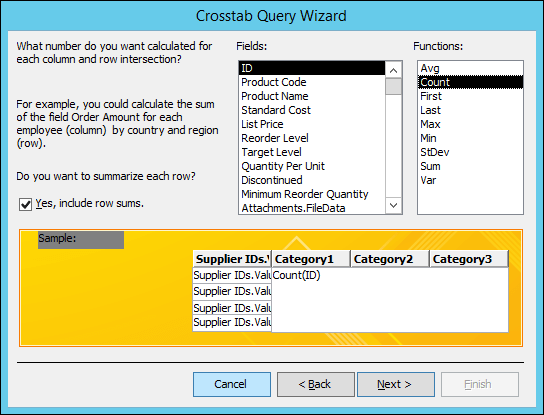
On the next page, choose a field and a function to use to calculate summary values. The data type of the field that you select determines which functions are available.
On the same page, select or clear the Yes, include row sums check box to include or exclude row sums.
If you include row sums, the crosstab query has an additional row heading that uses the same field and function as the field value. Including a row sum inserts an additional column that summarizes the remaining columns. For example, if your crosstab query calculates average age by location and gender (with gender column headings), the additional column calculates the average age by location, across all genders.
For this example, select ID in the Fields box and Count in the Functions box in order to have Access count the number of products in each intersection of supplier and category. Leave the Yes, include row sums check box selected. Access will create a column that totals the number of products from each supplier. Click Next to continue.
-
On the last page of the wizard, type a name for your query and then specify whether you want to view the results or modify the query design.
You can change the function that is used to produce row sums by editing the crosstab query in Design view.
-
If you've walked through this example using the Products table from the Northwind database, the crosstab query displays the list of supplier names as rows, the product category names as columns, and a count of the number of products in each intersection.
Create a crosstab query in Design view
By using Design view to create your crosstab query, you can use as many record sources (tables and queries) as you want. However, you can keep the design simple by first creating a select query that returns all of the data that you want and then using that query as the only record source for your crosstab query. For more information about creating a select query, refer to the See Also section.
When you build a crosstab query in Design view, you use the Total and Crosstab rows in the design grid to specify which field's values will become column headings, which fields' values will become row headings, and which field's values to sum, average, count, or otherwise calculate.
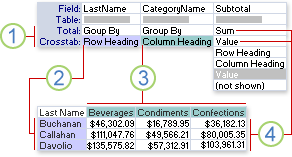
1. The settings in these rows determine whether the field is a row heading, column heading, or summary value.
2. This setting displays the field's values as row headings.
3. This setting displays the field's values as column headings.
4. These settings produce the summary values.
Create the query
-
On the Create tab, in the Queries group, click Query Design. Note, if you're using Access 2007, click Create > Other > Query Design.

-
In the Show Table dialog box, double-click each table or query that you want to use as a record source.
If you use more than one record source, make sure that the tables or queries are joined on fields that they have in common. For more information about joining tables and queries, refer to the See Also section.
-
Close the Show Table dialog box.
-
On the Design tab, in the Query Type group, click Crosstab.
-
In the query design window, double-click each field that you want to use as a source of row headings. You can select as many as three fields for row headings.
-
In the query design grid, in the Crosstab row for each row heading field, select Row Heading.
You can enter an expression in the Criteria row to limit the results for that field. You can also use the Sort row to specify a sort order for a field.
-
In the query design window, double-click the field that you want to use as the source of column headings. You can select only one field for column headings.
-
In the query design grid, in the Crosstab row for the column heading field, select Column Heading.
You can enter an expression in the Criteria row to limit the results for the column heading field. However, using a criteria expression with the column heading field does not limit the number of columns returned by the crosstab query. Instead, it limits which columns contain data. For example, suppose you have a column heading field that has three possible values: red, green, and blue. If you apply the criterion ='blue' to the column heading field, the crosstab still displays a column for red and a column for green, but only the column for blue contains data.
If you want to limit the values that display as column headings, you can specify a list of fixed values by using the query's Column Headings property. For more information, see the next section.
-
In the query design window, double-click the field that you want to use to calculate summary values. You can select only one field to use for summary values.
-
In the query design grid, in the Total row for the summary values field, select an aggregate function to use to calculate the values.
-
In the Crosstab row for the summary values field, select Value.
You cannot specify criteria for or sort on a summary values field.
-
On the Design tab, in the Results group, click Run.
Specify fixed values for column headings
If you want to specify fixed values to use for column headings, you can set the query's Column Headings property.
-
Open the crosstab query in Design view.
-
If the property sheet is not visible, press F4 to display it.
-
In the property sheet, just above the General tab, make sure that the Selection type is Query Properties. If it is not, click an empty spot in the space above the query design grid.
-
In the property sheet, on the General tab, in the Column Headings property, enter a comma-separated list of values that you want to use as column headings.
Some characters (such as most punctuation marks) are not allowed in column headings. If you use these characters in your list of values, Access substitutes an underscore (_) for each such character.
Create a crosstab query in SQL view
SQL syntax for a crosstab query
A crosstab query is expressed in SQL as a TRANSFORM statement. A TRANSFORM statement has the following syntax:
TRANSFORM aggfunction
selectstatement
PIVOT pivotfield [IN (value1[, value2[, ...]])]
The TRANSFORM statement has these parts:
| Part | Description |
| aggfunction | An SQL aggregate function that operates on the selected data. |
| selectstatement | A SELECT statement. |
| pivotfield | The field or expression you want to use to create column headings in the query's result set. |
| value1, value2 | Fixed values used to create column headings. |
SQL view does not limit the number of tables or queries that you can use as record sources for a crosstab query. However, you can help keep the design simple by creating a select query that returns all of the data that you want to use in your crosstab query, and then using that select query as the record source. For more information about creating a select query, refer to the See Also section.
-
On the Create tab, in the Other group, click Query Design.
-
Close the Show Table dialog box.
-
On the Design tab , in the Views group, click View, and then click SQL View.
-
In the SQL object tab, type or paste the following SQL:
                TRANSFORM
SELECT
FROM
GROUP BY
PIVOT
; -
On the first line, after TRANSFORM, type an expression to use to calculate summary values; for example, Sum([Amount]).
If you are using more than one table or query as a record source, include the table or query name as part of each field name; for example, Sum([Expense].[Amount]).
-
On the second line, after SELECT, type a list of fields or field expressions that you want to use for row headings. Separate the list items by using commas; for example, [Budget].[Dept_ID], [Expense].[Type].
-
On the third line, after FROM, type a list of the tables or queries that you are using as record sources; for example, Budget, Expense.
-
On the fourth line, after GROUP BY, type the same list of fields that you used in the SELECT clause, in step 6.
-
On the fifth line, after PIVOT, type a field name or expression that you want to use for column headings; for example, PIVOT [Budget].[Year].
Add a sort order to a row heading field
To add a sort order to a crosstab query in SQL view, use an ORDER BY clause.
-
Insert a line between the GROUP BY clause and the PIVOT clause.
-
On the new line, type ORDER BY followed by a space.
-
Type the field name or expression that you want to sort on; for example, ORDER BY [Expense].[Expense_Class]
By default, an ORDER BY clause sorts values in ascending order. If you want to sort in descending order, type DESC after the field name or expression.
-
If you want to sort on an additional field or expression, type a comma and then type the additional field name or expression. Sorting occurs in the order that the fields or expressions appear in the ORDER BY clause.
Specify fixed values to use as column headings
-
At the end of the PIVOT clause in SQL view of your crosstab query, type IN, followed by a comma-separated list of values (enclosed in parentheses) to use as column headings. For example, IN (2007, 2008, 2009, 2010) produces four column headings: 2007, 2008, 2009, 2010.
If you specify a fixed value that does not correspond to a field value from the pivot field, that fixed value becomes a column heading for an empty column.
Add query criteria to limit row headings
-
Insert a new line after the FROM clause in SQL view of your crosstab query.
-
Type WHERE followed by a field criterion.
If you want to use additional criteria, you can use the AND and OR operators to extend your WHERE clause. You can also use parentheses to group criteria into logical sets.
Use ranges or intervals for headings
Sometimes, rather than using every value of a field for row or column headings, you want to group the values of a field into ranges and then use those ranges for row or column headings. For example, suppose you use an "Age" field for column headings. Rather than using a column for each age, you may prefer to use columns that represent age ranges.
You can use the IIf Function in an expression to create ranges to use for row or column headings.
Tip: If you want to create intervals with a Date/Time field, consider using the Crosstab Query Wizard. The wizard allows you to group dates into Year, Quarter, Month, Date, or Date/Time intervals. If none of these intervals is what you want, you should create your crosstab query in Design view, and then use the technique described in this section to create the intervals that you want.
Create ranges by using an expression
-
Open the crosstab query in Design view.
-
In the query design grid, in the Field row, right-click an empty column, and then click Zoom on the shortcut menu.
-
In the Zoom box, type a field alias, followed by a colon (:).
-
Type IIf().
-
Inside the parentheses that follow IIf, type a comparison expression that defines the first range of field values.
For example, suppose you are creating ranges for an Age field, and you want each range to be twenty years. The comparison expression for the first range is [Age]<21.
-
Type a comma after the comparison expression, and then type a name for the range, enclosed in quotation marks. The name you supply is the crosstab heading for values that fall within the range.
For example, after [Age]<21, type a comma and then type "0-20 years".
-
Type a comma after the range name (outside the quotation marks), and then do one of the following:
-
To create another range, type IIf() and then repeat steps 5, 6 and 7.
-
For the last range, type just a name for the range.
For example, a complete nested IIf expression that separates an Age field into twenty-year ranges might look like this (line breaks were added for readability):
                    IIf([Age]<21,"0-20 years",
 IIf([Age]<41,"21-40 years",
 IIf([Age]<61,"41-60 years",
 IIf([Age]<81,"61-80 years", "80+ years"))))
Note: When Access evaluates the expression, it stops evaluating as soon as one of the IIf statements evaluates to true. You do not need to specify the lower end of each range, because any value that falls below the lower end of a given range would already have evaluated as true.
-
-
In the query design grid, in the Total row, select Group By.
-
In the Crosstab row, specify whether to use the ranges as row headings or column headings. Remember that you can specify from one to three row headings, and one column heading.
Prompt for a parameter to limit row headings
You may want your crosstab query to prompt for input when it is run. For example, suppose that you are using several row headings, one of which is Country/Region. Rather than always displaying data for every country or region, you may want your query to prompt for a name and then display data according to the user's input.
You can add a parameter prompt to any row heading field.
Note: You can also add a parameter prompt to a column heading field, but this will not limit the columns that appear.
-
Open the crosstab query in Design view.
-
In the Criteria row for the row heading field for which you want to prompt the user for input, type question text enclosed in square brackets. The question text will appear as a prompt when the query is run.
For example, if you type [Which country or region?] in the Criteria row, when the query runs, a dialog box appears that contains the question "Which country or region?," an input box, and an OK button.
Tip: If you want your parameter to be flexible, concatenate your expression with wildcards, by using the Like operator. For example, instead of using [Which country or region?] as your criterion, you can use Like [Which country or region?]&"*" to make the parameter match a greater range of input. Using Like does not change the appearance of the parameter prompt.
-
On the Design tab, in the Show/Hide group, click Parameters.
-
In the Query Parameters dialog box, in the Parameters column, enter the same parameter prompt that you used in the Criteria row. Include the square brackets, but do not include any concatenated wildcards or the Like operator.
-
In the Data Type column, select the data type for the parameter. The data type should match the data type of the row heading field.
Replace null values with zeroes
If the field that you use to calculate summary values in your crosstab query contains null values, those values are ignored by any aggregate function that you use. For some aggregate functions, your results can be affected. For example, to calculate an average, you add all of the values and divide the result by the number of values. But if the field contains any null values, those null values are not counted as part of the number of values.
In some cases, you may prefer to replace any null values with zeroes so that the values will be counted during aggregate calculations. You can use the Nz function to replace null values with zeroes.
Nz syntax
Nz ( variant [, valueifnull ] )
The Nz function syntax has these arguments:
| Argument | Description |
| variant | Required. A variable of data type Variant. |
| valueifnull | Optional (unless used in a query). A Variant that supplies a value to be returned if the variant argument is Null. This argument enables you to return a value other than zero or a zero-length string. Note: If you use the Nz function in an expression in a query without using the valueifnull argument, the results will be a zero-length string in the fields that contain null values. |
-
With the query open in Design view, in the query design grid, right-click the Value field.
-
On the shortcut menu, click Zoom.
-
In the Zoom box, surround the field name or expression with parentheses, and then type Nz in front of the parentheses.
-
Type , 0 just inside the right parenthesis.
For example, if you used Nz with a field called "Hours Lost" to turn null values into zeroes, your finished expression would look like this:
Nz([Hours Lost], 0)
Crosstab query tips
-
Keep it simple Crosstab queries can become difficult to read as the number of row combinations grows. Don't use more row headings than you need.
-
Consider building your crosstab in steps Don't limit yourself to using only tables. You can often start by building a totals query and then using that query as the record source for a crosstab query.
-
Choose your column heading field carefully Crosstab datasheets tend to be easier to read when the number of column headings stays relatively small. Once you have identified the fields that you want to use as headings, consider using the field that has the fewest distinct values to produce column headings. For example, if your query calculates a value by age and gender, consider using gender for column headings instead of age because gender typically has fewer possible values than age.
-
Use a subquery in a WHERE clause You can use a subquery as part of a WHERE clause in a crosstab query.
No comments:
Post a Comment