Work Smart: Using Lync 2010 with Office 2010
When you run Microsoft® Office 2010 with Microsoft® Lync™ 2010 communications software, you can access many Lync 2010 features directly from your Office 2010 programs.
What do you want to do?
View a person's Lync 2010 contact card and contact options
The contact card displays detailed information about people and provides one-click access to several ways of communicating with them. You can access a person's contact card in Office 2010 programs anywhere you see the Lync 2010 presence indicator next to a person's name.
View a person's contact card and contact options in an Office 2010 program
-
Point to a person's presence indicator, and then click the View More Options button. For details, see Use the contact card.
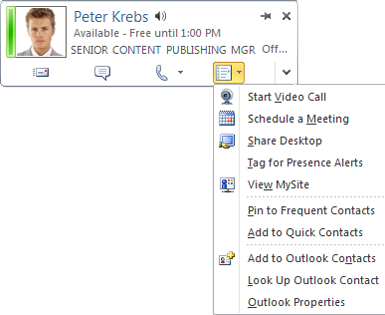
The following table describes where you can find the Lync 2010 presence indicator and contact card in Office 2010 programs.
| Office 2010 program | Location |
| Microsoft® Outlook® messaging and collaboration client | Email From, To, and Cc boxes Find a Contact search results To-Do Bar, under Quick Contacts Meeting request Scheduling Assistant |
| Microsoft® Word word-processing program Microsoft® Excel® spreadsheet software Microsoft® PowerPoint® presentation graphics program | On the File tab, on the Info tab, under Related People |
| Microsoft® SharePoint 2010 team services Microsoft® SharePoint Workspace 2010 (formerly Microsoft® Office Groove 2007) | Next to a person's name |
Use Lync 2010 features in Outlook 2010
In addition to viewing a person's availability and contact card as described in the previous section, you can use the following additional Lync 2010 features when working in Outlook 2010:
-
Respond to an email, contact, or task with an IM or call
-
Search for a contact quickly
-
View your contact list in the Outlook To-Do Bar
-
Schedule an online meeting
-
View a record of your Lync 2010 calls, voice mails, and conversations
You can also control which features are shared between Lync 2010 and Outlook 2010.
Respond with an IM
-
In Outlook Mail, on the Home tab, in the Respond group, click IM.

-
Click Reply with IM, or Reply All with IM.
You can also respond with an IM in other Outlook locations:
-
In an open email message, on the Message tab, in the Respond group
-
In Outlook Contacts, on the Home tab, in the Communicate group, on the More menu
-
In Outlook Tasks, on the Home tab, in the Respond group
Respond with a call
-
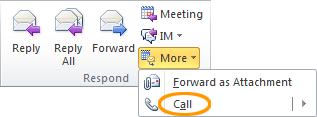
In Outlook Mail, on the Home tab, in the Respond group, click More, and then click Call.
-
Do one of the following:
-
Click the name or number of the person who sent the email message
-
Click Call all to start a Lync 2010 audio conference with everyone who received the email message
-
You can also respond with an IM in other Outlook locations:
-
In an open email message, on the Message tab, in the Respond group, on the More menu
-
In Outlook Contacts, on the Home tab, in the Communicate group, on the More menu
-
In Outlook Tasks, on the Home tab, in the Respond group, on the More menu
Search for a contact quickly
-
In the Outlook Find a Contact box, begin typing the name of the contact you want to find. A list of search results appears as soon as you begin typing.
View your contact list in the Outlook To-Do Bar
-
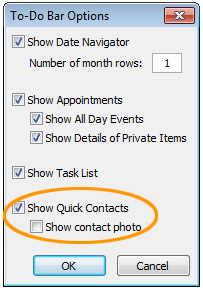
Right-click in the To-Do Bar, click Options, and then select or clear Show Quick Contacts.
-
(Optional) Select or clear Show contact photo.
Schedule an online meeting
-
In the Outlook Calendar ribbon, on the Home tab, in the Online Meeting group, click Online Meeting (in Microsoft Outlook 2007) or New Online Meeting(in Microsoft Outlook 2010).
View your Conversation History
-
In the Outlook Navigation Pane, click the Conversation History folder. This folder contains a record of your Lync 2010 calls, voice mails, and conversations.
Set Outlook integration options in Lync 2010
-
In the Lync main window, click the Options button, and then click Personal.
-
Under Personal information manager, select either Microsoft Exchange or Microsoft Outlook or None from the drop-down list.
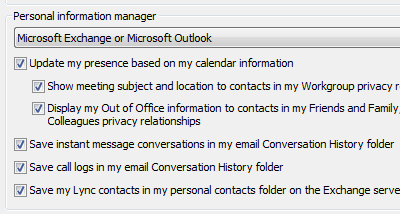
When you select Microsoft Exchange or Microsoft Outlook, the Lync search feature uses the Microsoft Outlook Contact list as a source of contacts, in addition to the global address list. When you select None, the Lync search feature returns contacts only from the global address list. It does not use either the Windows Address Book or the Outlook Contact list.
-
If you select Microsoft Exchange or Microsoft Outlook, do any of the following:
-
To make your presence automatically reflect when you are in a scheduled meeting, select the Update my presence based on my calendar information check box. Use the following settings to further specify who can see this information:
-
To show this information to contacts in your Workgroup, select the Show meeting subject and location to contacts in my Workgroup privacy relationship check box.
-
To show your Out of Office information to contacts, select the Display my Out of Office information to contacts in my Friends and Family, Workgroup, and Colleagues privacy relationships check box. Clear the check box if you want to hide your Out of Office information from all your contacts.
-
-
To save conversation history in Outlook, select the Save instant message conversations in my email Conversation History folder check box. Clearing this check box means that your instant message history is not kept.
-
To save your phone call history in Outlook, select the Save call logs in my email Conversation History folder check box. Clearing this check box means that your phone call history is not kept.
-
To save your contacts in Microsoft Exchange Server, select the Save my Lync contacts in my personal contacts folder on the Exchange server check box. Clearing this check box means that your Lync contacts are kept only in Lync.
-
Set Lync integration options in Outlook 2010
-
In Outlook, on the File tab, click Options, and then click Contacts.
-
Under Online status and photographs, select or clear Display online status next to name.

Start a Lync 2010 sharing session in Word, PowerPoint, or Excel
You can share an open document in Word 2010, Excel 2010, or PowerPoint 2010 by sending a copy or starting a sharing session with one or more contacts.
Share an open document from the File tab
To send a copy of your document as an instant message attachment, do the following:
-
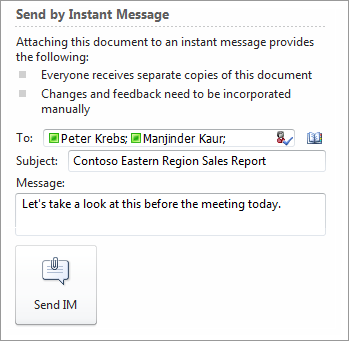
On the File tab, click Send & Save, and then click Send by Instant Message.
-
In the Send by Instant Message pane, complete the To, Subject, and Message boxes.
-
Click Send IM.
To start a Lync 2010 sharing and collaboration session with your document, do the following:
-
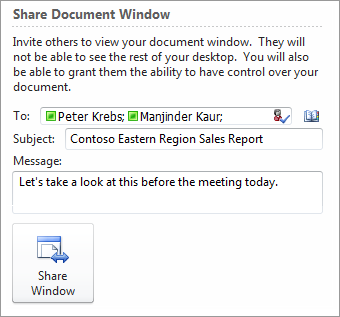
On the File tab, click Send & Save, and then click Share Document Window.
-
In the Share Document Window pane, complete the To, Subject, and Message boxes.
-
Click Share Now.
Share an open document from the Review tab
To send a copy of your document as an instant message attachment, do the following:
-
On the Review tab, in the Share group, click Send by IM.

-
In the Send File window, select one or more people from your Contact list, or look for additional contacts in the search box.
-
Click OK.
To start a Lync 2010 sharing and collaboration session with your document, do the following:
-
On the Review tab, in the Share group, click Share Now.

-
In the Share Now window, select one or more people from your Contact list, or look for additional contacts in the search box.
-
Click OK.
No comments:
Post a Comment