Create or delete an Excel table
When you create a table in an Excel worksheet, it's not only easier for you to manage and analyze your data, but you also get built-in filtering, sorting, row shading with Banded Rows, and the ability to use different formulas in a Total Row.
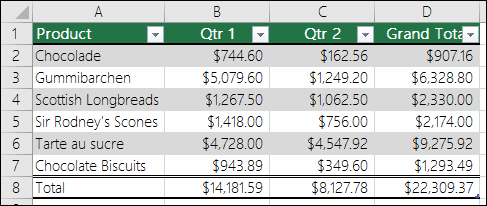
Notes:
-
Excel tables shouldn't be confused with the data tables that are part of a suite of What-If Analysis commands (Data Tools, on the Data tab). See Introduction to What-If Analysis for more information.
-
The screen shots in this article were taken in Excel 2016. If you have a different version your view might be slightly different, but unless otherwise noted, the functionality is the same.
Create a table in the style you want
-
Select any cell within the range of cells you want included in the table.
-
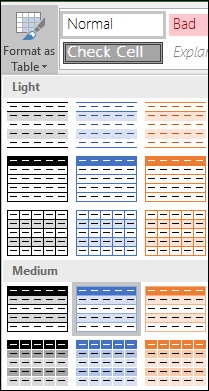
On the Home tab, click Styles > Format as Table > select the style of your choice from the table Style Gallery.
-
Excel will automatically highlight the data range for your table, and the range address will be listed in the Format As Table dialog, but you can adjust the range if necessary. If the top row of the selected range contains data you want to use as table headers, check the My table has headers box. If you don't check the My table has headers box, table headers with default names like Column1 and Column2 are added to your table above its data. You can modify default header names at any time. For more information, see Turn Excel headers on or off.
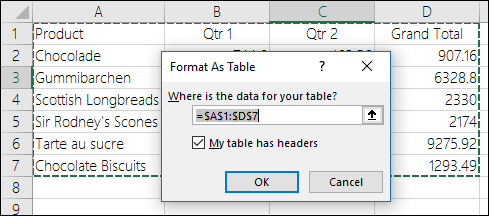
Once you click OK, Excel will format your data range as a table with the style you selected.
You can change the current style any time by selecting a new one from the Style Gallery. You can also create your own table style to use in the current workbook by selecting New Table Style in the Style Gallery. After you create a custom table style, it's available for the current workbook when you click Format as Table > Custom in the Style Gallery. For more information, see Format an Excel table.
Create a table using the default table style
-
Select any cell within the range of cells you want included in the table.
-
Click Insert > Table.

Tip: Keyboard shortcut : Press Ctrl+T or Ctrl+L.
-
With this method, Excel will display a Create Table dialog box. If the top row of the selected range contains data you want to use as table headers, check the My table has headers box.
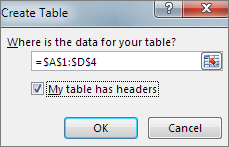
If you don't check the My table has headers box, table headers with default names like Column1 and Column2 are added to your table above its data. You can modify default header names at any time. For more information, see Turn Excel headers on or off
More about tables
-
After you create a table, the Table Tools become available, and you'll see a Design tab. You can use the tools on the Design tab to customize or edit the table. Note that the Design tab is visible only when at least one or more cells in the table are selected.
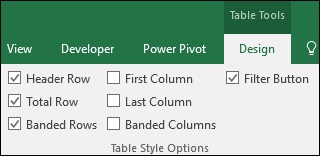
On a Mac, table options are available on the Table tab in the Ribbon.
-
After you create a table, you'll see the Quick Analysis button
 next to it. Click this button to see tools that can help you analyze your table data, such as conditional formatting, sparklines, charts, or formulas.
 -
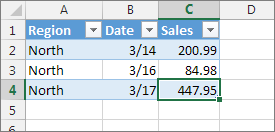
To add a row, you can simply start typing anywhere in the blank row immediately beneath the table, or select the last cell in the last row of the table, and press Tab.
In the example shown here, pressing Tab with cell C4 selected expands the table to a fifth row, and moves the selection to the first column in the new row, cell A5.
Delete a table
Delete a table without losing the data or table formatting
After you create a table, you might not want to keep working with the table functionality that it includes. Or you might only want a table style without the table functionality. To stop working with your data in a table without losing any table style formatting that you applied, you can convert the table to a regular range of data on the worksheet.
-
Click anywhere in the table.
This displays the Table Tools tab on the ribbon.
-
On the Design tab, in the Tools group, click Convert to Range.

--OR--
Right-click on the table and click Convert to Range.
On a Mac, go to Table > Convert to Range
Table features are no longer available after you convert the table back to a range. For example, the row headers no longer include the sort and filter arrows, and any structured references that were used in formulas turn into regular cell references. For more information, see Using structured references in Excel tables.
Delete the entire table
-
Select the entire table by picking any of its header cells, and pressing Ctrl+A to select all its cells.
-
Press Delete.
Clear the data but keep the table
To keep the structure and formatting of the table, but delete the data, do this:
-
Select all the rows of the table except the headers.
-
On the Home tab, go to Editing > Clear > Clear Contents.
-
To clear the headers, select all the cells in its row and pick Clear > Clear Contents.
Note: If you select the entire table, when you use Clear > Clear Contents, Excel will delete all of the selected data as well as the table.
Need more help?
You can always ask an expert in the Excel Tech Community, get support in the Answers community, or suggest a new feature or improvement on Excel User Voice.
Too good article,Keep sharing more article posts with us.
ReplyDeleteThank you...
ServiceNow Training
Microsoft Office Tutorials: Create Or Delete An Excel Table >>>>> Download Now
ReplyDelete>>>>> Download Full
Microsoft Office Tutorials: Create Or Delete An Excel Table >>>>> Download LINK
>>>>> Download Now
Microsoft Office Tutorials: Create Or Delete An Excel Table >>>>> Download Full
>>>>> Download LINK MV