Add or delete audio in your PowerPoint presentation
You can add audio, such as music, narration, or sound bites, to your PowerPoint presentation. To record and hear any audio, your computer must be equipped with a sound card, microphone, and speakers.
To record and add narration with timings to your PowerPoint presentation, see Record a slide show with narration and slide timings.
To play music through the length of your presentation, see Play music for the duration of your slide show.

What would you like to do?
Select an audio file to insert
-
In Normal view, click the slide that you want to add a sound to.
-
On the Insert tab, in the Media group, click Audio.
-
In the list, click Audio on My PC, locate and select the audio clip that you want, and then click Insert.
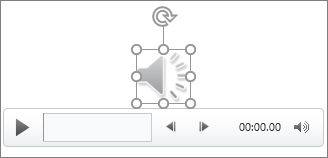
The audio icon and controls appear on the slide.

-
In Normal view or Slide Show view, click the icon and click Play to play the music or other sound.
Record audio
-
In Normal view, click the slide that you want to add recorded sound to.
-
On the Insert tab, in the Media group, click Audio.
-
In the list, click Record Sound (in PowerPoint 2016) or Record Audio (in PowerPoint 2013).
The Record Sound dialog box opens.
-
In the Record Sound box, click Record, and begin speaking or playing your own audio.
-
Click Stop
 when you're done recording. Assign a name to the recording.
 Click Play
 to listen to the recording. If you're satisfied, click OK to save the recording and insert it on the slide. If you're not yet satisfied, repeat steps 4 and 5.
The audio icon and controls appear on the slide.

-
In Normal view or Slide Show view, click the icon and click Play to play the music or other sound.
Set the playback options
-
On the slide, select the audio clip icon
 .
. -
Under Audio Tools, on the Playback tab, in the Audio Options group, select one of the following options from the Start list:
Option
Description
In Click Sequence (2016 only)
Starts the audio clip in the click sequence
Automatically
Starts the audio clip automatically when you show the slide
When Clicked (2016)
On Click (2013)
Manually starts the audio clip when you click it on the slide
Two additional options on the ribbon help determine how long the audio plays:
-
To play an audio clip as you click through the slides in your presentation, select Play Across Slides.
-
To play an audio clip continuously until you manually stop it or you advance to the next slide, select Loop until Stopped.
-
Preview audio
-
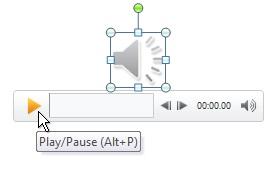
On the slide, select the audio icon, and then click the Play/Pause button beneath the audio icon.

Hide the audio icon
Important: Use this option only if you set the audio clip to play automatically, or if you created some other kind of control, such as a trigger, to click to play the clip. (A trigger is something on your slide, such as a picture, shape, button, paragraph of text, or text box, that can set off an action when you click it.) Note that the audio icon is always visible unless you drag it off the slide.
-
Click the audio clip icon
 .
. -
Under Audio Tools, on the Playback tab, in the Audio Options group, select the Hide During Show check box.
Delete an audio clip
To delete a music clip or another sound in PowerPoint, do the following:
-
Locate the slide that contains the sound that you want to delete.
-
In Normal view, click the sound icon
 or CD icon
  , and then press Delete.
What would you like to do?
Select an audio file to insert
-
In Normal view, click the slide that you want to add a sound to.
-
On the Insert tab, in the Media group, click the arrow under Audio.

-
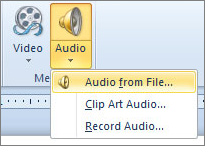
In the list, click Audio from file or Clip Art audio, locate and select the audio clip that you want, and then click Insert.
The audio icon and controls appear on the slide.

-
In Normal view or Slide Show view, click the icon and click Play to play the music or other sound.
Record audio
-
In Normal view, click the slide that you want to add a sound to.
-
On the Insert tab, in the Media group, click the arrow under Audio.

-
In the list, click Record Sound.
The Record Sound dialog box opens.
-
In the Record Sound dialog box, click Record
 , and begin speaking or playing your own audio.
 -
Click Stop
 when you're done recording. Assign a name to the recording.
 Click Play
 to listen to the recording. If you're satisfied, click OK to save the recording and insert it on the slide. If you're not yet satisfied, repeat steps 4 and 5.
The audio icon and controls appear on the slide:

-
In Normal view or Slide Show view, click the icon and click Play to play the music or other sound.
Set the playback options
-
On the slide, select the audio clip icon
 .
. -
Under Audio Tools, on the Playback tab, in the Audio Options group, do one of the following:
-
To start the audio clip automatically when you show the slide, in the Start list, click Automatically.
-
To manually start the audio clip when you click it on the slide, in the Start list, click On Click.
-
To play an audio clip as you click through the slides in your presentation, in the Start list, click Play across slides.
-
To play an audio clip continuously until you stop it, select the Loop until Stopped check box.
Note: When you loop a sound, it plays continuously until you advance to the next slide.
-
Preview audio
-
On the slide, click the Play/Pause button beneath the audio icon.

Hide the audio icon
Important: Use this option only if you set the audio clip to play automatically, or if you created some other kind of control, such as a trigger, to click to play the clip. (A trigger is something on your slide, such as a picture, shape, button, paragraph of text, or text box, that can set off an action when you click it.) Note that the audio icon is always visible unless you drag it off the slide.
-
Click the audio clip icon
 .
. -
Under Audio Tools, on the Playback tab, in the Audio Options group, select the Hide During Show check box.
Delete an audio clip
To delete a music clip or another sound in PowerPoint, do the following:
-
Locate the slide that contains the sound that you want to delete.
-
In Normal view, click the sound icon
 or CD icon
  , and then press Delete.
What would you like to do?
Add or record audio
-
In Normal view, click the slide that you want to add a sound to.
-
On the Insert tab, in the Media Clips group, click the arrow under Sound.

-
Do one of the following:
-
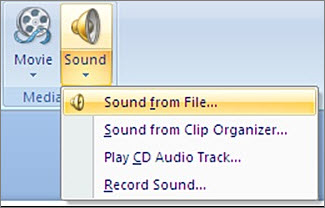
To add a sound from your computer or a network share, click Sound from File, locate the folder that contains the file, and then double-click the file that you want to add.
-
To add a sound from clip art, click Sound from Clip Organizer, locate the audio clip that you want in the Clip Art task pane, and then click to add it to the slide.
-
To play a sound from a CD running on your computer, click Play CD Audio Track, select starting and ending times and any other play options, and click OK.
-
To record and add your own audio, click Record Sound, and in the dialog box, click the Record button
 to begin speaking or playing your own audio.
The audio
 icon appears on the slide.
 -
Set the playback options
-
On the slide, select the sound icon
 .
. -
Under Sound Tools, on the Options tab, in the Sound Options group, do one of the following:
-
To start the audio clip automatically when you show the slide, in the Play Sound list, click Automatically.
-
To manually start the audio clip when you click it on the slide, in the Play Sound list, click When Clicked.
-
To play an audio clip as you click through the slides in your presentation, in the Play Sound list, click Play across slides.
-
To play an audio clip continuously until you stop it, select Loop Until Stopped.
Note: When you loop a sound, it plays continuously until you advance to the next slide.
-
Play or repeat a sound until you stop it
To repeat a sound until you stop it, or to play it for the duration of a presentation, you need to specify the stop options.
-
To adjust the settings for when the sound file stops, on the Animations tab, in the Animations group, click Custom Animation.

-
In the Custom Animation task pane, click the arrow to the right of the selected sound in the Custom Animation list, and then click Effect Options.
-
On the Effect tab, under Stop playing, do one of the following:
-
To stop the sound file with one mouse-click on the slide, click On click.
-
To stop the sound file after this slide, click After current slide.
-
To play the sound file for several slides, click After, and then set the total number of slides on which the file should play.
Note: For the last two options above, the sound should be as long as the specified display of the slides. You can see the length of the sound file on the Sound Settings tab, under Information.
-
Preview audio
-
On the slide, double-click the sound icon
 .
.
Hide the sound icon
Important: Use this option only if you set the sound to play automatically, or if you created some other kind of control, such as a trigger, to click to play the sound. (A trigger is something on your slide, such as a picture, shape, button, paragraph of text, or text box, that sets off an action when you click it.) Note that the sound icon is always visible in Normal view unless you drag it off the slide.
-
Click the sound icon
 .
. -
Under Sound Tools, on the Options tab, in the Sound Options group, select the Hide During Show check box.
Delete a sound
-
Click the slide that contains the sound that you want to delete.
-
In Normal view, click the sound icon
 or CD icon
  , and then press DELETE.
To delete multiple sounds, repeat steps 1 and 2 for each slide that contains sound files that you want to delete.
See also
Add audio to your slide show in PowerPoint 2016 for Mac
Play music for the duration of your slide show
Video and audio file formats supported in PowerPoint
Play music or other sounds automatically when a slide appears
Hello, Get the right sound effect when you need it. We have organized more than 4 TB sound effects that cover the sound spectrum. prosoundeffects.com You get the breadth, depth, reliable metadata and search software you need for lightning fast and accurate results.
ReplyDelete