Merge columns (Power Query)
Note: Power Query is known as Get & Transform in Excel 2016. Information provided here applies to both. To learn more, see Get & Transform in Excel 2016.
Note: For a quick video on how to display Query Editor, see the end of this article.
With Power Query, you can merge two or more columns in your query. You can merge columns to replace them with a merged column, or create a new merged column alongside the columns that are merged. You can merge columns of Text data type only.
I want to
Merge columns to replace existing columns
-
In Query Editor, ensure that the columns that you want to merge are of Text data type. Right-click a column header, and select Change Type > Text from the context menu.
-
Select two or more columns to be merged. Press the CTRL key, and then click on the column headers to select the columns that you want to merge. The order of the values in the merged column depends on the order in which you selected the columns to be merged.
-
Right-click the selected columns, and click Merge Columns.
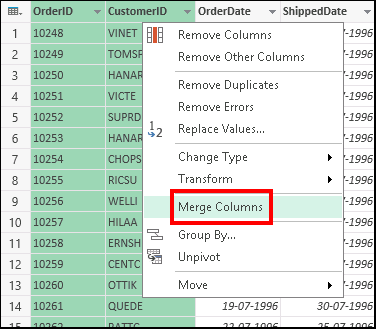
Note: The Merge Columns command is available only if all the columns selected for the merge operation are of Text data type.
-
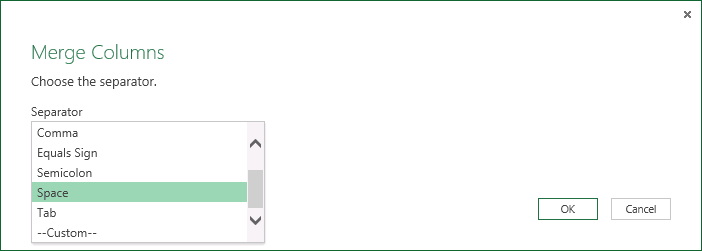
In the Merge Columns dialog box, specify the separator between the column values to be merged. You can select from predefined separator values, or specify a custom separator value.
-
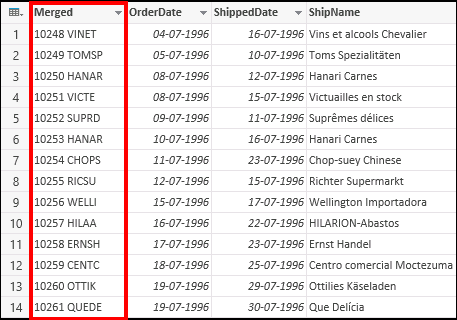
Click OK. A Merged column is created to replace the columns selected for the merge operation. Rename the merged column name as required.
Merge columns to create a new column
You can insert a custom column into the query table and use a custom column formula to merge values in two or more columns. In this case, the existing columns that are merged are available alongside the new merged column in the query table.
To merge column values by inserting a custom column:
-
In Query Editor, ensure that the columns that you want to merge are of Text data type. Right-click a column header, and select Change Type > Text.
-
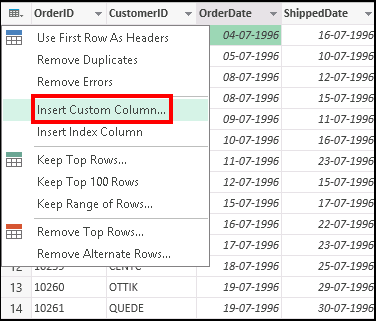
Click the table icon (
 ), and then click Insert Custom Column. Alternatively, you can right-click a column header, and then click Insert Custom Column.
-
In the Insert Custom Column dialog box:
-
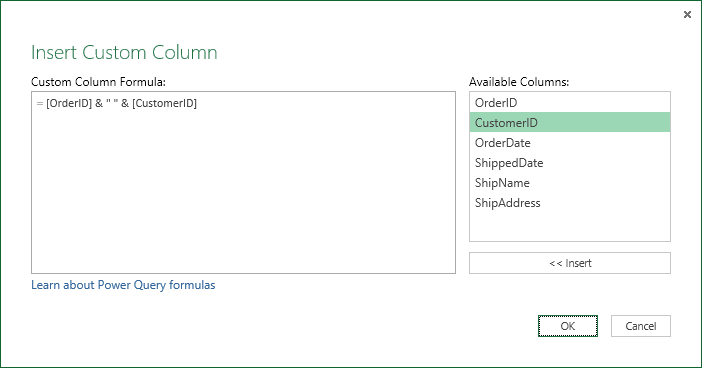
Double-click the first column that you want to merge from the Available Columns list or click the column from the Available Columns list, and click Insert. The column gets added to the Custom Column Formula box.
-
In the Custom Column Formula box, type & after the first column that you inserted. The & operator is used to combine values.
-
Specify the separator between the values. In this example, we will specify space as the separator between the values by specifying " ".
-
Type & after " ".
-
Specify the second column that you want to merge after &by double-clicking the column name in the Available Columns list or clicking the column from the Available Columns list, and then clicking Insert. In this example, we will merge the same columns as earlier (OrderID and CustomerID) separated by a space.
-
-
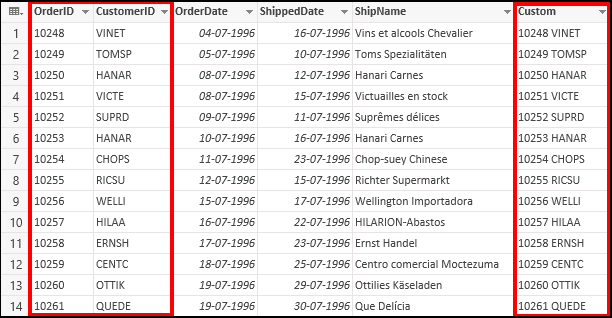
Click OK. A Custom column is created at the end of the query table with merged values from the original columns. In this case, the original columns are also available in the query table. Rename the custom column name as required.
See Also
Insert a custom column into a table
Microsoft Power Query for Excel Help
Note: The Query Editor only appears when you load, edit, or create a new query using Power Query. The following video shows the Query Editor window appearing after editing a query from an Excel workbook. To view the Query Editor without loading or editing an existing workbook query, from the Get External Data section in the Power Query ribbon tab, select From Other Sources > Blank Query. The following video shows one way to display the Query Editor.

No comments:
Post a Comment