Page Setup
Use the Page Setup dialog box to set up layout and print options of a page.
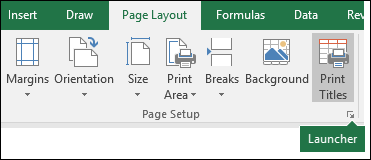
Click on the Page Layout tab, then in the Page Setup group, click the Dialog Box Launcher  .
.
Page tab options
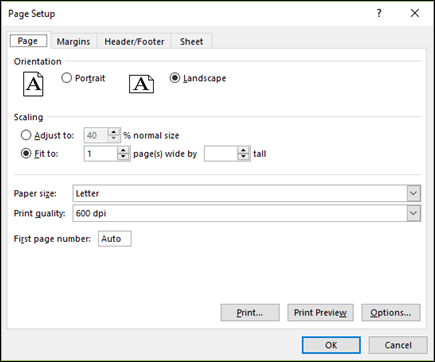
Orientation Choose between landscape and portrait.
Scaling Enlarges or reduces the worksheet or selection when you print so that it fits on the specified number of pages.
-
Adjust to When you select Adjust to, you can enter a percentage in the % normal size box.
-
Fit to When you select Fit to, you can enter a number in the page(s) wide by box and the tall box. To fill the paper width and use as many pages as necessary, type 1 in the pages(s) wide by box and leave the tall box blank.
Paper size In this box, click Letter, Legal, or other size options to indicate the size that you want to use for your printed document or envelope.
Print quality In this box, click a resolution to specify the print quality for the active worksheet. Resolution is the number of dots per linear inch (dpi) that appear on the printed page. Higher resolution produces better quality printing in printers that support high-resolution printing.
First page number In this box, enter Auto to start numbering pages at "1" (if it is the first page of the print job) or at the next sequential number (if it is not the first page of the print job). Enter a number to specify a starting page number other than "1."
Margins tab options
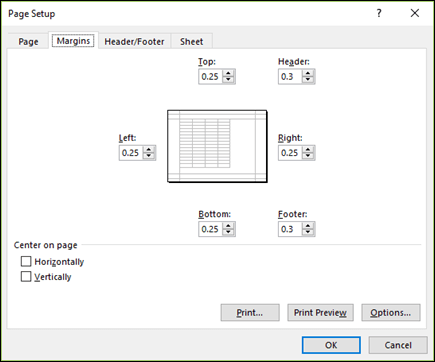
Enter margin settings and see the results in the Preview box.
-
Top, Bottom, Left, Right Adjust measurements in the Top, Bottom, Left, and Right boxes to specify the distance between your data and the edge of the printed page.
-
Header or Footer Enter a number in the Header box or the Footer box to adjust the distance between the header and the top of the page or between the footer and the bottom of the page. The distance should be smaller than the margin settings to prevent the header or footer from overlapping the data.
Center on pageCenter the data on the page within the margins by selecting the Vertically check box, the Horizontally check box, or both.
Header/Footer tab options
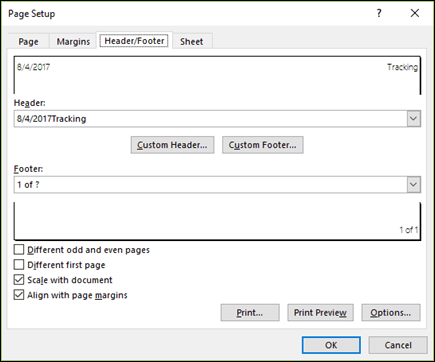
Header Click a built-in header in the Header box or click Custom Header to create a custom header for the worksheet that you want to print. The built-in header is copied to the Header dialog box, where you can format or edit the selected header.
Footer Click a built-in footer in the Footer box or click Custom Footer to create a custom footer for the worksheet that you want to print. The built-in footer is copied to the Footer dialog box, where you can format or edit the selected footer.
Different odd and even pages Select the Different odd and even Pages check box to specify that the headers and footers on odd-numbered pages should be different from those on even-numbered pages.
Different first page Select the Different first page check box to remove headers and footers from or to create custom headers and footers for the first printed page. To create a custom header or footer for the first page, select this check box, click Custom Header or Custom Footer, and then on the First Page Header or First Page Footer tab, you can add the header or footer information that you want to appear on the first page.
Scale with document Select the Scale with document check box to specify whether the headers and footers should use the same font size and scaling as the worksheet. This check box is selected by default. To make the font size and scaling of the headers or footers independent of the worksheet scaling to create a consistent display across multiple pages, clear this check box.
Align with page margins Select the Align with page margins check box to make sure that the header or footer margin is aligned with the left and right margins of the worksheet. This check box is selected by default. To set the left and right margins of the headers and footers to a specific value that is independent of the left and right margins of the worksheet, clear this check box.
Sheet tab options
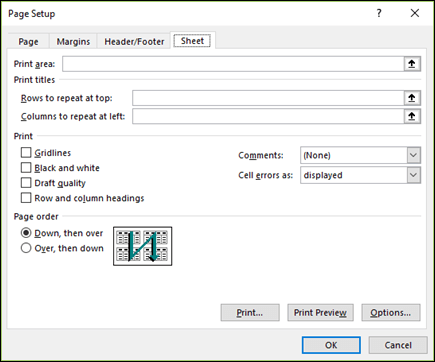
Print area Click the Print area box to select a worksheet range to print, and then drag through the worksheet areas that you want to print. The Collapse Dialog button  at the right end of this box temporarily moves the dialog box so that you enter the range by selecting cells in the worksheet. After you finish, you can click the button again to display the entire dialog box.
Print titles Select an option under Print titles to print the same columns or rows as titles on every page of a printed worksheet. Select Rows to repeat at top if you want specific rows as your horizontal title for each page. Select Columns to repeat at left if you want vertical titles on each page. Then on the worksheet, select a cell or cells in the title columns or rows you want. The Collapse Dialog button  at the right end of this box temporarily moves the dialog box so that you enter the range by selecting cells in the worksheet. After you finish, you can click the button again to display the entire dialog box.
Print Specifies what is printed from the worksheet, whether the printout is in color or black and white, and what the print quality is.
-
Gridlines Select the Gridlines check box to include worksheet gridlines in the printout. Gridlines are not printed by default, regardless of whether they are displayed on the worksheet or not.
-
Black and white Select the Black and white check box when you use a color printer but you want to use black and white only when printing. This option is off by default. You do not have to select it when you are using a printer that prints black and white only.
-
Draft quality Select the Draft quality check box to print faster by using less print quality when the printer that you use has a draft-quality mode. This option has no effect when the printer has no draft-quality mode.
-
Row and column headings Select the Row and column headings check box to include these headings in the printout.
-
Comments In this box, select the location where you want annotations that you added to worksheet cells to appear in the printout. Select At end of sheet to combine all annotations and print them together on a page that is added at the end of the printout. Select As displayed on sheet to print the annotations in their original location on the worksheet. Annotations are not automatically included in the printout, because None is selected by default.
-
Cell errors as In this box, select how you want cell errors that appear on the worksheet to be displayed in the printout. By default, errors are displayed as they appear, but you cannot display them by selecting <blank>, display them as a double hyphen by selecting --, or display them as #N/A.
Page order Click Down, then over or Over, then down to control the order in which data is numbered and printed when it does not fit on one page. The sample picture previews the direction your document will print when you choose one of these options.
Need more help?
You can always ask an expert in the Excel Tech Community, get support in the Answers community, or suggest a new feature or improvement on Excel User Voice.




 button: Open the folder one level above the open folder.
 button: Delete the selected folder or file.
 button: Create a new folder.
  button: Switch among available folder views.
 ) on or off.
 ) on or off.
 ) on or off.
 ) on or off.
 ) on or off.
 )
) ).
). ).
). ).
). ).
). ).
). ).
). ).
). ).
). ).
). ).
). ).
). ).
). ).
). ).
).