A list helps organize useful data that the whole team can use. For example, you can create a list to track customer feedback from a conference, and follow up with action items.
Note: You need to be a member of the Designers group or have contributor permission to modify a team site. A safe way to practice changing a team site is to create and use a subsite under the team site. For more information, see Create a subsite under the existing site.
-
Sign in to Office 365 with your work or school account, and then navigate to your team site (In the app launcher
 , click Sites, and then locate your team site).
 -
Click Site Settings
 > Add an App.
 -
Locate and click the Issues Tracking app, and then enter EventFollowUp as the name.
This list has the following default fields: Issue ID, Title, Assigned To, Issue Status, Priority, and Due Date.
-
To add a Customer Notes field, click List > Create Column.
-
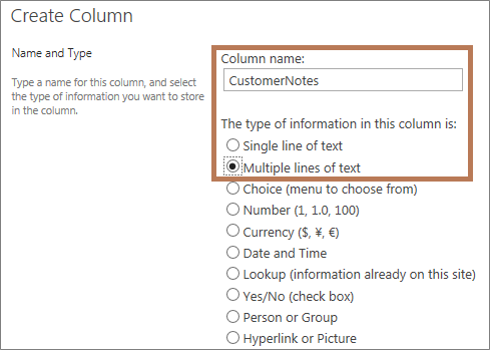
Add a name, such as CustomerNotes, Select Multiple lines of text, and then click OK.

-
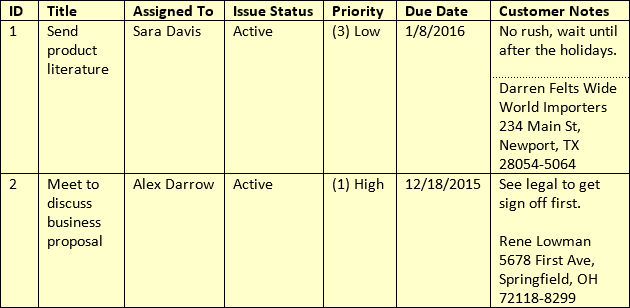
Add information gathered from the conference. For example:

Want more?
Lists are the best way to share and organize bits and pieces of data into useful information.
For example, we got a lot of questions and leads at a recent business conference.
I'll create a list to capture the feedback.
I click the Settings icon, and then Add an App.
I choose the Issue Tracking list, and enter the name EventFollowUp.
Here's my new App, I'll click it to open it up.
The issues list has just the fields I want, including Title, Priority, and Due Date.
But I'll add a field to capture the comments. So I click List, then Create Column.
I add CustomerNotes to the Title box, select Multiple lines of text, and then click OK.
Now we have a way to track customer feedback and follow up with action items.
No comments:
Post a Comment