Share your desktop or a program in Lync
You can show your entire desktop or just a program to everyone in a Lync Meeting, call, or instant messaging (IM) conversation.
Keep in mind that you need to be a presenter in a Lync Meeting to share your screen. If the option is grayed out, ask one of the presenters to give you presenter access.
-
Share your desktop when you need to switch between multiple programs, or work on files from different programs.
-
Share a program when you need to present specific programs or files and don't want people to see anything else on your computer.
Tip: For an interactive guide to Lync Meeting presenter tasks, see Managing your Lync Meeting.
View the video to find out how to share your desktop or a program, or follow the steps below.

Share your desktop or a program
-
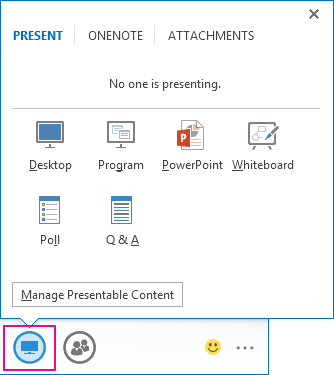
At the bottom of the conversation window, point to the presentation (monitor) icon.

-
On the Present tab, do one of the following:
To share the content on your desktop, click Desktop.
Important: When sharing your desktop, everyone in the meeting can see your programs, files, and notifications. If you have confidential information or files that you don't want people to see, close them or use program sharing instead.
To share one or more programs or files, click Program, and then select the specific program(s) or file(s).
-
On the sharing toolbar, on top of the screen, use any of these options:
Click Stop Presenting when you are done sharing your screen.
Click Give Control to share control of your desktop or program with the participants. For details, see Give and take control of a sharing session.

Click the blue pin to hide the toolbar and have more space. To un-hide the toolbar, move your mouse to the top of the screen. When the sharing toolbar appears, use any of the controls you need or click the pin again to keep the toolbar visible.
Note: While you are sharing, your Lync status changes to Presenting, and you won't receive instant messages or calls.
If you want a meeting attendee to share their screen, give them presenter access, so they can use the controls. If they don't use Lync, they can still use Lync Web App to present. See Share your desktop and programs from Lync Web App for more information.
Share primary, secondary or all monitors
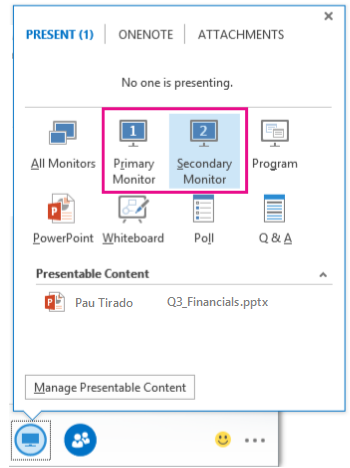
If you have more than one monitor, they all display on the Present tab, and you can choose which one to share. When you share All Monitors, the sharing toolbar opens on your primary monitor.

Presenting a PowerPoint slide show--in a multiple monitors scenario
You can present a PowerPoint slide show like a pro when you take advantage of multiple monitors.
If you are in a conference room, and you want to display the slide show using a projector or large screen device, then present to the secondary monitor. Your PowerPoint slide show will appear on the big screen for the people in the room and on the presentation stage for the people on Lync. And on your laptop, you'll see the presenter view that shows the current slide, your presenter notes, and a preview of the next slide--visible to only you.
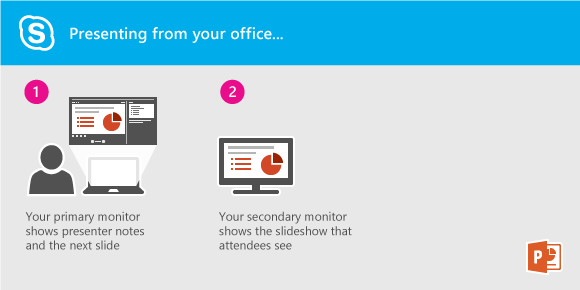
If you are presenting a PowerPoint slide show using Lync from your office, and you have multiple monitors, you can present to your secondary monitor and still see your presenter notes view on your primary monitor.


Either way, the instructions are the same:
-
Open your PowerPoint deck on your primary monitor (or laptop if you are in a conference room).
-
From Lync, click the Present icon.
-
Choose Secondary monitor.

Give and take control of a sharing session
If you want another meeting participant to change a file, help you present, or demonstrate something, you can grant control to that person. You will both be in control of the sharing, and you can take back control anytime.
-
On the sharing toolbar, click Give Control.
-
Select the name of the person you want to give control to.
Lync sends a notification to that person to let them know you're sharing control.
-
To take control back, click Give Control again, and then click Take Back Control.
Tip: You can allow people to automatically take control of your sharing session at any time, by clicking Give Control Automatically on the sharing toolbar. We recommend you choose this option only in small and casual meetings. To take back automatic permission, click Give Control, and clear the Give Control Automatically check box.
You can have working sessions and share and edit files with others by using desktop and program sharing. It only takes a couple of clicks to share your screen with a colleague in another location.
Share your desktop
Let everyone in the conversation or meeting view your desktop, or choose a specific monitor to share.
Do one of the following:
-
To share in a meeting, open Microsoft Outlook Calendar, open the meeting invitation, and click the Join online meeting or meeting link.
-
To share in an instant-messaging conversation, open Microsoft Lync 2010, and double-click a contact that you want to share with. To add contacts, in the Conversation window, click the People Options menu, click Invite by Name or Phone Number, and select contacts to add.
In the Conversation window, click Share. If you have only one monitor, click Desktop. Otherwise, click the monitor that you want to share.
Note: Whenever you're actively sharing, a bar is shown at the top of the window that reads You are now sharing. The meeting stage, in the right pane, shows a preview of what attendees are seeing, and a glow appears around the area being shared.
Choose an open program to share
You might want to share only a particular program and its associated windows.
-
In a Conversation window, click Share, and then click Program.
-
In the Share Desktop or Applications dialog box, under Select applications you want to share, click the program that you want to show, and then click Share.
Stop sharing your desktop, monitor, or program
To stop sharing, do the following:
-
On the sharing bar at the top of your screen, click the Stop Sharing button.
Give control to others
When you start sharing your desktop, a monitor, or a program, you're the only one in control. When you're ready, you can allow others to use their own mouse and keyboard to navigate and make changes to whatever you're sharing. You can take back control at any time.
-
On the sharing bar at the top of your screen, click the Give Control button on the sharing bar at the top of your screen, and then do one of the following:
-
To allow anyone in the meeting to automatically take control of your computer, click Automatically accept control requests.
-
To give control only to an individual, click the person's name under Attendees.
-
Note: If you choose an individual, this person can immediately control your mouse and make edits using his or her keyboard. If you choose the Automatically accept control requests option, people will automatically get control when they click Request Control, onthe sharing bar.
Take back control at any time
You can take back control at any time by doing the following:
-
On the sharing bar at the top of your screen, click Give Control, and then click the selected option, either Automatically accept control requests or Take Back Control.
Stop people from being able to share
If you have presenter privileges, you can prevent other people from sharing by doing the following:
-
In the Conversation window, click the drop-down list beside the People Options menu, and then click Make Everyone an Attendee.
Request control
When another person is sharing, you can request to take control.
-
On the sharing bar at the top of your screen, click Request Control. The person sharing must accept your request before you can take control.
Microsoft Office Tutorials: Share Your Desktop Or A Program In Lync >>>>> Download Now
ReplyDelete>>>>> Download Full
Microsoft Office Tutorials: Share Your Desktop Or A Program In Lync >>>>> Download LINK
>>>>> Download Now
Microsoft Office Tutorials: Share Your Desktop Or A Program In Lync >>>>> Download Full
>>>>> Download LINK BG