Monday, July 31, 2017

Move or copy cell widths along with cell contents

Move or copy cell widths along with cell contents

When you move or copy the contents of cells, the column width settings of the destination cells will be used when you paste the data. To use the column width settings of the source cells, you can paste the column width of the source cells together with the data.

  1. Select the cells that you want to move or copy.

    How to select cells or ranges

    To select

    Do this

    A single cell

    Click the cell, or press the arrow keys to move to the cell.

    A range of cells

    Click the first cell in the range, and then drag to the last cell, or hold down SHIFT while you press the arrow keys to extend the selection.

    You can also select the first cell in the range, and then press F8 to extend the selection by using the arrow keys. To stop extending the selection, press F8 again.

    A large range of cells

    Click the first cell in the range, and then hold down SHIFT while you click the last cell in the range. You can scroll to make the last cell visible.

    All cells on a worksheet

    Click the Select All button.

    Select All button

    To select the entire worksheet, you can also press CTRL+A.

    Note: If the worksheet contains data, CTRL+A selects the current region. Pressing CTRL+A a second time selects the entire worksheet.

    Nonadjacent cells or cell ranges

    Select the first cell or range of cells, and then hold down CTRL while you select the other cells or ranges.

    You can also select the first cell or range of cells, and then press SHIFT+F8 to add another nonadjacent cell or range to the selection. To stop adding cells or ranges to the selection, press SHIFT+F8 again.

    Note: You cannot cancel the selection of a cell or range of cells in a nonadjacent selection without canceling the entire selection.

    An entire row or column

    Click the row or column heading.

    Worksheet headings

    1. Row heading

    2. Column heading

    You can also select cells in a row or column by selecting the first cell and then pressing CTRL+SHIFT+ARROW key (RIGHT ARROW or LEFT ARROW for rows, UP ARROW or DOWN ARROW for columns).

    Note: If the row or column contains data, CTRL+SHIFT+ARROW key selects the row or column to the last used cell. Pressing CTRL+SHIFT+ARROW key a second time selects the entire row or column.

    Adjacent rows or columns

    Drag across the row or column headings. Or select the first row or column; then hold down SHIFT while you select the last row or column.

    Nonadjacent rows or columns

    Click the column or row heading of the first row or column in your selection; then hold down CTRL while you click the column or row headings of other rows or columns that you want to add to the selection.

    The first or last cell in a row or column

    Select a cell in the row or column, and then press CTRL+ARROW key (RIGHT ARROW or LEFT ARROW for rows, UP ARROW or DOWN ARROW for columns).

    The first or last cell on a worksheet or in a Microsoft Office Excel table

    Press CTRL+HOME to select the first cell on the worksheet or in an Excel list.

    Press CTRL+END to select the last cell on the worksheet or in an Excel list that contains data or formatting.

    Cells to the last used cell on the worksheet (lower-right corner)

    Select the first cell, and then press CTRL+SHIFT+END to extend the selection of cells to the last used cell on the worksheet (lower-right corner).

    Cells to the beginning of the worksheet

    Select the first cell, and then press CTRL+SHIFT+HOME to extend the selection of cells to the beginning of the worksheet.

    More or fewer cells than the active selection

    Hold down SHIFT while you click the last cell that you want to include in the new selection. The rectangular range between the active cell and the cell that you click becomes the new selection.

    Tip: To cancel a selection of cells, click any cell on the worksheet.

  2. On the Home tab, in the Clipboard group, do one of the following:

    The Clipboard group on the Home tab

    • To move cells, click Cut Button image .

      Keyboard shortcut  You can also press CTRL+X.

    • To copy cells, click Copy Button image .

      Keyboard shortcut  You can also press CTRL+C.

  3. Select the upper-left cell of the paste area.

    Tip: To move or copy a selection to a different worksheet or workbook, click another worksheet tab or switch to another workbook, and then select the upper-left cell of the paste area.

  4. On the Home tab, in the Clipboard group, click Paste Button image , and then click Paste Special.

    Keyboard shortcut  You can also press CTRL+ALT+V.

  5. In the Paste Special dialog box, under Paste, click Column widths.

Top of Page

Rename a slide master

Rename a slide master

  1. On the View tab, in the Master Views group, click Slide Master.

  2. In the slide thumbnails on the left, click the slide master that you want to rename.

  3. On the Slide Master tab, in the Edit Master group, click Rename.

  4. In the Rename Master dialog box, in the Master name box, type a new name, and then click Rename.

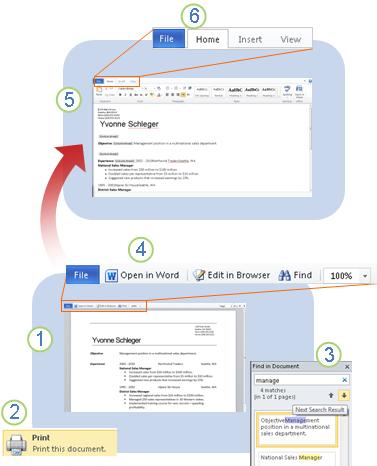
Word Web App at a glance

Word Web App at a glance

Word Web App at a glance

1. Reading view displays a Word document in full fidelity. You can page through the document or jump to a particular page.

2. On the File tab, click Print to print the document (also available in Editing view).

3. Click Find to search the document. Search results are highlighted in the document, and you can browse from one result to the next.

4. Click Edit in Browser to edit the document in the browser; click Open in Word to work on it in the Word desktop application.

5. Editing view is optimized for adding and formatting text.

6. Word Web App has the familiar look and feel of Word.

  • The Home tab has commands for formatting text. You can apply direct formatting, such as bold, italics, and underline, and you can apply styles for a cohesive, professional-looking document.

  • Use the Insert tab to add tables, pictures, or clip art. Clip art comes from the collection of images available from Office.com. You can also add new sections and pages to the document on the Insert tab.

  • Use the View tab to switch back to Reading view, to see the effect of your changes.

SWITCH function

SWITCH function

This article describes the formula syntax and usage of SWITCH, one of the logical functions in Microsoft Excel.

Note: This feature is only available if you have an Office 365 subscription. If you are an Office 365 subscriber, make sure you have the latest version of Office.

Try Office 365 or the latest version of Excel

Description

The SWITCH function evaluates one value (called the expression) against a list of values, and returns the result corresponding to the first matching value. If there is no match, an optional default value may be returned.

Syntax

SWITCH(expression, value1, result1, [default or value2, result2],…[default or value3, result3])

Argument

Description

expression
(required)

Expression is the value (such as a number, date or some text) that will be compared against value1…value126.

value1…value126

ValueN is a value that will be compared against expression.

result1…result126

ResultN is the value to be returned when the corresponding valueN argument matches expression. ResultN and must be supplied for each corresponding valueN argument.

default
(optional)

Default is the value to return in case no matches are found in the valueN expressions. The Default argument is identified by having no corresponding resultN expression (see examples). Default must be the final argument in the function.

Because functions are limited to 254 arguments, you can use up to 126 pairs of value and result arguments.

Overview

In its simplest form, the SWITCH function says:

  • =SWITCH(Value to switch, Value to match1...[2-126], Value to return if there's a match1...[2-126], Value to return if there's no match)

Where you can evaluate up to 126 matching values and results.

See the following formula:

Breakdown of the SWITCH function's arguments
  1. Value to switch? In this case, WEEKDAY(A2) equals 2.

  2. What value do you want to match? In this case, it's 1, 2 and 3.

  3. If there's a match, what do you want to return as a result? In this case, it would be Sunday for 1, Monday for 2 and Tuesday for 3.

  4. Default value to return if there's no match found. In this case, it's the text "No match".

    Note: If there are no matching values, and no default argument is supplied, the SWITCH function returns the #N/A! error.

Examples

You can copy the example data in the following table and paste it in cell A1 of a new Excel worksheet to see the SWITCH function in action. If the formulas don't show results, you can select them, then press F2 > Enter. If you need to, you can adjust the column widths to see all the data.

Example

Value

Formula

Result

2

=SWITCH(WEEKDAY(A2),1,"Sunday",2,"Monday",3,"Tuesday","No match")

Because A2=2, and Monday is the result argument corresponding to the value 2, SWITCH returns Monday

99

=SWITCH(A3,1,"Sunday",2,"Monday",3,"Tuesday")

Because there's no match and no else argument, SWITCH returns #N/A!

99

=SWITCH(A4,1,"Sunday",2,"Monday",3,"Tuesday","No match")

No match

2

=SWITCH(A5,1,"Sunday",7,"Saturday","weekday")

weekday

3

=SWITCH(A6,1,"Sunday",2,"Monday",3,"Tuesday","No match")

Tuesday

Need more help?

You can always ask an expert in the Excel Tech Community, get support in the Answers community, or suggest a new feature or improvement on Excel User Voice.

See Also

VLOOKUP function

CHOOSE function

IF function

IFS function

Overview of formulas in Excel

How to avoid broken formulas

Find and correct errors in formulas

Excel keyboard shortcuts and function keys

Logical functions (reference)

Excel functions (alphabetical)

Excel functions (by category)

Change the nudge distance

Change the nudge distance

  1. On the Tools menu, click Options.

  2. In the Options dialog box, click the Edit tab.

  3. Select the Arrow keys nudge objects by check box and type the distance you want objects to move when you nudge them.

Publication is in RGB mode

Publication is in RGB mode

Today's commercial print shops universally accept (or even prefer) PDF files for printing publications. Save your publication as a PDF in Publisher by clicking File > Export > Create PDF/XPS Document > Create PDF/XSP.

The publication is set up to print RGB colors, and you selected the Run commercial printing checks check box. For more predictable printing results — especially if this publication will be printed by a commercial printing service — set up your publication for spot-color or process-color printing.

Automatic fix

Convert to another color mode    Click this fix to open the Color Model dialog box, where you can select a different printing process.

In the Color Model dialog box, click one of the following:

  • Spot colors

    If you click Spot colors, Microsoft Office Publisher converts all the RGB colors to spot-color inks and lists them on the Inks tab. Publisher lists all the colors that are used in the publication on the Colors tab. You can add new spot-color inks by clicking New Ink on the Inks tab.

    Notes: 

    • If you have more than two spot-color inks and you selected Run commercial printing checks, an error message will be displayed in the Design Checker.

    • Color schemes are not available if you convert to spot-color inks.

  • Process colors (CMYK)

    If you click Process colors (CMYK), Publisher converts all the RGB colors to process colors and lists cyan, magenta, yellow, and black — CMYK — as the only inks on the Inks tab. Publisher lists all the colors that are used in the publication on the Colors tab.

  • Process colors plus spot colors

    If you click Process colors plus spot colors, Publisher converts all the RGB colors to process colors and lists both the spot colors and the process colors on the Inks tab. Publisher lists all the colors that are used in the publication on both the Colors and Ink tabs.

Add callouts, captions, or lines to your SmartArt graphic

Add callouts, captions, or lines to your SmartArt graphic

When you create a SmartArt graphic, you might want to add some explanatory text or point out something on the SmartArt graphic. You can do this by either adding a caption or callout shape, or a line with an arrowhead.

Add a caption or callout shape

Which 2007 Office release program are you using?

Add a line with an arrowhead

Excel

  1. Click the spreadsheet that contains the SmartArt graphic that you want to add a caption to.

  2. On the Insert tab, in the Illustrations group, click Shapes.

    Excel Insert tab image

  3. Under Callouts, click the shape that you want, click anywhere on your SmartArt graphic, and then drag to draw and place the shape.

  4. To enter text, type in the shape.

    Notes: 

Top of Page

PowerPoint

  1. Click the slide that contains the SmartArt graphic that you want to add a caption to.

  2. On the Home tab, in the Drawing group, click Shapes.

    PowerPoint Home tab image

  3. Under Callouts, click the shape that you want, click anywhere on your SmartArt graphic, and then drag to draw and place the shape.

  4. To enter text, type in the shape.

    Notes: 

Top of Page

Word

  1. Click the document that contains the SmartArt graphic that you want to add a caption to.

  2. On the Insert tab, in the Illustrations group, click Shapes.

    Word Insert tab

  3. Under Callouts, click the shape that you want, click anywhere on your SmartArt graphic, and then drag to draw and place the shape.

  4. To enter text, type in the shape.

    Notes: 

Top of Page

Add a line with an arrowhead

Which 2007 Office release program are you using?

Excel

Excel

  1. Click the spreadsheet that contains the SmartArt graphic that you want to add a line with an arrowhead to.

  2. On the Insert tab, in the Illustrations group, click Shapes.

    Excel Insert tab image

  3. Under Lines, click the line that you want, click anywhere on your SmartArt graphic, and then drag to draw and place the line.

    To draw a straight line, click Line Button image , and then drag to draw the line.

  4. To add an arrowhead, select the line, and then under Drawing Tools, on the Format tab, in the Shape Styles group, click the arrow next to Shape Outline.

    Drawing Tools Format tab image

    If you do not see the Drawing Tools or Format tabs, make sure that you selected the line.

  5. Point to Arrows, and then click the arrow style that you want.

    To create a custom arrow style, click More Arrows, and then choose the options that you want.

    Notes: 

Top of Page

PowerPoint

  1. Click the slide that contains the SmartArt graphic that you want to add a line with an arrowhead to.

  2. On the Home tab, in the Drawing group, click Shapes.

    PowerPoint Home tab image

  3. Under Lines, click the line that you want, click anywhere on your SmartArt graphic, and then drag to draw and place the line.

    To draw a straight line, click Line Button image , and then drag to draw the line.

  4. To add an arrowhead, select the line, and then under Drawing Tools, on the Format tab, in the Shape Styles group, click the arrow next to Shape Outline.

    Drawing Tools Format tab image

    If you do not see the Drawing Tools or Format tabs, make sure that you selected the line.

  5. Point to Arrows, and then click the arrow style that you want.

    To create a custom arrow style, click More Arrows, and then choose the options that you want.

    Notes: 

Top of Page

Word

  1. Click the document that contains the SmartArt graphic that you want to add a line to.

  2. On the Insert tab, in the Illustrations group, click Shapes.

    Word Insert tab

  3. Under Lines, click the line that you want, click anywhere on your SmartArt graphic, and then drag to draw and place the line.

    To draw a straight line, click Line Button image , and then drag to draw the line.

    To constrain the line at 15-degree angles from its starting point, press and hold SHIFT as you drag.

  4. To add an arrowhead, select the line, and then under Drawing Tools, on the Format tab, in the Shape Styles group, click the arrow next to Shape Outline.

    drawing tools, format tab image

    If you do not see the Drawing Tools or Format tabs, make sure that you selected the line.

  5. Point to Arrows, and then click the arrow style that you want.

    To create a custom arrow style, click More Arrows, and then choose the options that you want.

    Notes: 

Top of Page

How to Contact Others

How to Contact Others

Each contact in your Contact List has a Presence status button that reflects his or her current state of availability. You can use a contact's presence status to decide which mode of communication is best suited for successful communication with the contact. For example, if a contact is available, you can send her an instant message or make an audio call to her. If a contact is busy, you might want to send her an e-mail message or check her Contact Card to determine when she is free for a conversation.

What do you want to do?

Determine a contact's status

View a person's Contact Card

View calling options

Tag a contact so you are notified when they are available

Determine a contact's status

The presence information that is displayed for each contact in your Contact List reflects the availability of the contact. Presence status is indicated graphically by an indicator to the left of the contact's name, and by a text string to the right of the contact's name. Some presence states, such as Available, can be set by the user or by Communicator. Other presence states, such as Inactive, can only be set by Communicator.

Presence Button

Status Text

Description

Available

Available

The contact is online and can participate in conversations. This status can be set manually by the user.

Busy

Busy
In a Call
In a Conference
In a Meeting

The contact is available but engaged in another activity. Activities include:

  • In a call    The contact is in a phone, voice, or video conversation.

  • In a Conference     The contact is in a multiparty conversation using phone, voice, video, or application sharing.

  • In a Meeting     The Office Outlook calendar shows that the contact has a scheduled meeting.


This presence level can be set manually by the user.

Do not disturb

Do Not Disturb

You see this status for a contact if the contact has assigned you to an access level other than the Team level and one of the following conditions exist:

  • The contact has manually set his or her presence status to Do Not Disturb

  • The contact is displaying a PowerPoint presentation or is running another program in full-screen mode.

Busy

Urgent interruptions only

You see this status for a contact if the contact has assigned you to the Team access level and one of the following conditions exist:

  • The contact has manually set his or her presence status to Do Not Disturb.

  • The contact is displaying a PowerPoint presentation or is running another program in full-screen mode.

Away

Away

The contact is probably not available. This status is displayed for the following reasons:

  • The contact's computer has been idle for more than the idle time period setting—15 minutes by default.

  • The contact's Office Outlook calendar or Out of Office Assistant indicates that he or she is out of the office.

  • The contact is temporarily unavailable. As soon as activity is detected on the contact's computer, Communicator 2007 automatically resets the presence status to the appropriate state.

  • The contact has manually set his or her presence status to Away.

Inactive

Inactive

This contact may be available, but his or her computer has been idle for more than the idle time period setting—five minutes by default. In this state, the contact is online and transitioning from an Available state, as indicated by the half-green/half-yellow button. This status is set by Communicator.

Busy Inactive

Busy (Inactive)

This contact is engaged in a meeting or is scheduled to be in a meeting (as indicated in the Outlook calender), but his or her computer has been inactive for the idle time period setting—5 minutes by default. In this state, the contact is online, typically in a meeting and his or her computer is idle. This status is set by Communicator.

Offline

Offline

Communicator cannot determine the status of the contact. This status is usually displayed because the contact's presence status is stored in another computer system, such as that of an organization that is not a federated partner.

Presence unknown

Presence unknown

Communicator cannot determine the status of the contact. This status is usually displayed because the contact's presence status is stored in another computer system, such as that of an organization that is not a federated partner.

Blocked

Blocked

This button is displayed in your Contact List next to the contact name you have blocked. To the person you have blocked, you appear to be offline.

Top of Page

View a person's Contact Card

If a contact's status is not available, you can open their Contact Card to get additional details to determine when they are free.

To view a contact's schedule information

  • In the Contact List, click the contact's Presence button. If a contact has granted you the Company access level or higher, you can click their Presence button to view their schedule and determine when they are available.

Top of Page

View calling options

Sometimes you need to contact a person on their cell phone or at an alternate number. In Communicator, you can view a contact's alternate phone numbers by clicking the View More Options for Calling This Contact arrow.

To view a contact's optional phone numbers

  1. In the Contact List, click the arrow to the right of the Call button associated with the contact.

  2. The phone numbers that you see for a contact are determined by the access level the contact has granted you. For example, if the contact has granted you Team or Personal access, you see his or her mobile phone number. If a contact's mobile number is not available to you, you can contact that person and ask them to raise your access level to Team or Personal. The contact must publish his mobile phone number before it can be available.

Top of Page

Tag a contact so you are notified when they are available

Communicator can notify you of changes in a contact's availability by displaying an alert whenever their presence status changes to Available or Offline. The alert shows the contact's name, title, instant messaging address, and new presence status. You can click the alert to start an instant messaging session with the contact. Configuring Communicator to display this alert for a given contact is called tagging.

To tag a contact

  • In the Contact List, right-click a contact, and then click Tag for Status Change Alerts.

To view tagged contacts in the contact list

  • In the Communicator window, click the Change the way you view your contacts button, and then click Tagged Contacts. This view shows all your currently tagged contacts.

Top of Page

Call your voice mail and change greetings - Communicator

Call your voice mail and change greetings - Communicator

Note: Enterprise Voice Call-Forwarding features require enterprise capabilities to be enabled in your organization.

If Office Communicator 2007 R2 is configured for Enterprise Voice (also called Unified Communications), you can call your voice mail to check messages or to change your voice mail greeting. Your voice mail messages also appear in your Office Outlook Inbox. Instructions for setting up your voice mail are typically provided through an e-mail message from your system administrator.

Call Voice Mail

  1. Click the Call Forwarding button, and then click Call Voice Mail to call your voice mail server.

  2. Use the dial pad in the Conversation window or your keyboard to enter your PIN.

Change Greetings

  1. Click the Call Forwarding button, and then click Change Greetings to call your voice mail server.

  2. Use the dial pad in the Conversation window to enter your PIN.

  3. Follow the prompts to change your personal greeting.

  4. To change your Out of Office greeting, follow the prompts to accept the personal greeting and go to the main menu. From there you can change your Out of Office greeting.

Access information for voice mail, such as the number to call or the PIN, is typically provided through an e-mail message from your system administrator.

Enable publishing features

Enable publishing features

SharePoint Online includes a set of features that enables you to author and publish rich webpages for your intranet or Internet. These features are housed within the SharePoint Publishing Infrastructure and must be activated prior to use. You can activate them at either the site collection or site level.

Note:  If you created your site or site collection using one of the publishing site templates, the publishing infrastructure is already active and the publishing features ready to use.

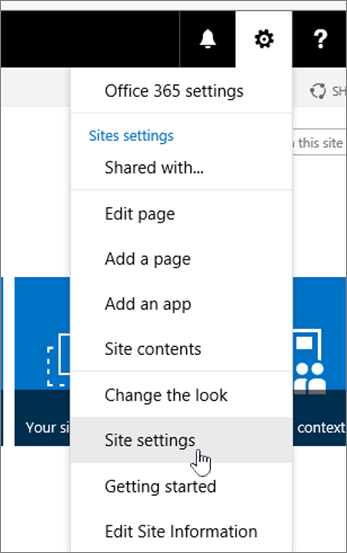
  1. From the root of your site collection, click Settings Small Settings gear that took the place of Site Settings. and then click Site settings.

    Site Setting drop down
  2. On the Site Settings page under Site Collection Administration, click Site collection features.

  3. On the Site Features page, scroll down to SharePoint Server Publishing Infrastructure and click Activate.

    Enable sharepoint publishing option under Site collection features

Once publishing features are activated, subsites inherit them automatically. But, if you built a site before activating the publishing infrastructure, you'll have to manually activate it for each site.

  1. From any page within the site, click Settings Small Settings gear that took the place of Site Settings. and then click Site settings.

    Site Setting drop down
  2. On the Site Settings page, in the Site Actions section, click Manage site features.

  3. On the Site Features page, next to SharePoint Server Publishing, click Activate.

    Enable sharepoint publishing option under Site collection features

My resources disappeared from a project that shares a resource pool

My resources disappeared from a project that shares a resource pool

Symptoms

The project file that shares resources from a resource pool does not contain all or some of the resources from the pool.

Cause

The sharer file may be disconnected from the project file that contains the shared resources.

Resolution

If some or all resources are missing from your project that shares a resource pool, on the View menu of the sharer file, click Resource Sheet. Resource names from the resource pool should be listed.

  • If all resources are missing, do one of the following:

    • Check the sharer project to be sure the resource pool is still connected. On the Tools menu, point to Resource Sharing, and then click Share Resources. Check that Use resources is selected and the resource pool project is listed in the From box.

    • Open the resource pool project. It must be open in order for you to see all the shared resources.

    • Check to see if resources are appearing correctly: In the sharer file, click Resource Usage on the View menu.

  • If some resources are missing, do one of the following:

    • Open the resource pool project. It must be open in order for you to see all the shared resources.

    • Check to see if resources are appearing correctly: In the sharer file, click Resource Usage on the View menu.

OneDrive changes for Office 365 Home, Personal, and University subscribers

OneDrive changes for Office 365 Home, Personal, and University subscribers

Microsoft has made some changes to OneDrive storage quotas. Learn how this impacts existing Office 365 Home, Personal, and University subscribers.

What's changing?

Microsoft previously announced that unlimited OneDrive storage would be rolled out to Office 365 Personal, Home, and University subscribers. On November 2, 2015, Microsoft announced that this plan had changed and those subscriptions would continue to include 1 TB of OneDrive storage. If you are one of the Office 365 consumer subscribers who received extra storage and have stored in excess of 1 TB, you will be notified of this change and will be able to keep your increased storage for at least 12 months from the date of that notification. See OneDrive storage changes - FAQ for details.

What's included with my Office 365 Home, Personal, and University subscription?

Office 365 includes the new Office 2016 apps for your PC or Mac, an optimized experience on your mobile devices, 1 TB of OneDrive storage, and 60 monthly Skype minutes to call landlines and mobile phones around the world*. Plus, you get ongoing upgrades and Microsoft Answer Desk technical support.

*Skype minutes are not available in all countries. See Office 365 FAQ for details.

I bought an Office 365 Home, Personal, or University subscription to get OneDrive unlimited storage. Can I get a refund?

Yes, you can cancel your Office 365 subscription and receive a full refund.

You're eligible for a refund if you meet the following requirements:

  • You have an active Office 365 Personal, Home, or University subscription as of November 2, 2015.

  • You cancel your Office 365 subscription and request your refund by June 30, 2016.

In order to cancel your subscription and request a refund, contact a Microsoft Accounts and Billing agent.

Keep in mind these important details about refunds:

  • It may take six to eight weeks for you to receive your refund.

  • If you have more than one Office 365 subscription, you must make one refund request for all your subscriptions at the same time.

  • You may be asked to provide proof-of-purchase documentation.

  • Trials and free subscriptions are not eligible for a refund.

  • Microsoft reserves the right to deny any refund request that it deems to be fraudulent.

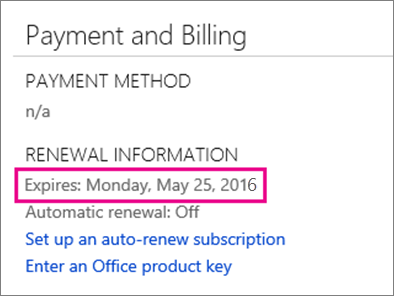
How can I find when my Office 365 subscription ends?

Sign in to your Office 365 account. Navigate to Payment and Billing to see your renewal details.

OneDrive Payment and Billing

Use tabbed conversations in Lync

Use tabbed conversations in Lync

If you have several Lync-based communications going on at the same time, Lync displays them all in one place, in the tabbed conversations section on the left side of the conversation window. This lets you quickly toggle back and forth among them, keeping them going simultaneously.

Tabbed conversations work only with instant messages and persistent chats. If you have multiple Lync audio and video calls, each opens in a separate window.

Move between conversations

  1. Click the listing or tab for the conversation or other interaction you want to take part in. That conversation now appears in the display area.

  2. To display a different conversation, click its tab. It now replaces the other conversation in the display area.

Turn off tabbed conversations

The tabbed conversations feature is on by default. To turn it off or adjust how it behaves:

  1. On the Lync main window, click Options > General.

  2. Under Conversation window (at the top of the General options window), check or clear the appropriate boxes to adjust the settings.

Setting

What the setting is for and default value

Enable tabbed conversations

Displays each active conversation as a clickable tab on the left side of conversation window. Default value: On

Make tabs one line only

Changes number of lines per conversation in tabbed display from two to one. Default value: Off

Reopen my conversations when I sign in to Lync

Restores your conversation display to the state it was in when you logged off. Reinstates open chat rooms and other interactions. Default value: Off

Top of Page

Video: Create an Access app

Video: Create an Access app

Important    Microsoft no longer recommends creating and using Access web apps in SharePoint. As an alternative, consider using Microsoft PowerApps to build no-code business solutions for the web and mobile devices.

Your browser does not support video. Install Microsoft Silverlight, Adobe Flash Player, or Internet Explorer 9.

Create an Access App: a database that runs in the cloud. Use templates to make it faster and easier.

Other videos in this course

This video is part of a training course called Create your first Access database.

Remove or turn off hyperlinks

Remove or turn off hyperlinks

You can remove a hyperlink from a single address, remove many links at once, turn automatic hyperlinks off, and turn off the requirement to press Ctrl to follow a hyperlink.

Remove a hyperlink

To remove a hyperlink but keep the text, right-click the hyperlink and click Remove Hyperlink.

Right click menu, Remove Hyperlink

To remove the hyperlink completely, select it and then press Delete.

Remove all hyperlinks at the same time

If you're using Word or Outlook, or Excel 2010 or later, you can remove all hyperlinks in a file by using a keyboard shortcut.

In Word and Outlook:

  1. Press Ctrl+A to select all text.

  2. Press Ctrl+Shift+F9.

In Excel 2010 and later:

  • Select all cells that contain hyperlinks, or press Ctrl+A to select all cells.

  • Right-click, and then click Remove Hyperlinks.

Turn off automatic hyperlinks

When it's not convenient to have Office automatically create hyperlinks in your document as you type, you can turn them off.

  1. In Office 2010 and later:

    Click File > Options > Proofing.

    (In Outlook, click File > Options > Mail > Editor Options > Proofing.)

    In Office 2007:

    Click the Microsoft Office button, and then click Options > Proofing.

    (In Outlook, open a new message, click the Microsoft Office button, and then click Editor Options > Proofing.)

  2. Click AutoCorrect Options, and then click the AutoFormat As You Type tab.

  3. Clear the Internet and network paths with hyperlinks check box.

Turn off Ctrl+Click to follow a link

By default, Word and Outlook require you to press Ctrl when you click to follow a hyperlink. This extra step keeps you from accidentally going to a linked destination while you're editing a document.

If you want to click links without having to press Ctrl, try this:

  1. In Word 2010 and later, click File > Options > Advanced.

    In Word 2007, click the Microsoft Office button > Word Options > Advanced.

    In Outlook 2010 and later, click File > Options > Mail > Editor Options > Advanced.

    In Outlook 2007, open a new message and click the Microsoft Office button > Editor Options > Advanced.

  2. Under Editing Options, clear the Use CTRL + Click to follow hyperlink check box.

See also

Create or edit a hyperlink

Attach files or insert pictures in Outlook email messages

Attach files or insert pictures in Outlook email messages

It's easy to attach pictures, files, contacts, emails and many other items to your Outlook messages. Outlook keeps track of the documents you've recently worked on, whether they're stored on your computer or saved in OneDrive (cloud only). And no matter where they're stored, Outlook lets you quickly choose whether to send the document as a traditional attachment or upload it to OneDrive and share a link to the file. You can also set permissions on any file sent from OneDrive that allow message recipients to view and edit them, or share them with others.

To solve problems attaching files, see Solve problems with attachments.

What would you like to do?

Outlook keeps track of the files you have worked on recently and suggests them whenever you decide you want to attach a file to an email message. Some file types are blocked from being sent or received. See Blocked attachments in Outlook for the complete list.

  1. In a new message, select Attach File from the ribbon.

  2. Select your file from one of the following locations:

    • Recent items
      The 12 most recent files you've worked on will be displayed here. These files may be on your computer, on OneDrive, SharePoint, or another online document library. Select a file to attach it to your email.

    • Browse Web Locations
      Locations include OneDriveSharePoint sites, or other locations such as a groups document library that you've accessed before. Select one of the locations to open a new window and then select your attachment.

    • Browse This PC
      Opens a File Explorer window where you can choose a file from your computer.

  3. If you selected a file on your local computer or group document library, a copy of the file is attached to the email. Selecting a OneDrive or SharePoint file, however, provides you with additional permission options and information.

  4. Send a link or send a copy Sending a link to the OneDrive or SharePoint file keeps the size of your email message small. If you choose to send a copy of the file, the entire file is attached to the email, just like it would be if you selected a file on your computer. If you choose to send a link to the file, you can also set the permissions on your file.

  5. By default, if you're in a business environment, everyone within your organization can edit the linked file. To change these permissions, select the arrow at the right of the attachment name to display a drop-down menu with a variety of permission options.

    • Organization can Edit if you want anyone in your organization to be able to modify the file.

    • Organization can View, if you want anyone in your organization to be able to read, but not modify, the file.

    • Recipients can Edit if you want only the recipients of your email to be able to modify the file.

    • Recipients can View if you want only the recipients of your email to be able to read, but not modify, the file.
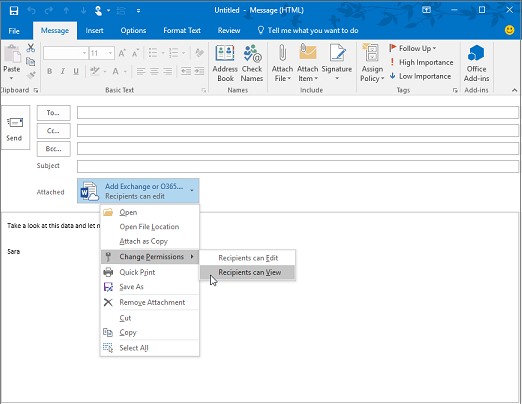
      Change Permission options include Recipients can edit and Recipients can view

  6. If Outlook detects that your recipients won't be able to view the file, for example if it's stored on a SharePoint site that's only accessible to you, you'll see a warning message directly under the file icon and name. Select Attach as copy to change the attachment from a linked file to a copy of the file.

    Note: If you attach a file as a copy, any changes your recipient makes won't be synchronized with the version of the file in OneDrive or on SharePoint.

When you attach a document that is saved on your computer and not in an online location, you also can choose to upload the document to your OneDrive before sending the email. Uploading the attachment makes collaboration easy. You can be sure that everyone is collaborating on the same (and most up-to-date) version of the file.

  1. On the ribbon, click Attach File > Browse This PC, and choose the file you want to attach.

  2. In your email message, select the down arrow for the attachment.

  3. Choose Upload to OneDrive, and then choose the desired location for the file.
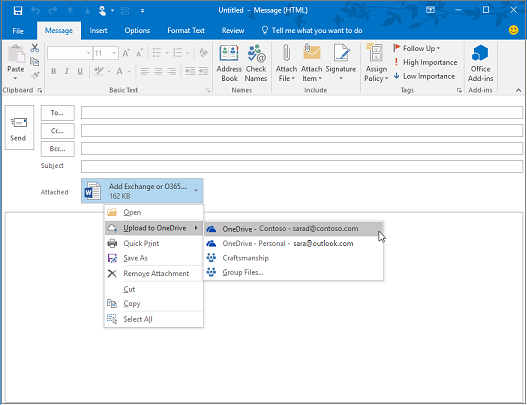
    Upload to OneDrive options include OneDrive and group document libraries

    Note: You might see choices such as the OneDrive location for your work account, the OneDrive location for your personal account, and document libraries for various groups you belong to.

  4. In your email message, select the down arrow for the attachment again.

  5. Choose Change Permissions, and then choose one of the following:

    • Organization can Edit if you want anyone in your organization to be able to modify the file.

    • Organization can View, if you want anyone in your organization to be able to read, but not modify, the file.

    • Recipients can Edit if you want only the recipients of your email to be able to modify the file.

    • Recipients can View if you want only the recipients of your email to be able to read, but not modify, the file.

    Change Permission options include Recipients can edit and Recipients can view

When sending pictures, you can either attach the picture to the email message or insert the picture in the message body. To insert a picture that displays in the body of an email message, use the following steps:

  1. Position your cursor where you want the image in your message.

  2. Select Insert > Pictures.

  3. Browse your computer or online file locations for the picture you want to insert. Select the picture, then select Insert.

  4. To resize the picture, drag the handles at one of the four corners toward the center of the image or away from the center.

    Note: For more information about resizing pictures in Outlook, see Reduce the size of pictures and attachments in Outlook email messages

  1. In a new message, select Attach Item.

  2. Choose one of the following:

    • Business Card
      Choose an electronic business card from your contacts list.

    • Calendar
      Choose Date Range, Details, and other options as appropriate.

    • Outlook Item
      Choose one or more email messages from any of your email folders.

  3. Select the item you want to attach, and then select Insert.

What would you like to do?

Outlook blocks some file types from being sent or received. See Blocked attachments in Outlook for the complete list.

  1. In a new message, select Attach File from the ribbon.

  2. Select the file you want to attach and then select Insert.

When sending pictures, you can either attach the picture to the email message or insert the picture in the message body. To insert a picture that displays in the body of an email message, use the following steps:

  1. Position your cursor where you want the image in your message.

  2. Select Insert > Pictures.

  3. Browse your computer or online file locations for the picture you want to insert. Select the picture, then select Insert.

  4. To resize the picture, drag the handles at one of the four corners toward the center of the image or away from the center.

    Note: For more information about resizing pictures in Outlook, see Reduce the size of pictures and attachments in Outlook email messages

  1. In a new message, select Attach Item.

  2. Choose one of the following:

    • Business Card
      Choose an electronic business card from your contacts list.

    • Calendar
      Choose Date Range, Details, and other options as appropriate.

    • Outlook Item
      Choose one or more email messages from any of your email folders.

  3. Select the item you want to attach, and then select Insert.

What would you like to do?

  1. Create a message, or for an existing message, click Reply, Reply All, or Forward.

  2. In the message window, on the Message tab, in the Include group, click Attach File.

    Attach File command on the ribbon

  3. Browse to and click the file that you want to attach, and then click Insert.

Tip: When composing a message, you can also attach files by using the commands on the Insert tab in the Include group, or drag files from folders on your computer and drop them on the message window.

When sending pictures, you can either attach the picture to the email message or insert the picture in the message body. To insert a picture that displays in the body of an email message, use the following steps:

  1. Position your cursor where you want the image in your message.

  2. Select Insert > Pictures.

  3. Browse your computer or online file locations for the picture you want to insert. Select the picture, then select Insert.

  4. To resize the picture, drag the handles at one of the four corners toward the center of the image or away from the center.

    Note: For more information about resizing pictures in Outlook, see Reduce the size of pictures and attachments in Outlook email messages

You can attach Outlook items, such as other email messages, tasks, contacts, or calendar items to a message. This is the easiest way to forward multiple items or messages.

  1. Create a message, or for an existing message, click Reply, Reply All, or Forward.

  2. In the message window, on the Message tab, in the Include group, click Attach Item.

    Attach Item command on the ribbon

  3. Do one of the following:

    • Point to Business Card, and then click Other Business Cards. Click a contact, and then click OK. To select multiple contacts, press and hold Ctrl as you click each contact.

    • Click Calendar. Choose the calendar, date range, and detail to include. For Advanced options, click Show. Click OK to add the calendar to your message.

    • Click Outlook Item. Browse through your folder list to find the folder that contains the item that you want to attach. Under Items, click the item, and then click OK.
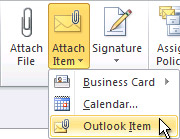
      Attach Outlook Item command on the ribbon

Tip: When composing a message, you also can attach files by using the commands on the Insert tab in the Include group. Or move files from folders on your computer to the message window by using a drag-and-drop operation.

What would you like to do?

  1. On the File menu, click New, and then click Mail Message.

  2. On the Message tab, in the Include group, click Attach File.

    Attach File

  3. In the Insert File dialog box, browse to and choose the file that you want to attach, and then click Insert.
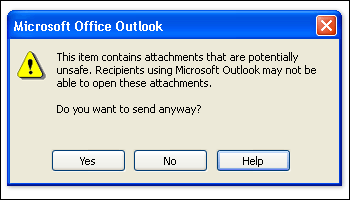
    Unsafe attachment warning

More information

  • If you don't see the file that you want in the appropriate folder, make sure that All files (*.*) is selected in the Files of type box, and that Windows Explorer is configured to show file name extensions.

  • You also canattach file from the new message's Insert tab.

  • By default, Outlook blocks potentially unsafe attachments (including .bat, .exe, .vbs, and .js files) that might contain viruses. If you attach such a file to an e-mail message, you will be asked whether you want to send a potentially unsafe attachment. If you answer Yes, Outlook will send the attachment. If you answer No, you can then remove the potentially unsafe attachment.

  • You can attach multiple files simultaneously by selecting the files and dragging them from a folder on your computer to an open message in Outlook.

When sending pictures, you can either attach the picture to the email message or insert the picture in the message body. To insert a picture that displays in the body of an email message, use the following steps:

  1. Position your cursor where you want the image in your message.

  2. Select Insert > Pictures.

  3. Browse your computer or online file locations for the picture you want to insert. Select the picture, then select Insert.

  4. To resize the picture, drag the handles at one of the four corners toward the center of the image or away from the center.

    Note: For more information about resizing pictures in Outlook, see Reduce the size of pictures and attachments in Outlook email messages

  1. On the File menu, click New, and then click Mail Message.

  2. On the Message tab, in the Include group, click Attach Item.

    Image

  3. In the Look in list, click the folder that contains the item that you want to attach.

  4. Click the item that you want, and then click OK.

Tip: You also can attach an item from the new message's Insert tab.

Where attachments appear in your message depends on the format in which you compose the message.

  • If the message format is HTML or plain text, attachments appear in the attachment box below the Subject line.

    Attachment line

  • If the message format is Rich Text, attachments appear in the body of the message. Even though the file appears to be embedded in the message, it is actually still a separate attachment.
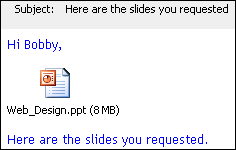
    Attachment in message body

The format in which a message is composed is indicated in the title bar at the top of the message.

Message

Outlook does not impose any size limit on attachments. However, most e-mail server administrators and Internet service providers (ISPs) do set limits on the overall message size, which is the sum of all attachments plus the content of the message itself. Typically, premium-level services provide more e-mail file storage space and allow larger messages than standard-level services. For more information on the maximum allowed message size, contact your ISP or the e-mail server administrator in your organization.

If you're attaching a very large file, you should first compress the file by using a zip program. Outlook files that are saved in the default Open XML Formats with the following file extensions are automatically zipped: .docx, .dotx, .xlsx, .xltx, .pptx, .potx, and .ppsx.

If files that you attach are zipped when you do not expect them to be, check to see whether a .zip utility has been installed in Outlook as a COM add-in. You can disable this sort of add-in by doing the following:

  1. On the Tools menu, click Trust Center, and then click Add-ins.

  2. In the Manage list, click COM Add-Ins, and then click Go.

  3. In the COM Add-ins dialog box, clear the check box next to the add-in name, and then click OK.

Look for answers or ask a question in the Microsoft Office Community.

  1. Why can't I attach a file? Outlook tells me the file is unsafe. Outlook blocks numerous file types that have the potential to spread computer viruses. To send a file that Outlook identifies as unsafe, zip the file first, then attach the zipped file. To zip a file, navigate to the folder on your computer or in the cloud that contains the file, right-click the file, and select Send to compressed (zipped) folder. You should then be able to send the zipped file. For more information, see Blocked attachments in Outlook.

  2. Why do my attachments show up in the message body and not below the subject line? Outlook allows you to send email messages in three formats: HTML, plain text, and rich text. If you use rich text format (RTF), any files you attach will show up in the message body. See Change your message format for instructions on how to switch your message format to HTML or plain text. You can check your message format by looking at the title bar of the message.

    You can send messages in rich text format
  3. The Insert > Pictures option is grayed out. If you can't select Pictures from the Insert tab on the ribbon, your message is probably in plain text format. Change your message format to HTML or rich text to insert pictures. You can check your message format by looking at the title bar of the message.

    You can send messages in plain text

Related Topics

Attach files to email messages and calendar events in Outlook.com or Outlook on the web