Remove items from your calendar
Over time, all of your saved calendar items might add up to a large number and occupy a large amount of space in your data file. To free some of this space, you can reduce the number of saved items by archiving or deleting them.
What do you want to do?
Archive your calendar items
The archive process deletes items from your data file after first making a backup of the items in another Outlook data file. You can configure Outlook to automatically run AutoArchive at specific intervals, or you can manually archive the items.
-
On the File menu, click Archive.
-
Click Archive this folder and all subfolders.
If you created other calendars below the default calendar, selecting this setting will archive items from those calendars as well.
-
In the folder list, select the Calendar folder.
-
In the Archive items older than list, select the date that you want. To archive everything, select a date in the future.
-
If you want, select the Include items with "Do not AutoArchive" checked check box.
Selecting this check box will archive everything, including items that you marked as exceptions to AutoArchive.
-
You can accept the file location where the archive file will be saved, or you can browse to a different folder and provide the file name of your choice.
Note: We recommend that you make a note of this location so that you can easily find the archive file later, if needed.
-
Click OK.
The archiving process begins. The Outlook status bar displays the Archiving menu. You can click Archiving for the option to cancel the archive in progress. Any items that were already archived up to that point will remain in the archive file.

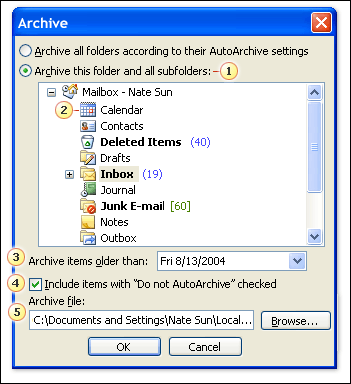
1. All items in the selected folder and all of its subfolders are included in the archive.
2. Click Calendar for calendar items.
3. To archive all items, select a date in the future.
4. When you select the Include items with "Do not AutoArchive" checked check box, all items are archived without exception.
5. Location of the archive file.
Delete all items on your calendar
The process of deleting removes all the items from your data file without making a backup.
Warning: The following steps will delete all items in your calendar, including holidays that are automatically added to the calendar. You can replace holidays that are deleted during these steps, but your other items will be unrecoverable. Find links to more information about adding holidays in the See also section.
-
In the Navigation Pane, click Calendar.
-
On the View menu, point to Current View, and then click By Category.
-
Click Categories: (none), and then press CTRL+A.
All items in the list should now be selected.
-
Press DELETE.
No comments:
Post a Comment