Set up an audio device for Skype for Business
Learn how to set up and use your computer's built-in mic and speakers, a headset, or another device for Skype for Business audio. For the best audio quality during a Skype for Business meeting or call, use an Optimized for Skype for Business audio device.
Note: If you're using Skype for Business with Windows 8.1, make sure to update your device drivers to the latest version. See Download and install drivers for Windows 8.1.

Set up your device
-
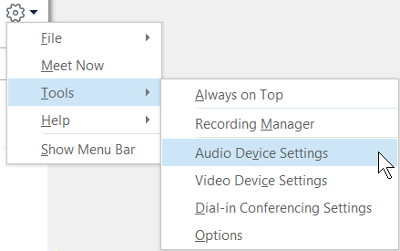
In the Skype for Business main window, click the arrow next to the Options button
 and select Tools > Audio Device Settings.
-
Under Audio device, choose the device you want.

-
Click the green arrow next to Speaker to hear a sample tone, and drag the slider if you need to adjust the volume.
-
To test your mic volume, speak for a few seconds. The volume is optimal when the progress bar reaches the middle of the test area. Drag the slider next to Microphone to adjust the mic volume.
-
Click the green arrow button next to Ringer to hear a sample ring when you get a call, and drag the slider to adjust the ringer volume.
-
Click Check Call Quality and follow the prompts to record a short message and play it back. Adjust audio as needed. Note that this option may not be available for your account.
-
If you have more than one audio device, you can choose to set both to ring when you get a call. Under Secondary Ringer, select Also ring, and then select an additional device.
You can also select Unmute when my phone rings, which will automatically unmute your speakers when you receive a Skype for Business call.
-
Select Allow stereo audio playback when available to make sure that the best audio quality is available during a meeting.
-
Click OK when you're done.
Tip: You can select different devices for microphone and speakers under each section. But to avoid echoing, it's better to use the same device for both. If you have to use separate devices, minimize echoing by lowering your speaker's volume.
If you don't see your device in the list, make sure it's connected directly to your computer and follow the instructions that came with the device to install it.
Test your audio quality
Before you start a Skype for Business meeting or call, make sure your audio device sounds the way you want. Note that Check Call Quality may not be available for your account.
-
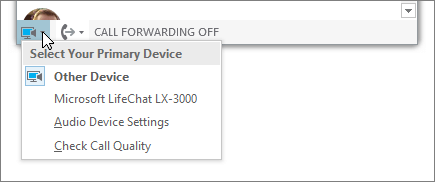
On the lower-left side of the main Skype for Business window, click Select Primary Device.

-
Click Check Call Quality and follow the prompts to record a short message and play it back.
-
If you're not happy with the audio quality, click Audio Device Settings to adjust your mic and speakers, or select another device.
Troubleshooting Skype for Business audio
Still having trouble with your audio? See Troubleshoot audio and video in Skype for Business.
Important: If your audio device isn't listed when you're installing drivers, you need to install the software for your audio device. Here are some tips:
-
For Windows 10: Fix sound problems
-
For Windows 8.1: Update drivers
-
For Windows 7: Update drivers
No comments:
Post a Comment