Overview of sharing and collaborating on Excel data
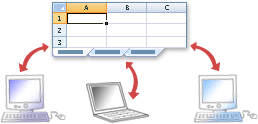
In the Excel Web App, available in Windows Live or with Microsoft SharePoint 2010 technology, multiple users can edit data in a worksheet in the browser at the same time.
Read a blog or try Office 365!

There are many ways to share, analyze, and communicate business information and data in Microsoft Office Excel 2007. The way that you choose to share data depends on many factors, including how you want others to view or work with the data. For example, do you want to keep sensitive or important information from being modified, or do you want to allow users to change and edit the data? Perhaps you need to share data with users who do not have Microsoft Office Excel or have different versions of Excel. Maybe you just want to share a fixed version of your workbook that can easily be sent in e-mail and printed.
This article is an overview that discusses how to share data in Excel, what you and others need in order to view or work with the data, and the limitations that are associated with sharing data. It also includes links to more detailed articles.
In this article
Using Excel Services to share data while maintaining one version of the workbook
If you have access to Excel Services, a part of Microsoft Office SharePoint Server 2007 that is capable of running Excel Calculation Services, you can save a workbook to that server so that other users can access all or parts of it in a browser.
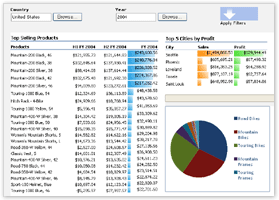
After they are saved to the server, workbooks are displayed by Microsoft Office Excel Web Access. With Excel Web Access, users can view and interact with worksheets in a familiar browser environment as well as calculate, create snapshots, refresh data, and extract values from the workbooks. Workbooks can also be used in dashboard reports. (Similar to a car dashboard, a dashboard report visually presents critical data in summary form so that users can get the information that they need at a glance.) Furthermore, users are not required to have Microsoft Office Excel 2007 installed on their local computers in order to use Excel Web Access.
The following illustration demonstrates Excel Web Access in a dashboard report.

When you save a workbook to Excel Services, the entire workbook is placed on the server, but you can specify the parts of the workbook (such as individual worksheets, named ranges, or charts) that you want to display in the browser. You can also set parameters to allow interactivity by specifying single cells that can be edited on the worksheet that is viewable. For example, you can specify cells into which users can enter values that are used by formulas in other cells, and then users can see the results that are calculated by Excel Services.
Use Excel Services to share data when:
-
You have access to Excel Services, a part of Office SharePoint Server that is capable of running Excel Calculation Services.
-
You want to maintain only one copy of a workbook or worksheet in a central, secure location.
-
Users need to analyze, chart, pivot, and interact with data by using a browser. Excel does not have to be installed on the users' computers.
-
You want to help secure and protect worksheet models and the data that populates the models. You can grant users view-only permissions so that users can view the worksheet in the browser, but they cannot access the worksheet directly by using Excel or any other client program. Additionally, you can control the parts of the worksheet that users are allowed to view in the browser.
-
You want to use a workbook in a dashboard report on a Web page where you can quickly view and analyze important project information.
-
You want to use reporting features to alert users to updated reports.
Additionally, Excel Services allows administrators to programmatically or manually manage and distribute customized Excel worksheets on the server.
For more information on saving and managing workbooks by using Excel Services, a part of Office SharePoint Server, see Save a workbook to Excel Services.
Collaborating on workbooks stored on a document management server
When you want to make one or more workbooks available for collaboration in a central location, you can save them to a document management server. A document management server enables you to use document management features, such as automated workflows and shared document libraries, to check in and check out documents. Additionally, if you have Windows SharePoint Services 3.0, you can save your document to a shared workspace to make it even easier for other users to collaborate on the document and to keep your local copy of the workbook synchronized with changes from the server.
Saving your workbook to a document management server
You can save workbooks to a document management server, such as Windows SharePoint Services 3.0, to give users a central location to collaborate on documents and to take advantage of the many document management features offered by the document management server systems.
Collaborate by using a document management server when:
-
You have access to a document management server.
-
Users have Excel installed to open and use workbooks from the document management server.
-
You want to take advantage of document management server features such as:
-
Automated workflow, so that users who work on the document are notified of and know what phase of work they are participating in (review, feedback, approval, and so on), and so that users can provide information and expertise as needed.
-
Document libraries where you can store and organize workbooks.
-
Checking in, checking out, and versioning of workbooks.
-
Administration and reporting features.
-
Collaboration features, such as Document Workspace sites.
-
To publish a workbook to a document management server, ensure that a document management server is available, and then click the Microsoft Office Button  , click the arrow next to Publish, and then click Document Management Server. In the Save As dialog box, choose a server location and the name of the workbook, and then click Save.
Creating a Document Workspace site with Windows SharePoint Services 3.0
If you want to share your workbook on a Windows SharePoint Services 3.0 site and allow other users to easily collaborate on it while you keep a local copy of the workbook synchronized with changes, you can create and use a Document Workspace site.
A Document Workspace site is an area that is hosted by a Windows SharePoint Services 3.0 server where users share documents and information, maintain lists of pertinent data, and keep each other updated on the status of a specific project.
Use a Document Workspace site when:
-
You have access to a server that is running Windows SharePoint Services 3.0.
-
You can create and administrate the site on which you will store your documents, and you want to grant users who visit or use the site different levels of permissions.
-
Users have Excel installed in order to open and use workbooks from the server.
-
You want to use a task list to assign to-do items with due dates for members of the Document Workspace site. If another member has assigned a task to you, you can check it off in the Tasks list. When other team members open the Tasks list in the Document Workspace pane, they can see that you have completed the task.
-
You want to display the user names of the members of the Document Workspace site in a Members list. In the Document Workspace pane, contact information — such as free or busy status, telephone number, and e-mail address — and other properties are included, so that members can easily keep in touch with each other. If you use instant messaging, you can also see the online status of Document Workspace site members.
-
You want to use e-mail alerts to notify members of changes to a list, a particular item (such as the status of a task), or a document in the Document Workspace site.
To create a Document Workspace site from Excel and to save a workbook to that Document Workspace site, ensure that you have Windows SharePoint Services 3.0 installed and available for use, and then click the Microsoft Office Button  , click the arrow next to Publish, and then click Create Document Workspace. In the task pane, type the name that you want to give to the Document Workspace site, and then type or select the URL for the Web server to which you want to save the workbook.
Distributing data through e-mail, by fax, or by printing
Perhaps the most common ways to share Excel data are by sending workbooks through e-mail, by faxing workbooks, and by printing and distributing hard copies of workbooks. Use e-mail, fax, or print to distribute workbooks when:
-
You have an e-mail program such as Microsoft Office Outlook 2007.
-
You have a fax machine or fax software and an Internet connection.
-
You have a printer and want to use or distribute hard copies of your data for reference.
Sending workbooks through e-mail
You can send a workbook from Excel or from your e-mail program. To send a workbook from Excel, open the workbook that you want to send, click the Microsoft Office Button  , click the arrow next to Send, and then click Email.
Faxing workbooks
You can fax a workbook from Excel if you are signed up with a fax service provider, or if you have fax software and an Internet connection or a fax modem. You can also can print your workbook and then fax it by using a fax machine.
To fax a workbook from Excel, ensure that you have an Internet connection and that you are signed up with a fax provider. Open the workbook that contains the information that you want to fax, click the Microsoft Office Button  , click the arrow next to Send, and then click Internet Fax.
Printing workbooks
You can easily print a workbook from Excel. Before you print a workbook that contains large amounts of data or charts, you can quickly fine-tune it in Page Layout view to achieve professional-looking results. In this view, you can change the layout and format of the data the way that you can in Normal view. But you can also use rulers to measure the width and height of the data, change the page orientation, add or change the page headers and footers, set the margins for printing, and hide or display the row and column headers. For more information on Page Layout view, see Use the Page Layout view to fine-tune pages before printing.
For more information on printing from Excel, see Print a worksheet or workbook.
Exchanging workbooks with users who use earlier versions of Excel
When you want to exchange workbooks with other users who may be using earlier versions of Excel, you can save your workbook in the Excel 97-2003 format (.xls) instead of Office Excel 2007 XML or binary format (.xlsx or .xlsb) and work on the document in Compatibility Mode. Compatibility Mode is automatically enabled when you open an Excel 97-2003 workbook. The visual cue Compatibility Mode appears in the program title bar when you are working in an earlier version file format.
Compatibility Mode enforces compatibility between Microsoft Office Excel 2003, Excel 2002, Excel 2000, and Office Excel 2007 by suppressing features within Office Excel 2007 that could potentially add content that is incompatible with the earlier Office releases. For example, when you work in Office Excel 2007 Compatibility Mode, the new 2007 Microsoft Office system charting engine is unavailable, but you can add charts by using the same engine that was available in earlier versions, which ensures that you can exchange charts freely.
When you save a workbook that is opened in Compatibility Mode, Excel automatically runs the Compatibility Checker to identify any possible compatibility issues. If you are not using Compatibility Mode, you can also use the Compatibility Checker to assist you when you save a workbook in 2007 Office release file format to a file format of an earlier version of Excel — for example, when converting .xlsx (Excel XML format) to .xls (Excel 97–2003 Workbook). The Compatibility Checker warns you about any content in a workbook that may not be compatible with earlier releases and that therefore may be affected by a file format conversion.
Use Compatibility Mode when:
-
You want to distribute copies of your workbook to other users who are working in earlier versions of Excel.
-
You expect that other users will want to change or manipulate the data that you distribute.
-
You want the recipients of your workbook to be able to use familiar Excel features to work with the data.
For more information on how to work in Compatibility Mode, see Using Office Excel 2007 with earlier versions of Excel.
Distributing workbooks to users who do not have Excel
A great way to allow users who do not have Excel to view and interact with Excel data is using Excel Services. For more information, see Using Excel Services to share data while maintaining one version of the workbook.
If you don't have access to Excel Services, however, you can install an add-in to save a workbook in PDF or XPS format, or you can save a workbook to other file formats and then send it to your recipients by using e-mail or fax, or by saving the file on a network share or Web share that the users can access.
Distributing fixed versions of your data for viewing and printing by using PDF or XPS format
Important: You can save as a PDF or XPS file from a 2007 Microsoft Office system program only after you install an add-in. For more information, see Enable support for other file formats, such as PDF and XPS.
After you install the add-in, you can save Excel data to a PDF (Portable Document Format) or XPS (XML Paper Specification) format for printing, posting, and e-mail distribution. Saving a worksheet as a PDF or XPS file lets you capture information in an easily distributed form that retains all of your formatting characteristics, but doesn't require other users to have Excel in order to review or print your output.
Save your worksheet in PDF or XPS format when:
-
You want to distribute fixed versions of your files by e-mail or on a network or Web server.
-
Recipients of the file may not have Excel installed.
-
You want users to be able to easily print the information.
-
You don't want anyone to modify the source data.
-
You don't expect frequent updates to the data.
For more information on converting your workbook to PDF or XPS, see Save a file in PDF format and Save a file in XPS format.
Distributing workbooks in other file formats
You can save Excel workbooks in different file formats so that those who do not have Excel can open them in other applications or data systems.
You can save Excel files as XML files, text files, Web pages (HTML files), and others. For a list of formats that you can save to, see File formats that are supported in Excel.
Important: Not all Excel features will be retained when you save to other file formats. Formatting is often not retained, and sometimes formulas are not retained, depending on the format. Furthermore, when you save to some formats, only the active sheet is saved. Therefore, if you have several worksheets in a workbook and you want to save all worksheets to a specific format, you will have to save each worksheet separately.
Save workbooks to other file formats when:
-
You want to share the data but not necessarily the formatting or Excel-specific features.
-
You have an XML-based system, and you want to transfer data by using XML.
-
You need simple text files for use in other systems.
-
You want to post information to the Web, and you want to save Excel data as a Web page to integrate into your Web site.
To save to another file format, click the Microsoft Office Button  , and then click Save As. Click the arrow next to the Save as type list, and then click a file type in the list.
For more information on saving to other file formats, see Save a workbook in another file format.
Allowing multiple users to edit a workbook simultaneously
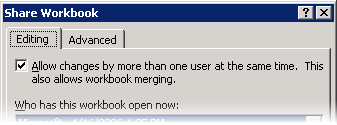
If you have a workbook in which you want to allow more than one other person to add or modify data simultaneously, you can set up and save the workbook as "shared" and then make it available on a network share (not a Web server).

Use the Share Workbook feature when:
-
You want multiple users to be able to edit the data in one workbook simultaneously, and you are comfortable with the original data in the workbook being modified, including edits, additions, and deletions.
-
You have a network share available on which to store the workbook and to which users have access.
Note: More than one user cannot simultaneously make changes to a shared workbook that is stored on a Windows SharePoint Services 3.0 site. If you want to store your workbook on a Windows SharePoint Services 3.0 site, you should do so only after the collaboration effort through sharing is complete.
-
You want to keep a record of the changes that are made in the workbook.
-
You do not expect to change the following features, which cannot be modified after a workbook is shared: merged cells, conditional formats, data validation, charts, pictures, objects (including drawing objects), hyperlinks, scenarios, outlines, subtotals, data tables, PivotTable reports, workbook and worksheet protection, and macros.
Important: Saving an Office Excel 2007 shared workbook to an earlier version file format unshares the workbook, and the revision history that documents the conflicts and resolutions is lost. If you need to save the workbook to an earlier version format, you may want to save a copy of the revision history first.
As the owner of the workbook, you can prepare it to be shared by entering and formatting the data that needs to be present. When you are finished, click Share Workbook in the Changes group on the Review tab, select your options, and then save the workbook on a network share (not a Web server) that is available to the intended users. Alternatively, you can click Protect and Share Workbook in the Changes group on the Review tab to prevent other users from turning off Change Tracking in the workbook.

Each time that you save the shared workbook, you are prompted with the changes that other users have saved since the last time that you saved the shared workbook. If you want to keep the shared workbook open to monitor progress, Excel can update you with the changes automatically, at timed intervals that you specify, with or without saving the workbook yourself.
When you save changes to a shared workbook, another person who is editing the workbook might have saved changes to the same cells. In this case, the changes conflict, and you are prompted with a conflict resolution dialog box so that you can choose which changes to keep.
For more information on setting up and using shared workbooks, see Use a shared workbook to collaborate.
Distributing copies of a workbook and then merge or consolidate data from each copy
Distributing workbooks and merging changes from each
To distribute copies of a workbook and then merge changes from several of the copies, you need to set up the workbook as a shared workbook (see Allow multiple users to edit a workbook simultaneously). The difference is that instead of storing the workbook in one location for several users to edit, you can distribute copies of the workbook and allow the users to make changes and then send the changed workbooks back to you. You store the workbooks in one location and then click Compare and Merge Workbooks. You can review the changes and accept those changes that you want to keep and use in one master workbook. To add the Compare and Merge Workbooks command to the Quick Access Toolbar, click the Microsoft Office Button  , click Excel Options, and then click Customize. In the Choose commands from list, click All Commands, select Compare and Merge Workbooks, click Add, and then click OK.
Use the Compare and Merge feature when:
-
You want to collect input from several key users, but you want to have more control over what changes are made and accepted in the original version.
-
You don't want to store the workbook in one central location for several users to access, but you want to distribute copies of the workbook instead (in e-mail, for example).
-
You want to keep records of the changes that you accept.
-
You can accept the limitations of shared workbooks (see the section Allow multiple users to edit a workbook simultaneously).
Distributing workbooks and consolidating data from multiple worksheets
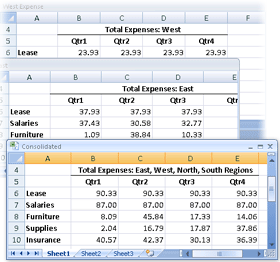
If you set up worksheets to have similar or identical layouts and send copies of those worksheets to other users to fill in, you can summarize and report the results from all of them on a master worksheet. For example, if you have a worksheet of expense figures in workbooks for each of your regional offices, you can roll up these figures onto one master corporate expense worksheet.

Use Data Consolidation when:
-
You want to collect input from several key users and roll it up onto one master worksheet.
-
You don't want to store the workbook in one central location for several users to access, but you want to distribute copies of the workbook instead (in e-mail, for example).
-
You have or are willing to create similar or identical worksheets from which to consolidate.
To consolidate data, on the Data tab, in the Data Tools group, click Consolidate, and then type or select the references to the data that you want to consolidate.

You have several options for consolidating data. You can consolidate data by:
Position Choose this option when the data on all of the worksheets is arranged in identical order and location.
Category Choose this option when each worksheet organizes the data differently but has the same row and column labels, which you can use to match the data.
3-D formulas Choose this option when the worksheets do not have a consistent pattern. You can create formulas that refer to cells in each range of data that you are combining. Formulas that refer to cells on multiple worksheets are called 3-D formulas.
For more information, see Consolidate data on multiple worksheets.
No comments:
Post a Comment