Draw a shape with the Pencil, Line, Arc, or Freeform tools
You can create your own custom shapes by using the rectangle, ellipse, arc, freeform, and pencil shapes in Visio.

If you want to be able to apply fill colors to your new shape, you need to create a closed shape. If you use the Rectangle tool or the Ellipse tool, you get closed shapes automatically. By default, closed shapes are filled with a solid color.

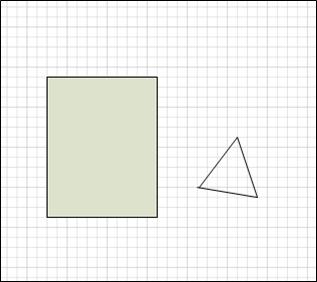
In this example, the rectangle is a closed shape because it is filled with a solid color. You can tell that the triangle is not closed because it is not filled with a solid color and you can see the drawing background through the shape.
What do you want to do?
Draw a rectangle or circle
-
On the Home tab, in the Tools group, click the arrow next to Rectangle
 , and then do one of the following:
-
To draw a rectangle, select the Rectangle tool.
-
To draw a circle or oval, select the Ellipse tool.
-
-
Drag to draw the shape on the drawing page.
-
To return to regular editing, in the Tools group, click the Pointer
 tool.
tool.
Draw a custom shape
-
On the Home tab, in the Tools group, click the arrow next to Rectangle
 , and then do one of the following:
-
To draw a straight line, select the Line tool.
-
To draw an irregular shape, select the Freeform tool.
-
To draw a curved line, select the Arc tool.
-
-
To draw the first segment, point to where you want to start the shape, and then drag until the segment is the size that you want.
-
After you draw the segment, the shape displays vertices
 .
.
-
-
To draw the second segment, point to the vertex of the first segment, and then drag.
-
To draw additional segments, point to the vertex at the end of the last segment that you added, and then drag to draw the next segment.
Note: To undo a segment, press CTRL+Z. Segments are deleted in the reverse order in which they were drawn.
-
To close the shape, drag the endpoint of the last segment that you create over the vertex at the beginning of the first segment. The shape becomes opaque, which indicates that it is a closed shape.
-
To return to regular editing, on the Home tab, in the Tools group, click the Pointer tool
 .
.
Edit a shape
You can edit most shapes in Visio by adding, deleting, and reshaping segments in the shape.
Delete a segment from a shape
-
On the Home tab, in the Tools group, click the arrow next to Rectangle
 , and then click the Pencil tool
  .
.
-
Select the shape that you want to delete a segment from, click the vertex
 that you want to delete, and then press DELETE.
Add a segment to a shape
-
On the Home tab, in the Tools group, click the arrow next to Rectangle
 , and then click the Pencil tool
  .
.
-
Select the shape the shape that you want to add a segment to, point to where you want to add the segment, and hold down the CTRL key and then click.
A new vertex appears where you clicked the shape, creating a new segment.
Reshape a shape
-
On the Home tab, in the Tools group, click the arrow next to Rectangle
 , and then click the Pencil tool
  .
.
-
Select the shape, click the vertex
 that you want to move, and then drag the vertex to a new position.
Create a new master shape
You can reuse your custom shape in other drawings by making it a master shape. To turn a custom shape into a master shape, do the following?
-
In the Shapes pane, click More Shapes, and then select a custom stencil or create a new custom stencil by selecting New Stencil (US units) or New Stencil (Metric).
-
On the drawing page, select your custom shape and drag it into the new stencil in the Shapes pane.
-
To rename your new master shape, right-click the shape, select Rename Master, and then type a name for the new master shape.
-
In the Shapes pane, on the custom stencil, click Save to save the changes to the custom stencil with the new master shape.
For more information about how to create a new master shape, see Create a shape or Edit a master shape.
No comments:
Post a Comment