Tuesday, February 28, 2017

Video: Create personal views of a list or library

Video: Create personal views of a list or library

Your browser does not support video. Install Microsoft Silverlight, Adobe Flash Player, or Internet Explorer 9.

Download video (captions included)

Learn how you can use views to organize and display the information in lists and libraries. This video shows how to use columns to sort and filter lists and libraries and how to create a personal view of a list or library.

Move Network Diagram boxes manually

Move Network Diagram boxes manually

By default, Microsoft Office Project automatically determines the position, alignment, and distance between boxes in the Network Diagram. To manually move Network Diagram boxes, choose the manual positioning layout mode.

  1. On the View menu, click Network Diagram.

  2. On the Format menu, click Layout.

  3. Click Allow manual box positioning, and then click OK.

  4. Use any of the following methods to reposition Network Diagram boxes:

    • To move adjacent tasks, hold down SHIFT, click the first and last task that you want to move, and then drag the border of one of the boxes to another location.

    • To move nonadjacent tasks, hold down CTRL, click each task that you want to move, and then drag the border of one of the boxes to another location.

    • To move a summary task and its subtasks, or a task and its successors, hold down SHIFT as you drag the border of the summary task box or the predecessor task box.

      Notes: 

      • If you select Allow manual box positioning and you manually reposition a task, you can change the layout of linked tasks or subtasks in relation to the task you moved. Right-click the task and click Layout Related Tasks Now to move related tasks while keeping the task you previously repositioned in the same place.

      • If you select Allow manual box positioning and you manually reposition multiple tasks, you can move one or more tasks to the positions defined in the Layout dialog box. To move one task, right-click the task, and then click Layout Selection Now. To select more than one task, hold down CTRL while you click each task, right-click, and then click Layout Selection Now.

NORM.S.DIST function

NORM.S.DIST function

Returns the standard normal distribution (has a mean of zero and a standard deviation of one).

Use this function in place of a table of standard normal curve areas.

Syntax – Standard Normal Distribution

NORM.S.DIST(z,cumulative)

The NORM.S.DIST function syntax has the following arguments:

  • Z     Required. The value for which you want the distribution.

  • Cumulative     Required. Cumulative is a logical value that determines the form of the function. If cumulative is TRUE, NORMS.DIST returns the cumulative distribution function; if FALSE, it returns the probability mass function.

Remarks

  • If z is nonnumeric, NORM.S.DIST returns the #VALUE! error value.

  • The equation for the standard normal density function is:

    Equation

Example

Copy the example data in the following table, and paste it in cell A1 of a new Excel worksheet. For formulas to show results, select them, press F2, and then press Enter. If you need to, you can adjust the column widths to see all the data.

Formula

Description

Result

=NORM.S.DIST(1.333333,TRUE)

Normal cumulative distribution function at 1.333333

0.908788726

=NORM.S.DIST(1.333333,FALSE)

Normal probability distribution function at 1.333333

0.164010148

Rename an XML map

Rename an XML map

When you add an XML map to a workbook, Microsoft Office Excel 2007 provides default XML map names in the following way: Root_Map, Root_Map1, Root_Map2, and so on. To avoid confusion, you may want to provide more meaningful names to the XML map, especially if you are working with more than one XML map.

  1. If the Developer tab is not available, do the following to display it:

    1. Click the Microsoft Office Button Office button image , and then click Excel Options.

    2. In the Popular category, under Top options for working with Excel, select the Show Developer tab in the Ribbon check box, and then click OK.

      Note: The Ribbon is a component of the Microsoft Office Fluent user interface.

  2. On the Developer tab, in the XML group, click Source.

    XML group in Ribbon

  3. In the XML Source task pane, click XML Maps.

  4. Click the XML map that you want to rename.

  5. Click Rename.

  6. Type the new name, and then press ENTER.

  7. Click OK.

    The new name is displayed in the XML maps in this workbook list at the top of the XML Source task pane.

Note:  Because element names are based on the XML schema file (.xsd) or the inferred schema that Excel creates when you don't have an XML schema file, you cannot change the element names after you create an XML map.

How to install Office with Click-to-Run in Office Online programs

How to install Office with Click-to-Run in Office Online programs

You can install a free trial of Microsoft Office 2010 with Click-to-Run, which is a program that streams Office to your computer. With Click-to-Run you can begin using your Office programs while they are being downloaded and installed.

The free trial is a way for you to evaluate Office 2010 for a limited time with no payment. If you decide you want to purchase Office 2010 you can convert your trial installation to a full version of the software. For more information about trying or buying Office 2010, see Top 7 Reasons to Try Office 2010.

In Office Online programs, after you click Try Office 2010 and then Install Now, the steps you follow to install Office are different depending on which web browser you are using.

Which browser are you using?

Internet Explorer

Another browser

FireFox

Browsers other than FireFox or Internet Explorer

Internet Explorer

In Internet Explorer, after you click Install Now, a dialog box instructs you to click Run in the dialog boxes that appear next, and to click Continue if you are prompted for permission to continue. Click Next, and then click Run as directed.

When Office 2010 completes installation your document opens in the Office desktop application that corresponds to the Office Online program where you clicked Try Office 2010.

Top of Page

Another browser

In browsers other than Internet Explorer, you must save the installation file on your computer. Click the command for saving the file. For example, in Firefox click Save File; in Chrome click Save. When the file is stored on your computer, double-click it to run it.

FireFox

When Office 2010 is installed, click the command in the Office Online programs for opening your document in the Office desktop application. For example, in PowerPoint Online, click Open in PowerPoint. Your presentation opens in Microsoft PowerPoint 2010.

Browsers other than FireFox or Internet Explorer

When Office 2010 is installed, you can use the full-featured capabilities of the Office desktop applications to update your documents, including saving them directly to SharePoint sites and to your OneDrive. To open a web-based document in Office 2010, download the document to your computer, open it in the Office desktop application, and then save it back to the website.

Note: Office Online programs are supported in Chrome when working in Windows Live, but not when working in SharePoint. FireFox and Safari are supported in both environments.

Top of Page

Draw or delete a line or connector

Draw or delete a line or connector

You can add lines to connect shapes or use lines to point to pieces of information, and you can delete lines.

Notes: 

Draw a line with connection points

A connector is a line with connection points at each end that stays connected to the shapes you attach it to. Connectors can be straight Straight connector , elbow (angled) Elbow connector , or curved Curved connector . When you choose a connector, dots appear on the shape outline. These dots indicate where you can attach a connector.

Important: In Word and Outlook, connection points work only when the lines and the objects they are connecting are placed on a drawing canvas. To insert a drawing canvas, click the Insert tab, click Shapes, and then click New Drawing Canvas at the bottom of the menu.

To add a line that connects to other objects, follow these steps.

  1. On the Insert tab, in the Illustrations group, click Shapes.

    Insert Shapes button

  2. Under Lines, click the connector that you want to add.

    Choosing a connector line

    Note: The last three styles listed under Lines (Curve, Freeform Shape, and Scribble) are not connectors. Rest your pointer over each style to see its name before clicking it.

  3. To draw a line connecting shapes, on the first shape, rest your mouse pointer over the shape or object to which you want to attach the connector.

    Connection dots will appear, indicating that your line can be connected to the shape. (The color and style of these dots vary among different versions of Office.)

    Shape with connection points

    Note: If no connection points appear, you've either chosen a line style that is not a connector, or you are not working on a drawing canvas (in Word or Outlook).

    Click anywhere on the first shape, and then drag the cursor to a connection dot on the second connection object.

    Note: When you rearrange shapes that are joined with connectors, the connectors remain attached to and move with the shapes. If you move either end of a connector, that end detaches from the shape, and you can then attach it to another connection site on the same shape or attach it to another shape. After the connector attaches to a connection site, the connector stays connected to the shapes no matter how you move each shape.

Draw a line without connection points

To add a line that is not connected to other objects, follow these steps.

  1. On the Insert tab, in the Illustrations group, click Shapes.

    Insert Shapes button

  2. Under Lines, click any line style you like.

    Choosing a connector line

  3. Click one location in the document, hold and drag your pointer to a different location, and then release the mouse button.

Draw the same line or connector multiple times

If you need to add the same line repeatedly, you can do so quickly by using Lock Drawing Mode.

  1. On the Insert tab, in the Illustrations group, click Shapes.

    Insert Shapes button

  2. Under Lines, right-click the line or connector that you want to add, and then click Lock Drawing Mode.

    Selecting Lock Drawing Mode

  3. Click where you want to start the line or connector, and then drag the cursor to where you want the line or connector to end.

  4. Repeat step 3 for each line or connector you want to add.

  5. When you finish adding all of the lines or connectors, press ESC.

Add, edit, or remove an arrow or a shape on a line

  1. Select the line you want to change.
    To work with multiple lines, select the first line, and then press and hold Ctrl while you select the other lines.

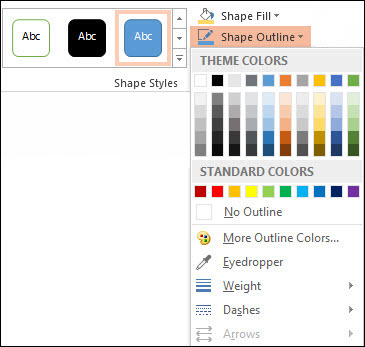
  2. On the Format tab, click the arrow next to Shape Outline.

    Shape Outline command
    If you don't see the Format tab, make sure you selected the line. You might have to double-click the line.

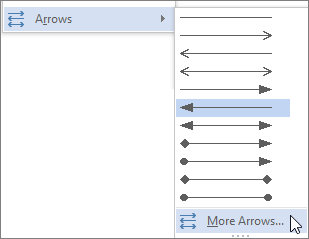
  3. Point to Arrows, and then click the arrow style that you want.

    To change the arrow type or size, or to change the type, width, or color of the line or arrow, click More Arrows, and then choose the options that you want.

    Clicking More Arrows to customize a line or arrow

    To remove an arrowhead, click the first style, Arrow Style 1 (no arrowheads).

Delete lines or connectors

  • Click the line, connector, or shape that you want to delete, and then press Delete.
    If you want to delete multiple lines or connectors, select the first line, press and hold Ctrl while you select the other lines, and then press Delete.

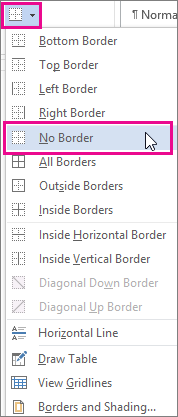
If you can't select a line to delete it in Word or Outlook, it might actually be a horizontal line, which is a type of border. You can remove borders by clicking the arrow next to the Borders button (in the Paragraph group in Word and Outlook; in the Font group in Excel), and then clicking No Border.

Removing a border with the Borders button

You can learn more about how lines work in borders by reading Add borders to text.

See also

Protect your personal information and keep it private

Protect your personal information and keep it private

Because it is possible for your name, address, phone number, and identity to be stolen, or made public, Microsoft Office, Windows, and Internet Explorer can help keep your personal information more private and secure. The following links take you to instructions that help you, your family, and your business protect one of your most important assets: your personal information.Preparing GDN for new TCRs and test cases

Online fraud and phishing

Protecting yourself against fraud starts with understanding fraud and the kinds of activities that expose you to the risk of fraud. To learn about how to identify likely fraud and practices that will help to protect you, see Protect yourself from phishing schemes and other forms of online fraud.

My privacy in Office

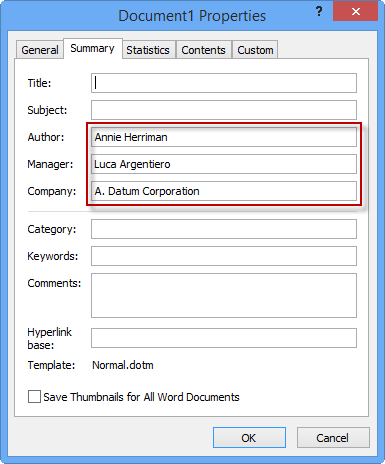
When using Office programs, it's important to know that personal information about you is stored in the file, such as Author (your name), Manager, Company, and Last Saved By. Additional information that can remain in the document is hidden text, revised text, field codes, or your email address. By using the instructions in the following articles, you can delete this information.

personal and private information, Advanced Properties in Word 2016
Example of personal information saved in Word document properties

What version of Office am I using?

For instructions about how to discover the version of Office that you're using, see What version of Office am I using?

Office 2010, Office 2013, and Office 2016

The Trust Center in Office is where you can configure settings to help protect your privacy and the security of your computer and documents. For more information about the Trust Center, see View my options and settings in the Trust Center

You can make sure personal information doesn't get to the wrong person by removing it from your Office documents. For instructions in removing personal information, see the following topics:

Office 2007

You have the option of what information is shared with Microsoft, and this version introduced the Trust Center where you can make privacy and security choices that you want.

My privacy in Windows

You can use the following instructions for your operating system to make sure your privacy and personal information is protected. If you're not sure what version of Windows you have installed, click the following link.

What version of Windows do I have?

To automatically discover the version of Windows that your computer is running, see Which version of Windows do I have?

Windows 7: InPrivate browsing

InPrivate browsing prevents Internet Explorer from storing data about your browsing session. This helps to prevent anyone else who might use your computer from seeing the websites that you visited and what you looked at on the web. For more information about InPrivate browsing, see InPrivate browsing.

Windows Vista: Windows Defender

Windows Defender is a security tool for Windows Vista that helps detect and remove spyware from your computer. For more information about Windows Defender, see Using Windows Defender

Top of Page

My privacy in Internet Explorer

When you're shopping, browsing, playing games, or downloading pictures, you can make sure that your privacy is more secure when you're using Internet Explorer.

What version of Internet Explorer do I have?

You can automatically discover the version of Internet Explorer running on your computer by clicking the following link: Which version of Internet Explorer do I have?

Internet Explorer 8

Learn about cookie settings, Pop-up Blocker, and InPrivate browsing.

Security and privacy features in Internet Explorer 8

Top of Page

Internet Explorer 7

For Internet Explorer 7, you can help prevent being a victim of fraud and identity theft by adjusting your browser's privacy settings. For more information, see Change Internet Explorer Privacy Settings (versions 7 and 8)

Apply a built-in theme to a slide master

Apply a built-in theme to a slide master

When you apply a PowerPoint 2007 theme, you apply a group of slide layouts, that contain a combination of coordinating colors, fonts, and effects.

Currency Theme
A free, pre-built Office theme, called 'Currency'

PowerPoint contains some built-in themes, and you can also find many different kinds of free, pre-built themes on Office Online, like the one shown in the diagram above.

Whether you use a pre-built theme, create a new, custom theme, or modify an existing theme, you can follow this procedure to apply a theme to your presentation.

Notes: 

Built-in themes

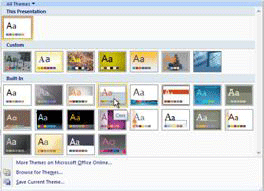
  1. On the Design tab, in the Themes group, click More Button image .

  2. Do one of the following:

    • To apply a built-in theme, under Built-In, click the theme that you want.

    • To apply a newly-created theme or an existing theme that you modified and saved, under Custom, click the theme that you want.

      Note: Custom is available only if you created one or more custom themes. For more information about customizing a theme, see Customize and save a theme in PowerPoint 2007.

    • To apply a custom theme or themed document stored in a different location, click Browse for Themes, and then locate and select the theme you want.

    • To download free themes from Office Online, click More Themes on Microsoft Office Online. Scroll to locate a theme. Double-click a theme, and then click Download.

      Note: If you are unable to download a theme from Office Online, note the name of the theme, open PowerPoint, and in the Search Microsoft Office Online box, type the theme name and then click the arrow. Click to select the theme, and then click Download.

Top of Page

Formula compatibility issues in Excel

Formula compatibility issues in Excel

The Compatibility Checker found one or more formula-related compatibility issues with previous versions of Microsoft Excel.

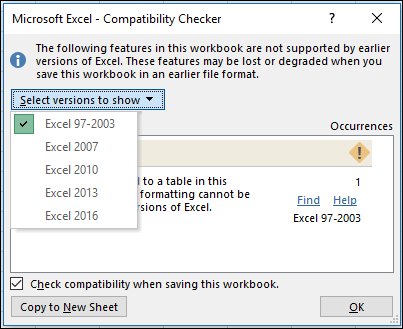
Beginning with Excel 2007, by default, the Compatibility Checker checks for issues with previous versions of Excel. If you're only interested in a specific version, clear the check boxes for the other versions.

Excel Compatibility Checker dialog

Important:  If you see issues in the Significant loss of functionality list, address them prior to saving the file so that you can prevent permanent loss of data or incorrect functionality.

Issues in the Minor loss of fidelity list might or might not have to be resolved before you continue saving the workbook—data or functionality is not lost, but the workbook might not look or work exactly the same way when you open it in an earlier version of Excel.

Tip: If you have many issues to investigate, select Copy to New Sheet. Use the new Compatibility Report sheet to work through each issue.

In this article

Issues that cause a significant loss of functionality

Issues that cause a minor loss of fidelity

Issues that cause a significant loss of functionality

Issue

Solution

Some worksheets contain more array formulas that refer to other worksheets than are supported by the selected file format. Some of these array formulas will not be saved and will be converted to #VALUE! errors.

What it means    In Excel 2007 and later, workbook arrays that refer to other worksheets are limited only by available memory, but in Excel 97-2003, worksheets can only contain up to 65,472 workbook arrays that refer to other worksheets. Workbook arrays beyond the maximum limit will be converted to and display #VALUE! errors.

What to do    In the Compatibility Checker, click Find to locate cells that contain array formulas that refer to another worksheet, and then make the necessary changes to avoid #VALUE! errors.

Some formulas contain arrays with more elements than are supported by the selected file format. Arrays with more than 256 columns or 65536 rows will not be saved and may produce different results.

What it means    In Excel 2010 and later, you can use array formulas that contain elements for more than 256 columns and 65,536 rows. In Excel 2007, this exceeds the limit for array elements and might return different results.

What to do    In the Compatibility Checker, click Find to locate cells that contain array formulas that have more elements than are supported in earlier versions of Excel, and then make the necessary changes.

Some formulas contain more values, references, and/or names than are supported by the selected file format. These formulas will not be saved and will be converted to #VALUE! errors.

What it means    In Excel 2007 and later, the maximum length of formula contents is 8,192 characters, and the maximum internal formula length is 16,384 bytes. In Excel 97-2003, the maximum length of formula contents is 1,024 characters, and the maximum internal formula length is 1,800 bytes. When the combination of formula arguments (including values, references, and/or names) exceeds the maximum limits of Excel 97-2003, the formulas will result in #VALUE! errors when you save the workbook to an earlier Excel file format.

What to do    In the Compatibility Checker, click Find to locate the cells that contain formulas that exceed the maximum formula length limits of Excel 97-2003, and then make the necessary changes to avoid #VALUE! errors.

Some formulas have more levels of nesting than are supported by the selected file format. Formulas with more than seven levels of nesting will not be saved and will be converted to #VALUE! errors.

What it means    In Excel 2007 and later, a formula can contain up to 64 levels of nesting, but in Excel 97-2003, the maximum levels of nesting is only 7.

What to do    In the Compatibility Checker, click Find to locate the cells that contain formulas with more than 7 levels of nesting, and then make the necessary changes to avoid #VALUE! errors.

Some formulas contain functions that have more arguments than are supported by the selected file format. Formulas that have more than 30 arguments per function will not be saved and will be converted to #VALUE! errors.

What it means    In Excel 2007 and later, a formula can contain up to 255 arguments, but in Excel 97-2003, the maximum limit of arguments in a formula is only 30.

What to do    In the Compatibility Checker, click Find to locate the cells that contain formulas with more than 30 arguments, and then make the necessary changes to avoid #VALUE! errors.

Some formulas use more operands than are allowed by the selected file format. These formulas will not be saved and will be converted to #VALUE! errors.

What it means    In Excel 2007 and later, the maximum number of operands that can be used in formulas is 1,024, but in Excel 97-2003, the maximum limit of operands in formulas is only 40.

What to do    In the Compatibility Checker, click Find to locate the cells that contain formulas with more than 40 operands, and then make the necessary changes to avoid #VALUE! errors.

Some formulas contain functions with more arguments than are supported by the selected file format. Formulas with more than 29 arguments to a function will not be saved and will be converted to #VALUE! errors.

What it means    In Excel 2007 and later, a User-Defined Function (UDF) that you create by using Visual Basic for Applications (VBA) can contain up to 60 arguments, but in Excel 97-2003, the number of arguments in UDFs are limited by VBA to only 29.

What to do    In the Compatibility Checker, click Find to locate the cells that contain functions that use more than 29 arguments, and then make the necessary changes to avoid #VALUE! errors. You may have to use VBA code to change user-defined functions.

One or more functions in this workbook are not available in earlier versions of Excel.  When recalculated in earlier versions, these functions will return a #NAME? error instead of their current results.

What it means    Excel 2007 and later provide new and renamed functions. Because these functions are not available in Excel 97-2003, they will return a #NAME? error instead of the expected results when the workbook is opened in the earlier version of Excel..

In some cases, the prefix _xlfn is added to the formula, for example, =_xlfn.IFERROR (1,2).

What to do    In the Compatibility Checker, click Find to locate the cells that contain functions that are not available in earlier versions of Excel, and then make the necessary changes to avoid #NAME? errors.

Compatibility functions are available for all functions that have been renamed. To avoid errors, you can use those functions instead.

New functions can be replaced with appropriate functions that are available in the earlier versions of Excel. You can also remove formulas that use new functions by replacing them with the formula results.

Some formulas contain references to tables that are not supported in the selected file format. These references will be converted to cell references.

What it means    In Excel 2007 and later, you can use structured references to make it much easier and more intuitive to work with table data when you are using formulas that reference a table, either portions of a table, or the entire table. This feature is not supported in Excel 97-2003, and structured references will be converted to cell references.

What to do    In the Compatibility Checker, click Find to locate the cells that contain formulas with structured references to tables so that you can change them to the cell references that you want to use.

Some formulas contain references to tables in other workbooks that are not currently open in this instance of Excel. These references will be converted to #REF on save to Excel 97-2003 format because they cannot be converted to sheet references.

What it means    In Excel 2007 and later, you can use structured references to make it much easier and more intuitive to work with table data when you are using formulas that reference a table, either portions of a table, or the entire table. This feature is not supported in Excel 97-2003, and structured references will be converted to cell references. However, if the structured references point to tables in other workbooks that are not currently open, they will be converted to and displayed as #REF errors.

What to do    In the Compatibility Checker, click Find to locate the cells that contain formulas with structured references to tables in other workbooks so that you can change them to avoid #REF errors.

One or more cells in this workbook contain data validation rules which refer to more than 8192 discontinuous areas of cells. These data validation rules will not be saved.

What it means    In Excel 2010 and later, data validation rules can refer to more than 8192 discontinuous areas of cells. In Excel 97-2007, this type of data validation rule is not supported and won't be available.

What to do    In the Compatibility Checker, click Find to locate cells that contain data validation rules that refer to more than 8192 discontinuous areas of cells, and then make the necessary changes.

One or more cells in this workbook contain data validation rules which refer to values on other worksheets. These data validation rules will not be supported in earlier versions of Excel.

What it means    In Excel 2010 and later, you can use data validation rules that refer to values on other worksheets. In Excel 97-2007, this type of data validation is not supported and cannot be displayed on the worksheet.

However, all data validation rules remain available in the workbook and are applied when the workbook is opened again in Excel 2010 and later, unless the rules were edited in Excel 97-2007.

What to do    In the Compatibility Checker, click Find to locate cells that contain data validation rules that refer to values on other worksheets, and then make the necessary changes on the Settings tab of the Data Validation dialog box (Data tab, Data Tools group).

This workbook contains a Data Consolidation Range with references to cells outside of the row and column limits of the selected file format. Formula references to data in this region will be adjusted and may not display correctly in an earlier version of Excel.

What it means    In Excel 2007 and later, data consolidation ranges can contain formulas that refer to data outside of the row and column limit of the selected file format. In Excel 97-2003, the worksheet size is only 256 columns by 65,536 rows. Formula references to data in cells outside of this column and row limit are adjusted and may not display correctly.

What to do    In the Compatibility Checker, click Find to locate data consolidation ranges that contain formula references to data outside of the row and column limit of Excel 97-2003, and then make the necessary changes.

This workbook contains custom descriptions for VBA User Defined Functions. All custom descriptions will be removed.

What it means    In of Excel 2010 and later, you can use Visual Basic for Applications (VBA) to create User-Defined Functions (UDFs) with custom descriptions. Custom descriptions are not supported in Excel 97-2007 and will be removed.

What to do    No action is needed because all custom descriptions will be removed.

Top of Page

Issues that cause a minor loss of fidelity

Issue

Solution

Some array formulas in this workbook refer to an entire column. In earlier versions of Excel, these formulas may be converted to #NUM! errors when they are recalculated.

What it means    Array formulas that refer to an entire column in Excel 2007 and later will be converted to and displayed as #NUM! errors when they are recalculated in Excel 97-2003.

What to do    In the Compatibility Checker, click Find to locate the array formulas that refer to an entire column so that you can make the necessary changes to avoid #NUM errors.

One or more defined names in this workbook contain formulas that use more than the 255 characters allowed in the selected file format. These formulas will be saved, but will be truncated when edited in earlier versions of Excel.

What it means    When named ranges in formulas exceed the 255 character limit that is supported in Excel 97-2003, the formula will work correctly, but it will be truncated in the Name dialog box and cannot be edited.

What to do    In the Compatibility Checker, click Find to locate cells that contain named ranges in formulas, and then make the necessary changes so that users can edit the formulas in Excel 97-2003.

Some formulas in this workbook are linked to other workbooks that are closed. When these formulas are recalculated in earlier versions of Excel without opening the linked workbooks, characters beyond the 255-character limit cannot be returned.

What it means    When formulas in a workbook are linked to other workbooks that are closed, they can only display up to 255 characters when they are recalculated in Excel 97-2003. The formula results might be truncated.

What to do    Find the cells that contain formulas that link to other workbooks that are closed so that you can verify the links and make the necessary changes to avoid truncated formula results in Excel 97-2003.

A Data Validation formula has more than 255 characters.

What it means    When Data Validation formulas exceed the 255 character limit that is supported in Excel 97-2003, the formula will work correctly, but it will be truncated and cannot be edited.

What to do    In the Compatibility Checker, click Find to locate cells that contain Data Validation formulas, and then use fewer characters in the formula so that users can edit them in Excel 97-2003.

Top of Page

Customers who purchased FOPE through a FrontBridge agreement

Customers who purchased FOPE through a FrontBridge agreement

If you purchased FOPE through a FrontBridge agreement we will have provided you with licenses for EOP. Along with the new licenses, we will have terminated the legacy FrontBridge agreement and you will no longer be billed for the FOPE service. If there are other services on the FrontBridge agreement, we will have only discontinued billing for the FOPE service. We will not have, nor will we, terminate your agreement. By accepting and using these licenses you will be bound by the Microsoft Online Subscription Agreement.

PerformancePoint Dashboard Designer Help

PerformancePoint Dashboard Designer Help

We have detailed information available on TechNet about how to create, edit, and publish dashboards by using Dashboard Designer. Please see Create Dashboards by using PerformancePoint Services (SharePoint Server 2013) on TechNet.

Resolve and help prevent duplicate data

Resolve and help prevent duplicate data

Duplicate data can cause confusion that might cost you money, trust or goodwill. For example, a duplicate record might result in a perishable delivery to the wrong address. Access can help you avoid duplicate data by providing ways to reuse data, and help prevent duplicate data input by requiring that new values be unique.

Note:  The methods in this article do not apply to web databases. However, you can use them in a desktop database, and then use that database as a source for creating a new web database. For more information about web databases, see the article Build an Access database to share on the Web.

Note:  This article doesn't apply to Access apps – the new kind of database you design with Access and publish online. See Create an Access app for more information.

In this article

Overview

Before you begin

Prepare sample data to follow along with some examples

Delete or edit duplicate data in one table

Resolve duplicate data in multiple tables

Help prevent users from entering duplicate data in a table

Overview

One of the primary reasons for using a relational database such as Access is to avoid duplicate data, which can cause confusion and problems. Sometimes if you create a database by gathering data from existing systems, say a set of Excel workbooks, you may end up with duplicate data that needs to be resolved before you start using the database. Moreover, if certain design precautions are not taken (or are impractical for some reason), a database can sometimes acquire duplicate values, especially when multiple users enter data simultaneously.

What duplicate data is

The term duplicate data doesn't mean that there are two exact copies of the same data. Rather, duplicate data is data that is slightly different but which refers to the same thing as some other data. It may not be incorrect – for example a full name with and without a middle initial.

Duplicate data can occur at various levels:

  • Two or more records might contain duplicate fields.    Two records might be considered duplicates, even though not all fields of the records contain matching values. For example, in this figure, you see two records for Antonio Moreno Taquería.

    Duplicate records for a customer in the Customers table

    Even though each record has a unique customer ID (the value in the left-most column), the values in the Name, Address, and City fields match. Perhaps a record was created twice for one customer, or maybe there is a legitimate reason that two customers are with the same company. You will have to use your knowledge of your business to review such records to see if they are duplicates.

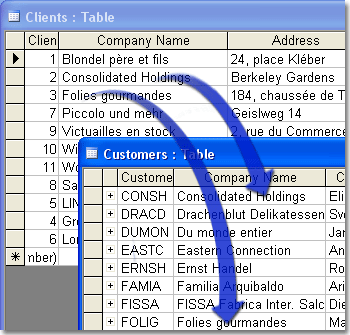
  • Two or more tables might contain similar data.    For example, you might find that a Customers table and a Clients table both contain records for the same customers.

    Clients and Customers tables with overlapping data

    Even though the tables might have somewhat different structures, both tables contain the same kind of information — customer data — so you should consider creating a new table by combining them.

  • Two or more databases might contain similar data.    If you find that two or more databases contain similar data, or you inherit a database that overlaps with your current database, you should compare the data and structure of the databases and then take necessary steps to consolidate them.

    Manually comparing databases, even small ones, is not an easy task. If you need help with a comparison, several third-party vendors sell tools for comparing the contents and structure of Access databases.

    Important:  If you take steps to eliminate duplicate data from your tables and you still see duplicate data in a form or report, it might be due to incorrect design of a form or report. Make sure that the underlying tables and queries are joined properly, and that the form or report sections do not include more than one control that is bound to the same control source. For more information about report design, see the article Introduction to reports.

What duplicate data is not

  • Sometimes two or more records will share a set of values but they will not refer to the same thing. For example, many customers might have the full name John Smith, but the values are not duplicates because they refer to different people. When that happens, you are not in danger of duplicating data as long as other fields in your database (such as ID fields, user names, addresses, or postal codes) contain enough unique information to keep the records from being considered duplicates.

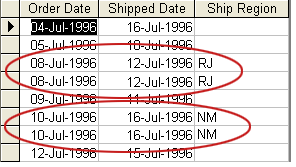
  • Data returned by a query might appear to contain duplicate records if the query does not include fields that uniquely identify each record. For example, this figure shows data returned by a query:

    A view that that does not include a field that could uniquely identify the records

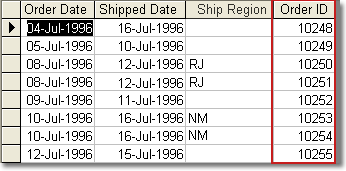
    Several rows in the query results appear to be duplicates. However, the same query with the primary key field included shows that each record is actually unique:

    View now includes the OrderID field to eliminate duplicate records

    To avoid this confusion, when you create a query include fields that identify each record uniquely. A primary key field can serve that function, but you can also use combinations of other fields instead. For example, you have many instances of a common contact name and many instances of a city name, but if you include a phone number and an address, the combination of data might be enough to make each record unique.

Resolving and preventing duplicate data

To resolve duplicate data, you either edit it or you delete it.

  • Edit a duplicate record if it actually represents a distinct entity – for example, a customer for whom there is no other record – and has become a duplicate of some other record by some error, perhaps erroneous input.

  • Delete a duplicate record if it does not represent some other entity; that is, there is another record for the same entity that you prefer to use.

  • In some cases, you will delete one duplicate and edit the other, because neither record is completely accurate. If you want to delete from a table that is related to other tables, you might need to enable cascade deletes for some of the relationships.

To help prevent duplicate data, consider the following:

  • Make sure that each of your tables has a primary key

  • If there are fields that are not part of a primary key but must contain unique values, create unique indexes for those fields

  • Consider creating forms for data input, and using list boxes on those forms to make finding existing values easier

Top of Page

Before you begin

Before you start deleting duplicate data, take the following steps:

  • Make sure that the database file is not read-only.

  • If other people use your database and you want to minimize their service disruption, ask them to close the objects that you want to work with. Otherwise, data conflicts might occur.

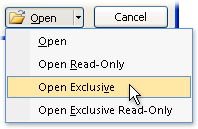
  • If it is acceptable for the database to be unavailable while you work on it, open the database in exclusive mode. To do so, click the File tab, and then click Open. In the dialog box, browse to and select the database, click the arrow next to the Open button, and then click Open Exclusive.

    Opening a file in Exclusive mode

  • Back up your database before you delete records. You cannot reverse or undo a delete operation. The only way to recover deleted records is to restore them from a backup. A delete operation might also delete records in related tables, so it is best to back up the entire database before starting the operation.

Back up a database

  1. Click the File tab, click Save As, and then under Save Database As click Back Up Database.
    The Save As dialog box appears, and Access appends the current date to the file name. For example, if you have a database named Assets, Access creates the following type of file name: Assets_2011-10-29.

  2. Accept the default name and location, or select another name or location, and then click Save.
    Access closes the original file, creates a backup, and then reopens the original file.

Note:  To restore from a backup, close and rename the original file so that the backup copy can use the name of the original version. Assign the name of the original version to the backup copy, and open it in Access.

Top of Page

Prepare sample data to follow along with some examples

The how-to steps in this article use the following sample tables. To follow along, copy the sample tables into a blank new database by usingthe steps at the end of this section.

The Customers table:

CompanyName

ContactName

Address

City

PostalCode

Phone

Baldwin Museum of Science

Josh Barnhill

1 Main St.

New York

12345

(505) 555-2122

Blue Yonder Airlines

Waleed Heloo

52 1st St.

Boston

23456

(104) 555-2123

Coho Winery

Pica Guido

3122 75th Ave. S.W.

Seattle

34567

(206) 555-2124

Contoso Pharmaceuticals

Jean Philippe Bagel

1 Contoso Blvd.

London

NS1 EW2

(171) 555-2125

Fourth Coffee

Julian Price

Calle Smith 2

Mexico City

56789

(7) 555-2126

Coho Winery

Christine Hughes

3122 75th St. S.

Seattle

34567

(206) 555-2125

Humongous Insurance

Steve Riley

67 Big St.

Tampa

01234

(916) 555-2128

Trey Research

Dana Birkby

2 Nosey Pkwy

Portland

43210

(503) 555-2129

Fourth Coffee

Reshma Patel

Calle Smith 2

Mexico City

56789

(7) 555-2233

The Employees table:

Last Name

FirstName

Address

City

BirthDate

HireDate

Barnhill

Josh

1 Main St.

New York

05-Feb-1968

10-Jun-1994

Heloo

Waleed

52 1st St.

Boston

22-May-1957

22-Nov-1996

Guido

Pica

3122 75th Ave. S.W.

Seattle

11-Nov-1960

11-Mar-2000

Bagel

Jean Philippe

1 Contoso Blvd.

London

22-Mar-1964

22-Jun-1998

Price

Julian

Calle Smith 2

Mexico City

05-Jun-1972

05-Jan-2002

Hughes

Christine

3122 75th St. S.

Seattle

23-Jan-1970

23-Apr-1999

Riley

Steve

67 Big St.

Tampa

14-Apr-1964

14-Oct-2004

Birkby

Dana

2 Nosey Pkwy

Portland

29-Oct-1959

29-Mar-1997

Bagel

Jean Philippe

1 Contoso Blvd.

London

22-Mar-1964

20-Jun-1998

The Amount Owed table:

CompanyName

ContactName

Address

City

PostalCode

Phone

AmountDue

Baldwin Museum of Science

Josh Barnhill

1 Main St.

New York

12345

(505) 555-2122

$556.78

Blue Yonder Airlines

Waleed Heloo

52 1st St.

Boston

23456

(104) 555-2123

$1,893.24

Coho Winery

Pica Guido

3122 75th Ave. S.W.

Seattle

34567

(206) 555-2124

$321.79

Contoso Pharmaceuticals

Jean Philippe Bagel

1 Contoso Blvd.

London

NS1 EW2

(171) 555-2125

£457.68

Fourth Coffee

Julian Price

Calle Smith 2

Mexico City

56789

(7) 555-2126

$98.75

Coho Winery

Christine Hughes

3122 75th St. S.

Seattle

34567

(206) 555-2125

$321.79

Humongous Insurance

Steve Riley

67 Big St.

Tampa

01234

(916) 555-2128

$297.45

Trey Research

Dana Birkby

2 Nosey Pkwy

Portland

43210

(503) 555-2129

$509.09

Fourth Coffee

Reshma Patel

2 Calle Smith

Mexico City

56789

(7) 555-2233

$98.75

The Clients table:

Name

Address

City

Phone

Fax

Baldwin Museum of Science

1 Main St.

New York

(505) 555-2122

(505) 555-2122

Blue Yonder Airlines

52 1st St.

Boston

(104) 555-2123

(104) 555-2123

Coho Winery

3122 75th Ave. S.W.

Seattle

(206) 555-2124

(206) 555-2124

Contoso Pharmaceuticals

1 Contoso Blvd.

London

(171) 555-2125

(171) 555-2125

Fourth Coffee

Calle Smith 2

Mexico City

(7) 555-2126

(7) 555-2126

Consolidated Messenger

3122 75th St. S.

Seattle

(206) 555-2125

(206) 555-2129

Graphic Design Institute

67 Big St.

Tampa

(916) 555-2128

(916) 555-2128

Litware, Inc.

3 Microsoft Way

Portland

(503) 555-2129

(503) 555-2110

Tailspin Toys

4 Microsoft Way

Portland

(503) 555-2233

(503) 555-2239

Paste the sample data into Excel worksheets

  1. Start Excel. An empty workbook opens.

  2. Press SHIFT+F11 to insert a worksheet (you will need four).

  3. Copy the data from each sample table into an empty worksheet. Include the column headings (the first row).

Create database tables from the worksheets

  1. Select the data from the first worksheet, including the column headings.

  2. Right-click the Navigation Pane, and then click Paste.

  3. Click Yes to confirm that the first row contains column headings.

  4. Repeat steps 1-3 for each of the remaining worksheets.

Top of Page

Delete or edit duplicate data in one table

Find records where some fields wholly or partially match

Use a query to delete duplicate records from one table and their related records in other tables

Create and run a delete query

Find records where some fields wholly or partially match

  • Create a query by using the Find Duplicates Wizard. By default, the query returns matching records only when the values in each field match character for character. If you need to find partial matches, you can use an expression in your query, or you can alter the Structured Query Language (SQL) code.

  • Optionally, edit the field values or delete records when viewing the query results in Datasheet view.

  • Optionally, use an expression in the query to include values that partially match.

The following steps use the sample Customers table provided in the section Prepare sample data to follow along with some examples.

Create a find duplicates query

  1. On the Create tab, in the Queries group, click Query Wizard.

  2. In the New Query dialog box, click Find Duplicates Query Wizard, and then click OK.

  3. In the list of tables, select the Customers table, and then click Next.

  4. In the list of available fields, select the CompanyName, Address, and City fields – the fields that you want to use to match. Click Next.

  5. In the next list of available fields, select the field or fields that contain the data that you want to inspect or update, or those that contain data that can help you distinguish duplicate from non-duplicate records. If you use the Customers table, you add the Contact Name and Phone fields, because the data in those fields can help you find the duplicate values and possibly identify why the values were entered. Click Next.

  6. Accept the suggested name (Find duplicates for Customers) or enter your own name, and then click Finish to run the query:

CompanyName

Address

City

ContactName

Phone

Fourth Coffee

Calle Smith 2

Mexico City

Julian Price

(7) 555-2126

Fourth Coffee

Calle Smith 2

Mexico City

Reshma Patel

(7) 555-2233

  1. When you created the Customers table, you might have noticed more than two duplicate records (the table contains four). You don't see the other duplicates because the values in the Address field don't match character-for-character. You can modify the query to return values that partially match — the next set of steps explains how.

Customize the duplicates query so that it includes partial matches

  1. Switch the query to SQL view. To do so, you can:

    • Right-click the document tab for the query, and then click SQL View.

    • In the Navigation Pane, right-click the query, and then click SQL View.

  2. Modify the SQL code to find and compare partial values.

    If you used the Customers table in the previous steps, you see the following SQL statement:

    SELECT Customers.[Company Name], Customers.[Address], Customers.[City], Customers.[Contact Name], Customers.[Phone]
    FROM Customers
    WHERE (((Customers.[CompanyName]) In (SELECT [CompanyName] FROM [Customers] As Tmp GROUP BY [CompanyName],[Address],[City] HAVING Count(*)>1 And [Address] = [Customers].[Address] And [City] = [Customers].[City])))
    ORDER BY Customers.[CompanyName], Customers.[Address], Customers.[City];

    Note that the WHERE clause uses a SELECT statement to identify sets of duplicates. The SELECT statement produces a list of company names that occur in more than one record with the same address and city, and the WHERE clause uses that list of names to limit the results of the duplicates query.

    Suppose that you decide to modify the Address field to return partial matches – say the first seven characters of the address must match – so that you will find potential duplicates arising from simple typographical differences. You modify the WHERE clause as follows:
    WHERE (((Customers.[CompanyName]) In (SELECT [CompanyName] FROM [Customers] As Tmp GROUP BY [CompanyName],Left([Address],7),[City] HAVING Count(*)>1 And Left([Address],7) = Left([Customers].[Address],7) And [City] = [Customers].[City])))If you want to make the criteria more or less restrictive, you change the number used by the Left function. For example, you might use Left([Address],5) to match using only the first five characters.

  3. After you finish modifying the statement, click Run Button image to run the query and display the results in Datasheet view.
    The query now returns all four duplicate records:

Company Name

Address

City

ContactName

Phone

Coho Winery

3122 75th Ave. S.W.

Seattle

Pica Guido

(206) 555-2124

Coho Winery

3122 75th St. S.W

Seattle

Christine Hughes

(206) 555-2125

Fourth Coffee

Calle Smith 2

Mexico City

Julian Price

(7) 555-2126

Fourth Coffee

Calle Smith 2

Mexico City

Reshma Patel

(7) 555-2233

Edit or delete the records

Do one of the following:

  • To edit the value in a field, select the field and enter a new value. In the example data, if Reshma Patel works at the Fourth Coffee in a different Mexico City location, you'd change the value of the Address field for that record.

  • To delete an entire record (a row), click the row selector (the empty box next to the row) and press DELETE. In the example data, if there is only one Coho Winery location and the contact is Pica Guido, you'd delete the other Coho Winery record.

Use a query to delete duplicate records from one table and their related records in other tables

If you have too many duplicates to resolve them all by hand, consider using a delete query. Before you use a delete query, check the table relationships. If the table that has duplicate data is related to another table, you should determine whether the duplicate data is in the table on the "one" side of a one-to-many relationship. You can use the Relationships tool to check:

  1. On the Database Tools tab, in the Relationships group, click Relationships.

  2. Find the tables in the Relationships window and look at the symbols next to each table. If one table has a "1" and the other has an infinity symbol, the relationship is one-to-many.

  3. If the data is on the "one" side (there is a "1" next to the table), you should enable cascade delete for the relationship. Cascade delete deletes records that are related to the record that you are deleting. For example, a customer has many orders, and you don't want to keep any of the order records when you delete the customer records to which they belong.

  4. If the data resides on the "many" side (there is an infinity symbol next to the table), and it does not matter whether cascade delete is enabled.

Create and run a delete query

Important: You cannot undo the results of a delete query. You should back up your database before you run your delete query.

  1. On the Create tab, in the Queries group, click Query Design.

  2. In the Show Table dialog box, double-click the table from which you want to delete records.
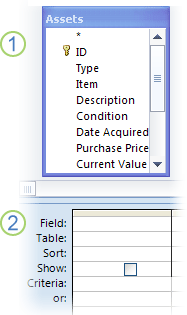
    The table appears in the query designer. This figure shows a typical table in the query designer.

    A table in the query designer

    1. Table in the query designer
    2. Query design grid

  3. Double-click the asterisk (*) to add all of the fields in the table to the design grid. Adding all the table fields enables the delete query to delete entire records (rows) from the table.

  4. Add one or more fields that you will use to identify the records to delete. For example, suppose that a customer goes out of business and you need to delete all of the pending orders for that customer. To find just those records, you might the Customer ID and Order Date fields to the design grid.

  5. Under the fields that you just added, enter criteria in the Criteria row of the design grid. For example, you might enter the Customer ID of the customer that went out of business and the date after which that customer's orders are invalid.

    For more information about using criteria, see the article Examples of query criteria.

  6. Clear the Show check box for each criteria field.

  7. On the Design tab, in the Results group, click Run. Verify that the query returns the records that you want to delete.

  8. On the Design tab, in the Results group, click Design View.

  9. On the Design tab, in the Query Type group, click Delete.

    Access changes the select query to a delete query, hides the Show row in the lower section of the design grid, and adds the Delete row.

  10. Make sure that the Delete row in the * (all fields) column displays From. The word Where should appear in any criteria columns.

  11. On the Design tab, in the Results group, click Run.

  12. Click Yes to confirm that you want delete the data.

Hide the confirmation message

Follow these steps if you do not want to see a confirmation message each time you run a delete query or other action query.

  1. On the File tab, click Options.

  2. In the Access Options dialog box, click Client Settings, and in the Editing section, under Confirm, clear the Action queries check box.

Top of Page

Resolve duplicate data in multiple tables

Data that is duplicated across tables is usually a case of overlapping records: a record exists for the same entity in more than one table. This can be complicated if the tables don't have exactly the same fields. For example, one table might use full names but the other has separate fields for first and last names. This kind of situation sometimes occurs:

  • When you create a new database from a variety of existing data sources

  • When you integrate a new data source into an existing database

  • When you merge two similar databases

To resolve this, combine all the data from the overlapping tables into a new table, decide which records to delete, and then delete the records that you don't want from that new table. Then, use the new table to replace both of the old tables.

Create a query that shows all the records from the overlapping tables together

Create a new table from the records in the overlapping tables

Decide and indicate which records to delete from the new table

Create a query to delete the unwanted duplicates

Create a query that shows all the records from the overlapping tables together

To bring together overlapping records from multiple tables, you create a union query. A union query usually filters out duplicates, but you can use the ALL keyword to let Access know that you want to see duplicate records. You should also sort the records by a field that has values you want to compare, such as names. The following procedure uses the Clients and Customers sample tables provided in the section Prepare sample data to follow along with some examples.

Note:  You can use more than two tables in a union query; just add a UNION ALL clause between each pair of SELECT statements.

  1. On the Create tab, in the Queries group, click Query Design.

  2. Close the Show Table dialog box without adding any tables or queries to the design grid.

  3. On the Design tab, in the Results group, click View, and then click SQL View.

  4. Paste the following SQL statement in the window.

    SELECT CompanyName, ContactName, Address, City, PostalCode, Phone, "" AS Remove FROM Customers 
    UNION ALL
    SELECT Name, "" AS ContactName, Address, City, "" AS PostalCode, Phone, "" AS Remove FROM Clients
    ORDER BY [Company Name];

    The first SELECT statement retrieves records from the Customers table, and the second SELECT statement retrieves records from the Clients table, and also creates empty values for the fields that are in Customers but not Clients. Both SELECT statements also contain a new field that you can use later to indicate which records to delete. The UNION ALL clause brings all records from both tables together. The ORDER BY clause sorts the records so that duplicate records are placed together for easy reviewing.

    Note: Each SELECT statement in a union query must return the same number of fields, and in the same order. The corresponding fields must have compatible data types, but with one exception: you can use a Number field and a Text field as corresponding fields. Also, remember that field can names differ: the query results will use the fields name from the first SELECT statement.

  5. On the Design tab, in the Results group, click Run to review the results.

  6. Save the query. You will use this query as a data source for a new table.

Create a new table from the records in the overlapping tables

You can use a union query as the data source of a new query that makes a new table. The new table will contain all the records from the overlapping tables. You can then edit the records and delete the ones that you don't want

  1. On the Create tab, in the Queries group, click Query Design.

  2. In the Show Table dialog box, click the Queries tab, and then double-click the union query that you created in the previous section.

  3. In the query designer, double-click the asterisk on the union query to add all its fields to the query results.

  4. On the Design tab, in the Query Type group, click Make Table.

  5. In the Make Table dialog box, enter a name for the new table.

  6. On the Design tab, in the Results group, click Run.

Decide and indicate which records to delete from the new table

After you combine the data into a new table, review it, and mark the records that you want to delete

  1. Open the new table.

  2. Review each set of duplicates, and enter an "x" in the Remove field for the duplicate records that you want to delete. You should only keep one record out of each set of duplicates.

Create a query to delete the unwanted duplicates

To delete the unwanted duplicates, follow the steps in the section Create and run a delete query, modified as follows:

  1. At step 4 (add fields to use as deletion criteria), add the Remove field.

  2. At step 5 (enter criteria), enter "x" in the Criteria row of the Remove field.

Top of Page

Help prevent users from entering duplicate data in a table

Here are some tips to help you prevent users from entering duplicate data in a table.

  • Set a field to contain only unique values.    Do one of the following:

    • Designate the field as a primary key. You can do this only if the table does not already have a primary key. To set the field as a primary key, open the table in Design view, right-click the field name, and then click Primary Key Button image . A primary key field accepts only unique values and will prompt users if they enter a duplicate.

    • If the table already has a primary key, and a different field that should contain unique values is a potential source of duplicate data, set the Indexed property of that field to Yes (No Duplicates) as follows:

      1. Right-click the table in Navigation Pane, and then click Design view.

      2. In the Field Properties pane, click Indexed, and then select Yes (No Duplicates) from the drop-down list.

  • Specify that a combination of values in two or more fields must be unique for each record.    For example, you might designate a combination of fields, such as Name, Address, and City, as the primary key for a table. Note that if you do ever need to enter a record that duplicates these values, you must remove the restriction, which could incur significant follow-up work.

    To create a multi-field primary key, follow these steps:

    1. Open the table in Design view.

    2. Click the row selector to the left of the first field so that the entire row is selected.

    3. Hold down CTRL while you click the row selector for the other fields that you want to include in the primary key.

    4. Right-click the selected fields, and then click Primary Key Button image .

      This step sets the Indexed property of each field in the primary key to Yes (Duplicates OK) so that, for example, you can enter the same name, or address, or city in multiple records, but you cannot enter an identical combination of name, address, and city in more than one record. For example, you can have two contacts named Jean Philippe Bagel who live at 2345 Main Street, as long as they don't both live in London.

Top of Page