Saturday, July 31, 2021

Use groups in the outlook mobile app

Microsoft 365 Groups are now available in the Outlook mobile app. Use groups to start, read, and respond to group conversations. You can also join and leave a group right from the Outlook app.

Browse your groups

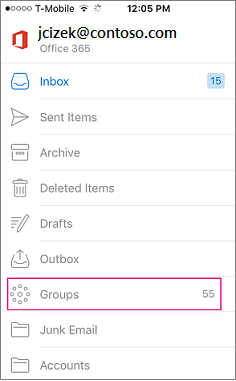
You'll find a Groups node in your folder list. Tap that node to see all the groups you're a member of. Here's an example from iOS.

Groups is a node on the folder list in Outlook mobile

Join or leave a group

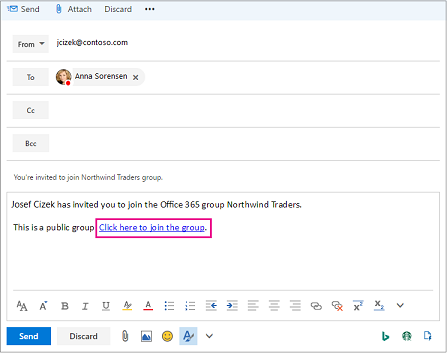
The easiest way to join a group in Outlook mobile is to receive an invitation from a group member or owner. That invitation might look like this:

Email with link inviting user to join group

Click the link to join the group.

Leave a group

  1. Select a group.

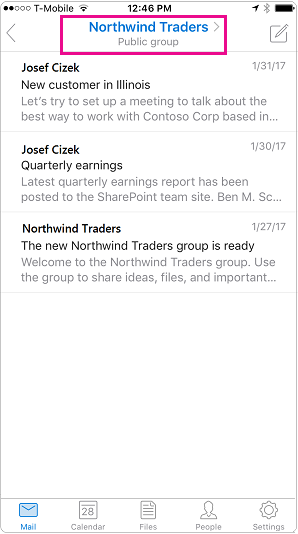
  2. Tap the group header.

    Outlook mobile conversation view with header highlighted

  3. On the Group Details card, tap Leave Group. Tap Leave Group again to confirm.

Have a group conversation

Start a conversation

  1. Select a group.

  2. Tap the New Message button. The message opens with the name of the group already listed on the To line.

  3. Add a subject.

  4. Type your message.

  5. Tap Send.

Join the conversation

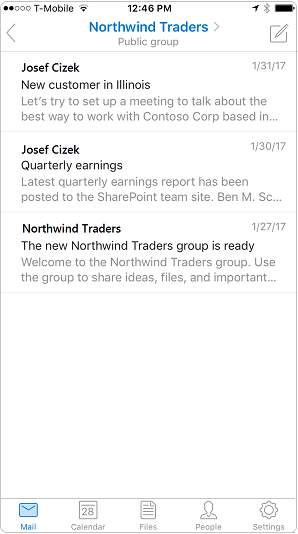
  1. Select a group. You'll see a list of all conversations in the group.

    Conversation view in the Outlook mobile app

  2. Tap a conversation to open it. The original message plus all replies are displayed in ascending order from oldest to newest.

  3. Select Reply All or Forward to join the conversation.

Frequently asked questions

Where do I get the Outlook mobile app?

You can find the Outlook mobile app in your device's app store.

How do I delete a conversation?

You can't delete a conversation from the group mailbox unless you're the owner of the group or the conversation. Deleting conversations from the group mailbox is possible in Outlook 2016 and Outlook on the web. If a copy of the conversation went to your personal inbox, you can delete the copy. The owner of the group determines whether copies are delivered to member inboxes.

Related Topics

Set up email in Outlook for iOS mobile app

Learn about Microsoft 365 Groups

Finish task field

Data Type    Date

Entry Type    Calculated or entered

Description    The Finish field shows the date when a task is scheduled to be completed. You can have Project calculate the finish date or you can enter it yourself.

How Calculated    Project calculates the finish date based on the start date, task duration, task dependencies, the project calendar, and other task constraints. If resources are assigned, Project also considers the resource calendar and assignment units.

If you enter a finish date for an automatically scheduled task, Project assigns a Finish No Earlier Than constraint to the task and uses your entered finish date as the constraint date. If your project schedules from the finish date, and if you enter a finish date, Project automatically applies a Finish No Later Than constraint to the task.

If you are using Project 2010, and you enter a finish date for a manually scheduled task, the date is simply entered as is, and Project does not assign a task constraint or make any other scheduling changes.

If you enter an actual finish date that is different from the scheduled finish date, Project changes the scheduled finish date to match the date in the Actual Finish field.

Best Uses    Add the Finish field to a task sheet when you want to review or filter for scheduled finish dates for tasks. The Finish field appears on the Gantt Chart view by default.

Example    You need to filter for all finish dates scheduled after March. You filter on the Finish field to see only those tasks scheduled with a finish date beyond March 31.

Remarks    In a manually scheduled task, you can enter a valid finish date, or you can enter text such as TBD or unknown. A manually scheduled task is considered a placeholder task until two of the three scheduling factors—start date, finish date, and duration—contain valid schedule information.

When you enter percent complete or actual work, Project might reschedule remaining work around the status date, and this can change the scheduled start date. If you prefer, you can leave these tracking fields in the project as originally scheduled, even if completed work is shown in the future or remaining work is shown in the past.

You can do this in the Project Options dialog box. Also, you can set the status date to a date other than today's date in the Project Information dialog box.

Change the color and thickness of ink strokes in onenote for windows 10

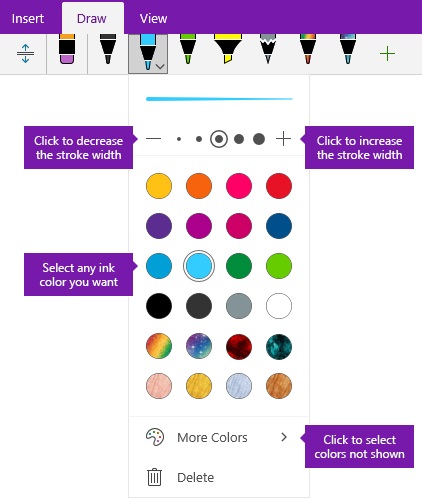
In OneNote for Windows 10, you can choose the color and thickness of new and existing ink strokes when drawing or handwriting notes.


Ink stroke width and color options in OneNote for Windows 10

Set the color and thickness of new ink strokes

  1. On the Draw tab, click or tap the Pen or Highlighter that you want to use, click the downward-facing arrow that appears next to your selection, and then select your preferred ink color.

    Tip: If the color you want isn't shown in the palette, click More Colors.

  2. If necessary, click the downward-facing arrow next to your pen or highlighter selection again, and then choose the thickness for the ink strokes you will draw by doing either of the following:

    • Click or tap the + symbol as often as you want to increase the pen or highlighter thickness.

    • Click or tap the symbol as often as you want to decrease the pen or highlighter thickness.

  3. Draw or handwrite your notes on the screen.

    Tip: To change the pen or highlighter color or thickness at any time while drawing or writing notes, repeat steps 1 and 2 as needed.

Set the color and thickness of existing ink strokes

If you want to change the color or thickness of ink strokes that you have already drawn, you can easily make adjustments.

  1. On the Draw tab, click the Lasso Select tool to select any existing ink stroke (or strokes) whose color or thickness you want to adjust.

  2. Click or tap the Pen or Highlighter that you want to use, click the downward-facing arrow that appears next to your selection, and then do any of the following:

    • Click to select your preferred ink color.

      Tip: If the color you want isn't shown in the palette, click More Colors.

    • Click or tap the + symbol as often as you want to increase the pen or highlighter thickness.

    • Click or tap the symbol as often as you want to decrease the pen or highlighter thickness.

Publish a workbook to a sharepoint site in excel for windows

You can publish a workbook to a Microsoft SharePoint library so that people can view or edit it in a web browser without needing Excel installed on their computers. Publishing is essentially the same as saving, but with some built-in options that let you control what people can see when they open the workbook in a browser.

Adopting an organization-wide practice of saving or publishing a workbook to a central SharePoint site can help you ensure that slightly different versions of the same workbook don't start popping up all over your organization when it's sent around in email.

By setting some publish options, you can emphasize specific parts of your workbook, such as charts, or exclude other parts from being viewed in the browser. For example, you can show a chart but not its underlying data. Or, you can show only certain worksheets to those people who need to see them and hide the other worksheets.

This article shows you how to publish a workbook from Excel for Windows and does not cover connecting a workbook or workbook data to an Excel Web Access Web Part on a SharePoint page.

When you publish a workbook to a SharePoint site, the entire workbook is saved to SharePoint. A user with the needed SharePoint permissions can view and work with the entire workbook either in the browser or in the Excel desktop program.

If Office for the web is deployed on SharePoint, viewing and working with your data in the browser can be very much like working with your data in the Excel desktop program. In fact, unlike the Excel desktop program, multiple users can simultaneously edit a workbook in the browser grid. When you view a workbook in the browser, if the Edit in Excel Online button is visible, you'll know that Office for the web is ready to use.

Edit in Excel Online on the Edit Workbook menu

Prepare the workbook

Before you publish the workbook, you can choose to select only the worksheets or items that you want visible in the browser. Just remember that although you can limit what is viewable in this mode, the entire contents of the workbook are still saved to the SharePoint server.

If you want to include entire worksheets as an item in addition to other items, such as charts or PivotTables, define the entire worksheet as a named range. Select the entire worksheet, and then define a named range. This named range will then appear as an available item in the Publish Options dialog box when you are ready to publish.

To let users enter a value in a cell to work with a formula in another cell, set that cell as a defined name in Excel before you publish the workbook. You can then add that defined name as a parameter on the Parameters tab in the Browser View Options dialog box.

For example, the following shows a cell D2, that has the defined name "Rate." In the browser, a user enters a value of 5.625 in the Rate box in the Parameters pane, and then clicks Apply. That value then appears in cell D2, and the formula in A2 uses the value in D2. The result of the formula is recalculated, and shown in A2: $1,151.31.
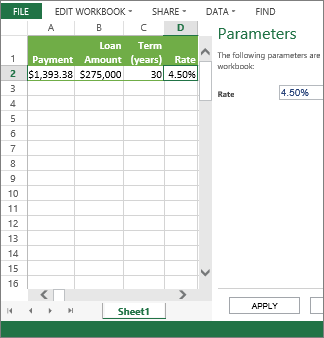
Entering a parameter in the pane uses it in cell D2

Note: If you create slicers for an Excel table and define a name for the range of cells containing the table and slicers, you won't be able to use the slicers to filter the table in the browser if you publish the defined range. If you publish the table or the entire worksheet or its workbook, the slicers will work as expected in the browser.

Publish the workbook

  1. Click the File tab, click Save As, and then click SharePoint.

  2. If you see your SharePoint folder under Current, Recent, or Older, click the folder you want.

    The Save As dialog box appears.


    Otherwise, click Browse, enter the web address for the SharePoint site, and then browse to the folder where you want to publish the workbook.
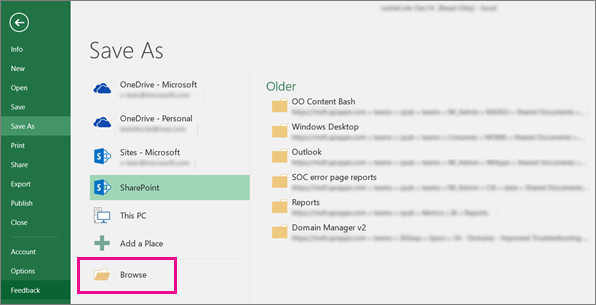
    Click a SharePoint folder or click Browse
  3. To select individual worksheets or items to publish from the workbook, click Browser View Options.
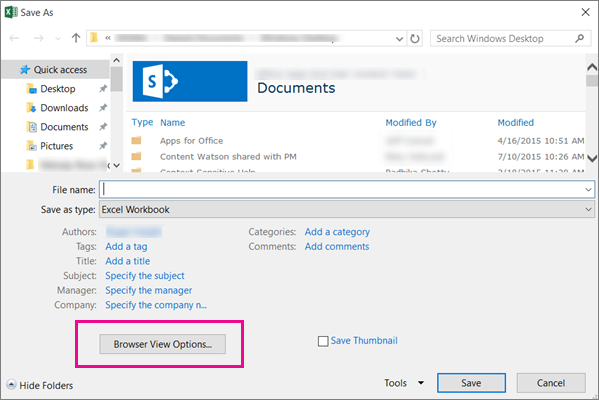
    In the Save As dialog box, click Browser View Options

    You'll see the Show tab and the Parameters tab.

  4. If you just want to publish the entire workbook, click Save. Otherwise, do one of the following:

    • To show the entire workbook in the browser, on the Show tab, select Entire Workbook in the list box.

    • To show only specific worksheets in the browser, on the Show tab, select Sheets in the list box, and then clear the check boxes for the sheets you don't want hidden in the browser.

      By default, all sheets are selected. To quickly make all sheets viewable after you unselected some of the check boxes, select the All Sheets check box.

    • To show only specific items in the browser (such as named ranges, charts, tables, or PivotTables), on the Show tab, select Items in the Workbook in the list box, and then select the check boxes for the items that you want to show.

    • On the Parameters tab, add any defined names you want to use to specify cells that are editable when users view the workbook in the browser, and then click OK.

  5. Save the workbook.

Notes: 

  • If you select items that have the same name (such as a chart and its underlying table of data), only one of these items will be available in the browser. To show all the items, make sure that each item in the workbook has a unique name.

  • You can rename tables on the Design tab in the Properties group, rename PivotTables on the Options tab in the PivotTable group, and rename charts or PivotCharts on the Layout tab in the Properties group. Rename other duplicate items, such as named ranges on the Formulas tab in the Defined Names group.

If Office for the web is deployed on SharePoint, viewing and working with your data in the browser can be very much like working with your data in the Excel desktop program. In fact, unlike the Excel desktop program, multiple users can simultaneously edit a workbook in the browser grid. When you view a workbook in the browser, if the Edit in Excel Online button is visible, you'll know that Office for the web is ready to use.

Edit in Excel Online on the Edit Workbook menu

For more information, see the article Differences between using a workbook in Excel and Excel Services.

Prepare the workbook

Before you publish the workbook, you can choose to select only the worksheets or items that you want visible in the browser. Just remember that although you can limit what is viewable in this mode, the entire contents of the workbook are still saved to the SharePoint server.

If you want to include entire worksheets as an item in addition to other items, such as charts or PivotTables, define the entire worksheet as a named range. Select the entire worksheet, and then define a named range. This named range will then appear as an available item in the Publish Options dialog box when you are ready to publish.

To let users enter a value in a cell to work with a formula in another cell, set that cell as a defined name in Excel before you publish the workbook. You can then add that defined name as a parameter on the Parameters tab in the Browser View Options dialog box.

For example, the following shows a cell D2, that has the defined name "Rate." In the browser, a user enters a value, 5.625, in the box in the Parameters pane and clicks Apply. That value then appears in cell D2, and the formula in A2 uses the value in D2. The result of the formula is recalculated, and shown in A2: $1,151.31.

See Excel Help for information about how to define ranges.

Entering a parameter in the pane uses it in cell D2

Note: If you create slicers for an Excel table and define a name for the range of cells containing the table and slicers, you won't be able to use the slicers to filter the table in the browser if you publish the defined range. If you publish the table or the entire worksheet or its workbook, the slicers will work as expected in the browser.

Publish the workbook

  1. Click File > Save As >SharePoint.

  2. If you see your SharePoint folder underCurrent Folder or Recent Folders, click the folder you want. Otherwise, click Browse and enter the web address for the SharePoint site. Then, browse to the folder where you want to publish the workbook. The Save As dialog box appears.

  3. To select individual worksheets or items to publish from the workbook, click Browser View Options. You'll see a Show tab and a Parameters tab. If you just want to publish the entire workbook, click Save. Otherwise, do one of the following:

    • To show the entire workbook in the browser, on the Show tab, select Entire Workbook in the list box.

    • To show only specific worksheets in the browser, on the Show tab, select Sheets in the list box, and then uncheck the boxes for the sheets you don't want hidden in the browser.

      By default, all sheets are selected. To quickly make all sheets viewable again after you uncheck some of the boxes, select the All Sheets check box.

    • To show only specific items in the browser (such as named ranges, charts, tables, or PivotTables), on the Show tab, select Items in the Workbook in the list box, and then check the boxes for the items that you want to show.

    • On the Parameters tab, add any defined names you want to use to specify cells that are editable when users view the workbook in the browser. Then click OK to close the dialog box.

  4. Save the workbook.

Notes: 

  • If you select items that have the same name (such as a chart and its underlying table of data), only one of these items will be available in the browser. To show all the items, make sure that each item in the workbook has a unique name.

  • If you select items that have the same name (such as a chart and its underlying table of data), only one of these items will be available in the browser. To show all the items, make sure that each item in the workbook has a unique name.

  • You can rename tables on the Design tab in the Properties group, rename PivotTables on the Options tab in the PivotTable group, and rename charts or PivotCharts on the Layout tab in the Properties group. Rename other duplicate items, such as named ranges on the Formulas tab in the Defined Names group.

  • You can rename tables on the Design tab in the Properties group, rename PivotTables on the Options tab in the PivotTable group, and rename charts or PivotCharts on the Layout tab in the Properties group. Rename other duplicate items, such as named ranges on the Formulas tab in the Defined Names group.

For more information about Excel Web Access web parts, see the article Display a workbook in an Excel Web Access web part.

When you publish a workbook to a SharePoint server, the entire contents of the workbook are saved to the server and can be viewed and worked with if you open the workbook in the Excel desktop program. If Office Web Apps are deployed on the SharePoint server, viewing and working with your data in the web browser can be very much like working with your data in the Excel desktop program. In fact, simultaneous editing of a workbook is possible in the browser grid when Office Web Apps are deployed. When you view a workbook in the browser, if the Edit in Browser button is visible, this means that Office Web Apps are available.

Edit in Browser button

For more information, see the article Differences between using a workbook in Excel and Excel Services.

Prepare the workbook

Before you publish the workbook, you have the opportunity (in the Publish Options dialog box) to select the worksheets or items that you want visible in the browser when editing has not been enabled by clicking the Edit in Browser button. Just remember that although you can select what is viewable in this mode, the entire contents of the workbook are still saved to the SharePoint server.

If you want to include entire worksheets as an item in addition to other items, such as charts or PivotTables, define the entire worksheet as a named range. Select the entire worksheet, and then define a named range. This named range will then appear as an available item in the Publish Options dialog box when you are ready to publish.

If you want to allow users to provide a parameter to a formula when viewing a worksheet in a browser, set a cell as a defined name. You can then add that defined name as a parameter on the Parameters tab in the Publish Options dialog box.

For example, in the following graphic that shows a worksheet in the browser, cell D2 has the defined name Rate. In the browser, a user has entered a value, 5.625, in the box in the Parameters pane and then clicked Apply. That value then appears in cell D2, and the formula in A2 uses the value in D2. The result of the formula is recalculated, and shown in A2: $1,151.31.
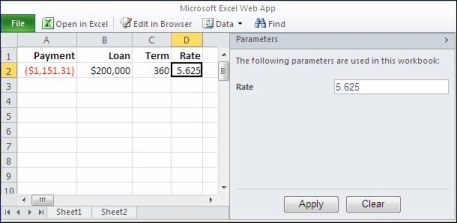
Using a parameter in the browser

See Excel Help for information about how to define ranges.

Publish the workbook

  1. Click the File tab, and then click Save & Send.

  2. Click Save to SharePoint.
    Note     If the Save to SharePoint command is unavailable, you can still save the workbook to a SharePoint site by using the Save As command. The Publish Options dialog box will not be available. You can also directly upload the workbook from a SharePoint library. Users can view and edit the contents of the workbook in the browser by going directly to the site where the workbook is saved.
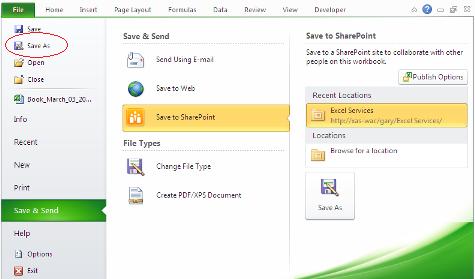
    The Save As command

  3. If you want to select individual worksheets or items to publish in the workbook, click the Publish Options button. Otherwise, if you want to publish the entire workbook, skip directly to step 4.
    On the Show tab, do the following:

    • To show the entire workbook in the browser, select Entire Workbook in the list box.

    • To show only specific worksheets in the browser, select Sheets in the list box, and then clear the check boxes for the sheets that you do not want to make visible.
      Note     By default, all sheets are selected. To quickly make all sheets viewable again after you clear some of the check boxes, you can select the All Sheets check box.

    • To show only specific items in the browser (such as named ranges, charts, tables, or PivotTables), select Items in the Workbook in the list box, and then select the check boxes of the items that you want to show.
      Note  If you select items that have the same name (such as a chart and its underlying table of data), only one of these items will be available in the browser. To show all the items, you must make sure that each item in the workbook has a unique name. You can rename tables on the Design tab in the Properties group, rename PivotTables on the Options tab in the PivotTable group, and rename charts or PivotCharts on the Layout tab in the Properties group. Duplicate items, such as named ranges, can be renamed on the Formulas tab in the Defined Names group.
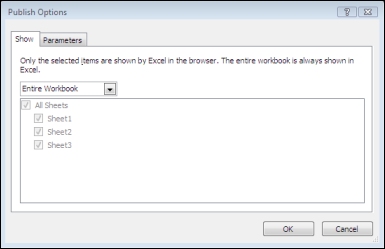
      Selecting worksheets or items

    • On the Parameters tab, add any defined names that you want to use to specify cells that are editable when users view the workbook in the browser. Then click OK to close the dialog box.
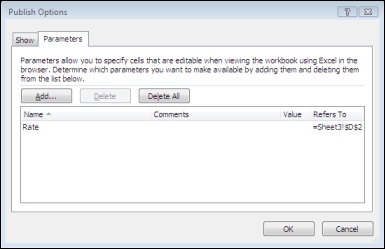
      Setting parameters

  4. Choose a location in which to publish your workbook.
    There may already be saved server locations under Current Location, Recent Locations, or Locations from which you can choose. If there are no such locations, or you want to save to a new location, under Locations, double-click Browse for a location.

  5. In the Save As dialog box, enter the web address for the SharePoint site, and then browse to the site or library in which you want to save your workbook.

  6. If you haven't already selected individual worksheets or items or set parameters, click the Publish Options button.

  7. In the File name box, accept the suggested name for the workbook, or type a new name if you want.

  8. To display the workbook contents in a browser window immediately after the publish operation has completed, make sure the Open with Excel in the browser check box is selected.

  9. Click Save.
Video type in powerpoint for ipad

Your browser does not support video.

Other tutorial videos for PowerPoint for iPad:

  1. Open files from the cloud. Open files from OneDrive for Business (for your work or school stuff), OneDrive.com (for your personal stuff), or from a Dropbox account.

  2. Open email attachments. Open, edit, and send back email attachments using PowerPoint for iPad.

  3. How saving works in PowerPoint for iPad. PowerPoint for iPad automatically saves your work every time you make even a small change. In most cases, you don't have to do anything at all to save your document. Watch this training video to learn about AutoSave.

  4. Type in PowerPoint for iPad. (You are here!) Typing in PowerPoint for iPad can be tricky at first, especially if you're used to a physical keyboard. This training video shows you some typing tips.

  5. Select stuff in PowerPoint for iPad. Select text and pictures expertly with your finger in PowerPoint for iPad. This training video helps you move from the mouse to the touchscreen.

  6. How to print in PowerPoint for iPad. You tap the File button to print in PowerPoint for iPad. Watch this video to learn how. At this time, you can only print to an AirPrint compatible printer.

  7. Run a slideshow in PowerPoint for iPad. There are some special finger gestures you can use to advance, go back, and end a slideshow. You can even use a laser pointer and ink pen, with the touch of your finger.

  8. Projecting your slideshow to a screen. If you want to project a slideshow from your iPad to a screen or TV, then watch this video. It will show you how to hook up an adaptor. You can also use AirPlay.

Looking for more training?

Add video to a lync conversation

To add video to a Lync conversation:

  • Click the Video button at the bottom of the conversation window, then click Turn My Camera On (if it isn't already on).

    Note:  If the other person doesn't have a video camera configured, you'll be viewable but he or she will not.

Top of Page

Basic tasks in sharepoint workspace 2010

Here are some basic tasks that you can do to help you learn how to use Microsoft SharePoint Workspace 2010.

Note: SharePoint Workspace was previously called Office Groove.

In this article

What is SharePoint Workspace?

Microsoft SharePoint Workspace 2010 allows you to access your SharePoint content whether or not you are connected to the SharePoint server or working offline. When you are connected to the SharePoint server, all content updates on the server and in the workspace are automatically synchronized. When you are not connected, changes you make in the workspace are cached locally. The next time you connect to the SharePoint server, all changes are automatically synchronized.

SharePoint workspaces provide easy navigation in accessing and working with your SharePoint content. If you are familiar with using a SharePoint site, you will immediately know how to use a SharePoint workspace.

Types of workspaces in SharePoint Workspace

SharePoint Workspace offers three workspace types: SharePoint workspaces, Groove workspaces, and shared folders.

SharePoint workspaces, new in this release, allow you to create a copy of a SharePoint site on your computer that is automatically synchronized with the server. This type of workspace can include only one member, the creator of the workspace.

Groove workspaces will be familiar to anyone who has used an earlier release of this software, such as Office Groove 2007. This type of workspace typically contains a variety of productivity tools, added as needed, and usually contains two or more members who join via invitation.

A shared folder is a special type of Groove workspace that enables you to share the contents of a folder in your Windows file system. For more information about this type of workspace, see About shared folders.

Parts of a SharePoint workspace

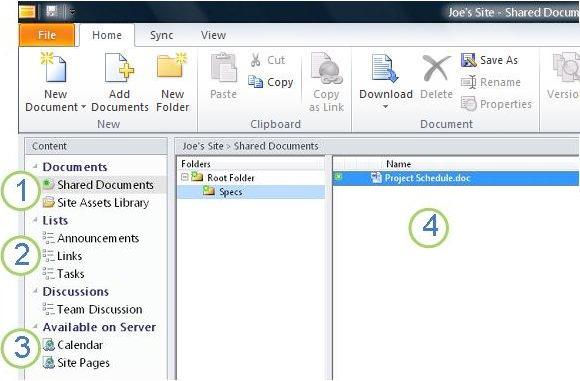
A SharePoint workspace

1. SharePoint document libraries synchronized in this workspace.

2. SharePoint lists synchronized in this workspace.

3. Lists or libraries not supported in SharePoint workspace. A Web link is provided for navigating to this content on the SharePoint site.

4. Content in the selected document library.

This document describes how to create a SharePoint Workspace starting from a SharePoint site.

Parts of a Groove workspace

With Groove workspaces, groups or organizations with common purposes and goals can share ideas and work together. A Groove workspace typically contains two or more "members," that is, people who join the workspace via invitation. Workspace content is highly dynamic. All members who are currently online see instantly any updates either they or other members add. You and other members send and receive updates as you come online.

Groove workspaces allow members to work with a variety of specialized application tools. For example, suppose you conduct a weekly meeting to discuss developing marketing materials. Activities might involve setting deadlines, assigning tasks, and reviewing completed work. To facilitate this meeting, workspace members might post files in a Documents tool, discuss issues in a Discussion tool, and collaborate on meeting agendas using a Calendar tool. All members currently online at the same time in the workspace could interact using real-time chat.

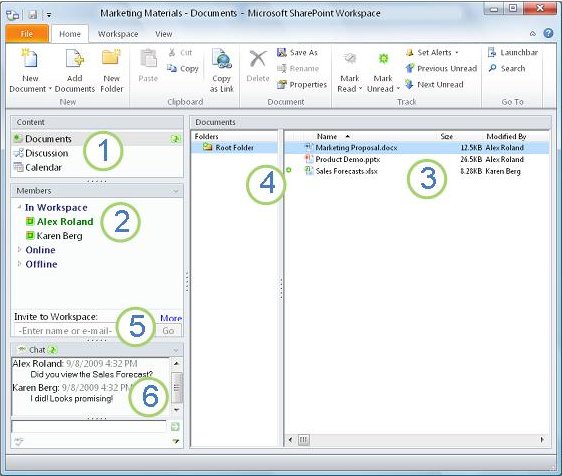
Groove Workspace

1. Tools in this workspace.

2. Members in this workspace.

3. Content in the currently selected workspace tool.

4. An item that contains new or unread content.

5. Invite new members to this workspace in the Invite to Workspace box.

6. The workspace chat transcript.

Create a SharePoint workspace

You can create SharePoint workspaces starting from a SharePoint site in a Web browser, or from the SharePoint Workspace Launchbar.

Create a SharePoint workspace that downloads items in all lists and libraries

The simplest way to create a SharePoint workspace is to go to the SharePoint site and synchronize the site to your computer. All items in supported lists and libraries will get downloaded to the SharePoint workspace. Note that the content of document library items is downloaded only on demand, as you open documents in the SharePoint workspace.

Lists and libraries that are not yet supported appear in the content pane of the workspace, and provide links to the SharePoint site.

Note: SharePoint Workspace will warn if the SharePoint site you selected is very large and would therefore take a lot of time to download all items.

  1. In a Web browser, go to the SharePoint site you would like to synchronize in a SharePoint workspace.

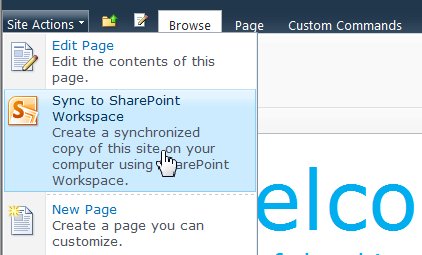
  2. Click Site Actions and then click Sync to SharePoint Workspace.

    Select this option to sync a SharePoint site to your computer

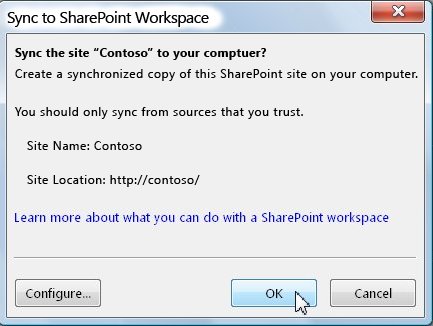
  3. In the Sync to SharePoint Workspace dialog box, click OK.

    The Sync to Computer dialog box

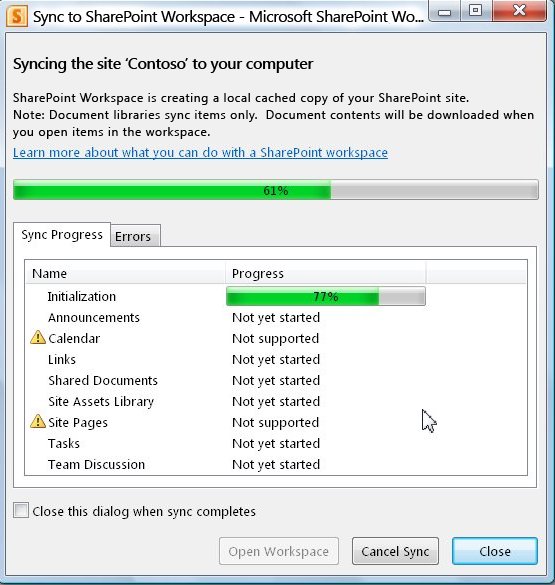
    A "Sync Progress" dialog box opens to keep you informed about the progress of the download from the SharePoint site to the SharePoint workspace.

    Sync to Computer progress window

  4. When the download completes, click Open Workspace or Close.

Create a SharePoint workspace syncing a selected list or library

Sometimes you may want to synchronize only a specific list or library to your computer in a SharePoint workspace. You can do so and avoid spending the time downloading items from other lists and libraries.

Note: You can also customize the creation of the SharePoint workspace to download a collection of specific lists and libraries. See "Create the SharePoint workspace downloading items from selected lists and libraries" in Creating a new workspace for more information.

  1. In a Web browser, go to the SharePoint site you would like to synchronize in a SharePoint workspace.

  2. Select the list or library you want to synchronize to your computer.

  3. Do one of the following:

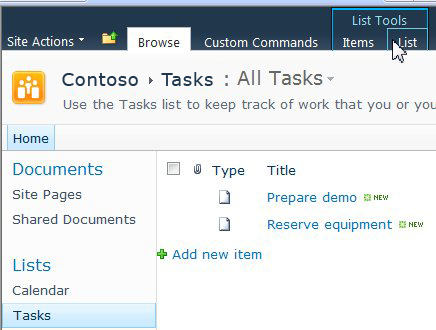
    • If you selected a list, click List under List Tools.

      The List tab under List tools in a SharePoint site

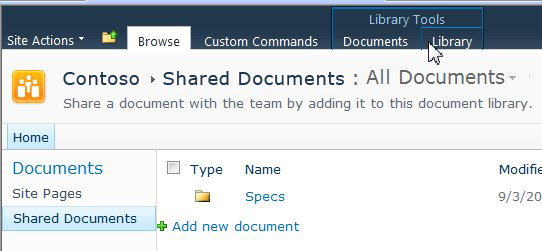
    • If you selected a library, click Library under Library Tools.

      The Library tab under Library tools

  4. In the SharePoint ribbon, in the Connect & Export group, click Sync to SharePoint Workspace.

  5. Click OK.
    A sync progress dialog box opens to keep you informed about the progress of the download from the SharePoint site to the SharePoint workspace.

  6. When the download completes, click Open Workspace or Close.

Synchronize content in a SharePoint workspace with the SharePoint server

A SharePoint workspace is automatically synchronized with the SharePoint site as follows:

  • All updates you make in a SharePoint workspace are immediately sent to the SharePoint site when you save them.

  • All content in the SharePoint workspace and the SharePoint site is automatically synchronized as frequently as possible, at minimum every 10 minutes, depending on network traffic.

You do not need to take any actions to keep your content synchronized. However, since updates that occur on the SharePoint site are not immediately sent to the SharePoint workspace, you may sometimes want to manually synchronize the SharePoint workspace to be sure that you have the latest content.

You can synchronize an individual list or library, or all lists and libraries in the SharePoint workspace at once.

Synchronizing an individual list or library

  1. Click the list or library that you want to synchronize in the Content pane.

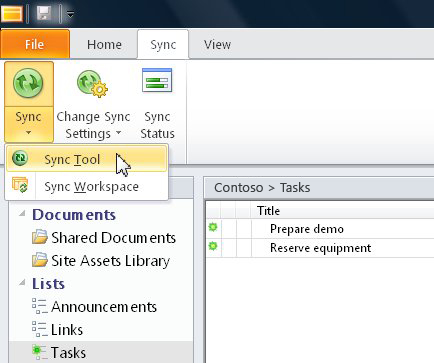
  2. On the Sync tab, click Sync, and then click Sync Tool.

    The Sync Tool command

The status bar reports on the progress of the synchronization.

Synchronizing all lists and libraries in the SharePoint workspace

  • On the Sync tab, click Sync, and then click Sync Workspace.

The status bar reports on the progress of the synchronization.

Navigate to a SharePoint workspace

Navigate to a SharePoint workspace in the Launchbar

You can go to any SharePoint workspace you have created by opening it in the Launchbar.

  1. Start SharePoint workspace.

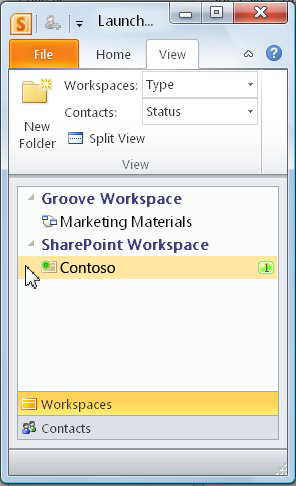
  2. In the Launchbar, click the Home tab.

  3. Double-click the SharePoint workspace name to open the workspace.

A SharePoint workspace in the Launchbar

Navigate to a SharePoint workspace in your file system

You can navigate to your SharePoint workspaces directly in your file system.

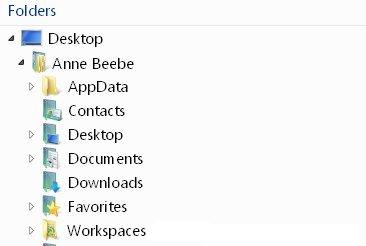
If you are running Windows Vista or later, your workspaces are stored in the Workspaces folder in your User Profile folder.

If you are running Windows XP, your workspaces are stored in the Workspaces folder in your My Documents folder.

Opening the Workspaces folder automatically starts up SharePoint Workspace, if it is not already running. Workspaces are listed with the same icons as in the launchbar.

Groove 2010 workspaces appear in this folder in your file system

Note: Only 2010 SharePoint or Groove workspaces display in the list. Additionally, SharePoint workspaces display only if they contain at least one document library, and Groove workspaces display only if they contain at least one Documents tool.

Open any workspace "folder" to see a list of all Documents tools in that workspace.

Groove Namespace Extension Shell Folder contents

Creating a Groove workspace

You can create a new Groove workspace in the Launchbar.

  1. On the Home tab, click New and then click Groove Workspace.

  2. Type a name for the workspace.

  3. Click Create.

SharePoint Workspace creates the Groove workspace and lists you as the initial member with the role of Manager. You can now add or update workspace tools and invite people to join as members.

Inviting people to a Groove workspace

To invite someone to a Groove workspace, you can do the following:

  1. Open the workspace.

  2. In the Members pane, type the e-mail address of the recipient in the Invite to Workspace box, and then click Go.

    Inviting to a workspace via e-mail address

    Note: If the person you want to invite is already a member of other Groove workspaces or in your contact list, you can find them quickly by typing the first few letters of their screen name in the box.

  3. In the Send Invitation box, click Invite.

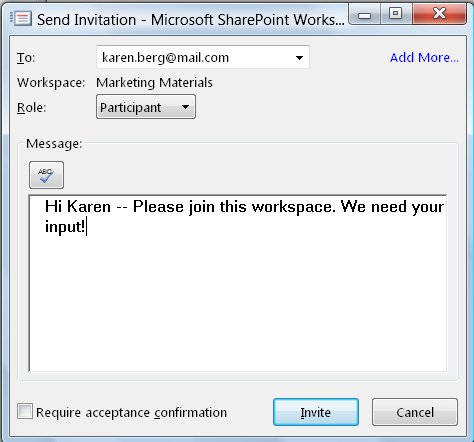
    Send Invitation dialog box

When you send the invitation, the recipient must open and accept it. You then receive a "confirm acceptance" message.

Once you confirm the acceptance, the workspace is sent to the new member's computer. The new member is added to the member list in the workspace.

For detailed information on sending invitations, see Inviting someone to a Groove workspace.

See Also

Creating links to files

Add or remove text effects

You can change the look of your text by changing its fill, changing its outline, or adding effects, such as shadows, reflections, or glows.

Note: You can also apply text effects to WordArt.

Add an effect to text

  1. Select the text that you want to add an effect to.

  2. On the Home tab, in the Font group, click Text Effect.

    Text effects

  3. Click the effect that you want.

    For more choices, point to Outline, Shadow, Reflection, or Glow, and then click the effect that you want to add.

Top of Page

Remove an effect from text

  1. Select the text that you want to remove an effect from.

  2. On the Home tab, in the Font group, click Clear Formatting.

    clear formatting in the font group

Top of Page

Change the color of hyperlink text throughout a presentation

You can systematically change the color of all hyperlink text in your presentation.

  • Which version of Office are you using?
  • Newer versions
  • Office 2007-2010
  1. On the Design tab, in the Variants group, select the down arrow that opens the gallery of color variants:

    Select the down arrow that opens the gallery of color variants
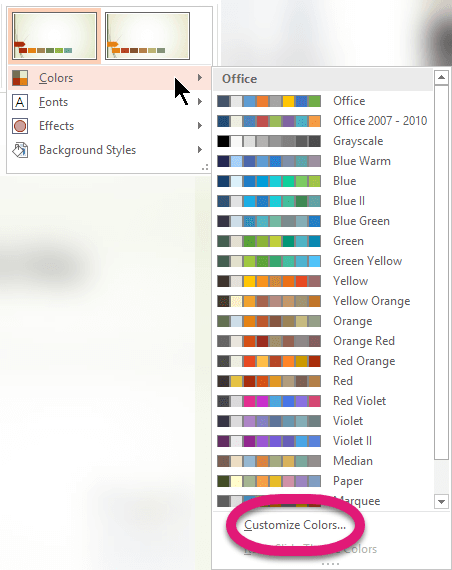
  2. Select Colors from the drop-down menu, and then click Customize Colors at the bottom of the menu.

    At the bottom of the Colors menu, select Customize Colors

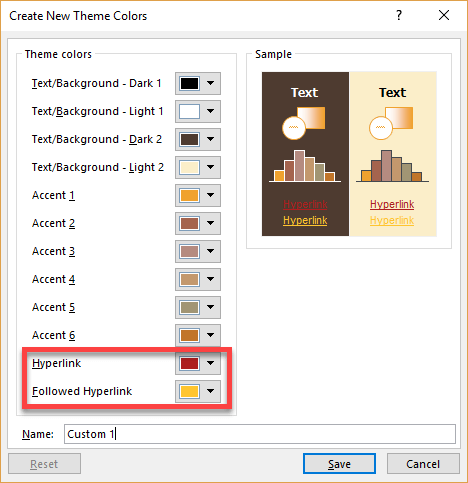
    The Create New Theme Colors dialog box opens.

  3. In the Create New Theme Colors dialog box, under Theme colors, do one of the following:

    • To change the color of hyperlink text, click the arrow next to Hyperlink, and then select a color.

    • To change the color of followed hyperlink text, click the arrow next to Followed Hyperlink, and then select a color.

      Choose colors for hyperlinks and followed hyperlinks

      Tip: For additional color choices, click More Colors.

  4. Click Save.

Beginning with PowerPoint 2016, you can also change the color of an individual hyperlink by directly using the text color control. See Add a hyperlink to a slide for more information.

Select a heading below to open it and see the detailed instructions.

Note: If hyperlinks appear in both the title and sub-title placeholders, do not change hyperlink text in the theme.

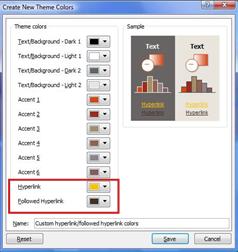
  1. On the Design tab, in the Themes group, click Colors, and then click Create New Theme Colors.

  2. In the Create New Theme Colors dialog box, under Theme colors, do one of the following:

    • To change the color of hyperlink text, click the arrow next to Hyperlink, and then select a color.

    • To change the color of followed hyperlink text, click the arrow next to Followed Hyperlink, and then select a color.

      Change the color of hyperlink text

      Tip: For additional color choices, click More Colors.

  3. Click Save.

Top of page

  1. Select and then right-click the text that is the color that you want the hyperlink text to be, and then click Font.

  2. On the Font tab, under All text, click the arrow next to Font color, and then click More Colors.

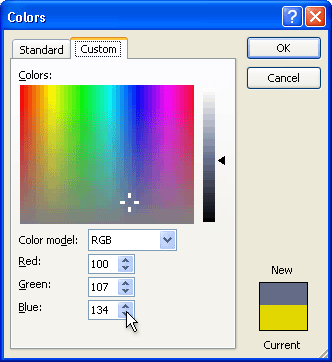
  3. In the Colors dialog box (shown below), on the Custom tab, note the color formula values in the Color model box and in the Red, Green, and Blue color boxes.

    Theme Colors

  4. Click Cancel twice to exit the Colors and Font dialog boxes.

  5. Select the hyperlink text whose color you want to change.

  6. On the Design tab, in the Themes group, click Colors, and then click Create New Theme Colors.

  7. In the Create New Theme Colors dialog box, under Theme colors, do one of the following:

    • To change the color of hyperlink text, click Hyperlink, and then click More Colors.

    • To change the color of the followed hyperlink text, click Followed Hyperlink, and then click More Colors.

  8. On the Custom tab, in the Colors dialog box, type the color formula values (that you noted in step 3) into the Color model box and ithe Red, Green, and Blue color boxes.

  9. Click OK, and then click Save.

Top of page

See also

Create a hyperlink

Remove a hyperlink from text or an object

Remove the underline from hyperlink text

Change the color of text on a slide

Top of page

  1. On the Format menu, select Theme Colors.

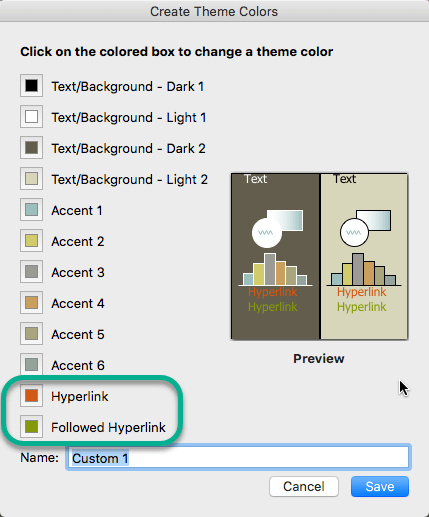
    The Create Theme Colors dialog box opens.

    Choose colors for hyperlinks and followed hyperlinks
  2. In the Create Theme Colors dialog box, select the colored box next to either Hyperlink or Followed Hyperlink to change that color setting.

    The Colors dialog box opens.

    There are several tabs in the dialog box that give you different ways to choose the color you want: a color wheel, slider bars, a palette of colors, or pencils.

  3. Select a color. It will immediately be reflected in the Create Theme Colors dialog box.

  4. Close the Colors dialog box and then click Save in the Create Theme Colors dialog box.