Create envelopes by using mail merge in Word for Mac
When you have bulk mail to send to people on your mailing list, you can use mail merge to create a batch of addressed envelopes. Each envelope will contain an address in your mailing list.
Note: Some of the content in this topic may not apply to some languages.
There are three documents involved in creating and printing envelopes using the mail merge process:
-
Your main document
This is the document you use to set up the layout of the envelopes in the mail merge. You can also set up any content—such as a company logo or your return address—that you want repeated on each envelope. -
Your mailing list
Your address list is the data source that Word uses in the mail merge. It's a file that contains the addresses to be printed on the envelopes. -
Your merged document
This document is a combination of the main document and the mailing list that is used to print individual addresses on the envelopes.
Step 1: Set up your mailing list
The address list can be an Excel spreadsheet, a directory of Outlook contacts, or an Apple Address Book. It contains the records Word pulls information from to build the addresses for the envelopes.
-
If you don't yet have a mailing list, you can create a new list in Word during mail merge. Before you start the mail merge process, collect all of your address lists.
-
If you're using an Excel spreadsheet, make sure the column for ZIP Codes or postal codes is formatted as text so that you don't lose any zeros.
-
If you want to use your Outlook contacts, make sure Outlook is your default email program.
Tip: To make Outlook your default email program, open Apple Mail, and on the Mail menu, choose Preferences. On the General tab, next to Default email reader, choose Microsoft Outlook.
Step 2: Prepare the main document to match your envelopes
-
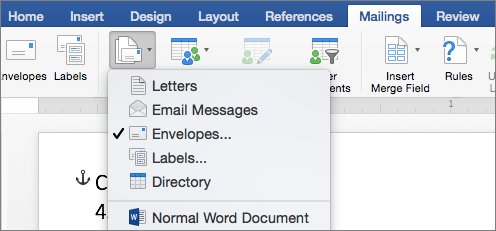
On the Mailings tab, choose Start Mail Merge > Envelopes.
-
In the Envelope dialog box, leave the Delivery Address blank, and under Return Address, do one of the following:
-
Choose Use my address to use your address from your email contact list.
-
Choose Omit to leave the return address blank.
-
Choose both options (Use my address and Omit), and type the return address you want to use.
-
Format the Return Address by choosing Font or Position, and then make the changes you want.
-
-
In the Envelope dialog box, under Printing Options, choose Page Setup.
-
In the Page Setup dialog box, in the Paper Size list, choose the option that matches the size of your envelope.
Tips: If none of the options match your envelope's size, do the following:
-
At the bottom of the Paper Size list, choose Manage Custom Sizes.
-
Click + (plus symbol) to add a new list item. In the Page Setup dialog box, double-click Untitled, and then type a name for your envelope.
-
Enter your envelope's dimensions in the Width and Height boxes, and then choose OK.
-
-
In the Page Setup dialog box, next to Orientation, choose Landscape > OK.
-
Choose OK to close the Envelope dialog box.
-
On the File menu, choose Save.
Step 3: Link your mailing list to your main document
-
On the Mailings tab, choose Select Recipients.
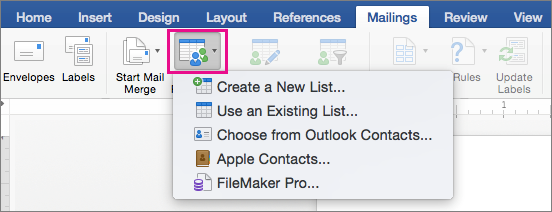
Choose
To
Create a New List
Start a new address list while you're setting up the mail merge
Use an Existing List
Use an Excel spreadsheet or another type of data file as your address list
Choose from Outlook Contacts
Select names directly from your Outlook contacts for your address list
Apple Contacts
Select names directly from your Apple Address Book for your address list
FileMaker Pro
Import data from a FileMaker Pro database
-
Choose an option:
|
|
| • Create a new list In the Edit List Fields dialog box, Word automatically creates fields for some basic information, such as first name, last name, and address. If you want to add a new field—for example, a message field—add it now, so you can fill in the field when you type the entry.
|
|
|
| • Use an Existing List
|
|
|
| • Choose from Outlook Contacts
|
|
|
| • Apple Contacts
|
|
|
| • File Maker Pro
|
Step 4: Add and format merge fields
-
In your document, click in the Drag fields into this box or type text box, and then click the text to remove it.
-
On the Mailings tab, choose Insert Merge Field, and then choose the field you want to add.

-
Add and format the fields you want to be included on the envelope, and choose OK.
Tips:
-
To format fields, for example, include a space between the First and Last name fields and press Return to start a new line for the Address field.
-
To sort your recipient list or remove recipients, on the Mailings tab, choose Filter Recipients, and then choose Sort Records or Filter Records. When you're done, choose OK.
-
Step 5: Preview and print the envelopes
-
On the Mailings tab, choose Preview Results to see how the envelopes will look.

Note: Use the left and right arrows on the Mailings tab, to scroll through each envelope.
-
To make additional formatting changes, choose Preview Results again, which lets you add or remove merge fields.
-
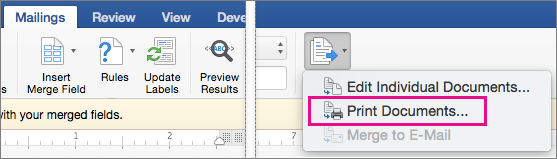
When the envelopes look how you want, on the Mailings tab, choose Finish & Merge > Print Documents to complete the mail merge.
Tip: If you want to review and update each envelope individually before printing, on the Mailings tab, choose Finish & Merge > Edit Individual Documents. When you're finished, on the File menu, choose Print to print the envelopes.
If you don't have a mailing list, you need to create one before you start the mail merge process. The mailing list can be an Excel spreadsheet, an Apple Address Book, a FileMaker Pro database, a Word document, or a delimited text file.
Step 1: Prepare your main document
-
In Word, on the File menu, choose New Blank Document.
-
On the View menu, choose Print Layout.
-
On the Tools menu, choose Mail Merge Manager.
-
Under 1. Select Document Type, choose Create New, and then select Envelopes.
-
In the Return address box, type your address.
Tips:
-
At this point, you shouldn't type anything (including spaces) in the Delivery address box.
-
If you can't type inside the Return address box, clear the Use my address check box, and then try again.
-
-
Under Printing Options, confirm the correct print settings for your envelopes are selected.
-
Choose OK when finished.
Step 2: Select the mailing list
-
On the Tools menu, choose Mail Merge Manager.
-
Under 2. Select Recipients List, choose Get List, and then select the source for the mailing list (for example, an Excel spreadsheet or a Word document).
-
Under 3. Insert Placeholders, choose Contacts.
-
Drag a field name from the Contacts list (for example, FirstName) to the envelope's address box.
-
Repeat Step 4 for all the fields that you want to appear on your envelopes.
-
In your main document, edit the envelope's address box to add spaces and carriage returns where you want them.
-
To finish creating your envelopes, do one of the following:
-
To print your envelopes immediately, in Mail Merge Manager, under 6. Complete Merge, choose Merge to Printer
 .
.or
-
To create a document that contains your merged envelopes that you can save, in Mail Merge Manager, under 6. Complete Merge, choose Merge to New Document
 .
.
-
See also
Create mailing labels by using mail merge
Create a data source for a mail merge
ReplyDeletePrint an envelope. The trick to printing an envelope is knowing which way to feed the envelope into your printer. Word gets
information from youre printer and shows you the right feed option. Go to Mailings
Envelopes, and enter delivery andreturn addresses.
Microsoft Office Tutorials: Create Envelopes By Using Mail Merge In Word For Mac >>>>> Download Now
Delete>>>>> Download Full
Microsoft Office Tutorials: Create Envelopes By Using Mail Merge In Word For Mac >>>>> Download LINK
>>>>> Download Now
Microsoft Office Tutorials: Create Envelopes By Using Mail Merge In Word For Mac >>>>> Download Full
>>>>> Download LINK uy
PC Software Download
ReplyDeleteYou make it look very easy with your presentation, but I think this is important to Be something that I think I would never understand
It seems very complex and extremely broad to me. I look forward to your next post,
FL Studio Crack
Exact Audio Copy Crack
Excel Merger Pro Crack
KLS Backup Professional Crack
Sidify Music Converter Crack
Adobe XD CC Crack
Anthemion Jutoh Crack
Enigma Recovery Pro 2022 Crack Smartphones are incredible they hold the key to everything that creates you beat one place. But if your content gets deleted whether it had been accidentally or completely out of your control. Then recovery is often difficult. Therefore Enigma
ReplyDeleteThanks for sharing this post. Your work is amazing. You can also check out PicPick Professional Crack for Free. You can also visit the Website vcracks.com
ReplyDeletePhpStorm Crack
Camtasia Studio Crack
Your blog is so good to read, Excellent effort.
ReplyDeleteigoal slot
Microsoft Office Tutorials: Create Envelopes By Using Mail Merge In Word For Mac >>>>> Download Now
ReplyDelete>>>>> Download Full
Microsoft Office Tutorials: Create Envelopes By Using Mail Merge In Word For Mac >>>>> Download LINK
>>>>> Download Now
Microsoft Office Tutorials: Create Envelopes By Using Mail Merge In Word For Mac >>>>> Download Full
>>>>> Download LINK 7D
I am very thankful for the effort put on by you, to help us, Thank you so much for the post it is very helpful, keep posting such type of Article.
ReplyDeleteZoner Photo Studio X Crack