Saturday, March 31, 2018

IsVisible Property

IsVisible Property

Applies to

BoundObjectFrame Object

Image Object

OptionButton Object

SubForm Object

CheckBox Object

Label Object

OptionGroup Object

TabControl Collection

ComboBox Object

Line Object

Page Object

TextBox Object

CommandButton Object

ListBox Object

PageBreak Object

ToggleButton Object

CustomControl Object

ObjectFrame Object

Rectangle Object

You can use the IsVisible property in Visual Basic for Applications (VBA) code to determine whether a control on a report is visible. Read/write Boolean.

expression.IsVisible

expression Required. An expression that returns one of the objects in the Applies To list.

Remarks

The IsVisible property uses the following settings.

Setting

Description

True

(Default) The control is visible.

False

The control isn't visible.

Note: You can set the IsVisible property only in the Print event of a report section that contains the control.

You can use the IsVisible property together with the HideDuplicates property to determine when a control on a report is visible and show or hide other controls as a result. For example, you could hide a line control when a text box control is hidden because it contains duplicate values.

Example

The following example uses the IsVisible property of a text box to control the display of a line control on a report. The report is based on a Products table and uses three controls with the following properties.

Properties

Line control

Text box #1

Text box #2

Name

Line0

CategoryID

ProductName

ControlSource

CategoryID

ProductName

HideDuplicates

Yes

No

Left

0

0

2.0

Top

0

.1

.1

Width

4.0

1.0

1.0


Paste the following code into the Declarations section of the report module, and then view the report to see the line formatting controlled by the IsVisible property:

Private Sub Detail_Print(Cancel As Integer, _
PrintCount As Integer)
If Me!CategoryID.IsVisible Then
Me!Line0.Visible = True
Else
Me!Line0.Visible = False
End If
End Sub

Remove subtotals

Remove subtotals

What do you want to do?

Watch a video

Remove subtotals

Remove subtotals from a PivotTable

Watch a video

Your browser does not support video. Install Microsoft Silverlight, Adobe Flash Player, or Internet Explorer 9.

Top of Page

Remove subtotals

When you remove subtotals, Microsoft Office Excel also removes the outline and any page breaks that you inserted into the list along with the subtotals.

  1. In the PivotTable, select an item of a row or column field.

    This displays the PivotTable Tools, adding the Options and Design tabs.

  2. On the Options tab, in the Activate Field group, click Field Settings.

    The Subtotal dialog box is displayed.

  3. Click Remove All.

Top of Page

Remove subtotals from a PivotTable

  1. In a PivotTable, select an item of a row or column field.

    This displays the PivotTable Tools, adding the Options and Design tabs.

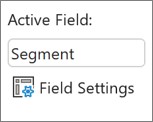
  2. On the Options tab, in the Active Field group, click Field Settings.

    Excel Ribbon Image

  3. In the Field Settings dialog box, under Subtotals, click None.

Note    If a field contains a calculated item, you can't change the subtotal summary function.

Top of Page

Restoring an account from a backup copy

Restoring an account from a backup copy

Note: This article has done its job, and will be retiring soon. To prevent "Page not found" woes, we're removing links we know about. If you've created links to this page, please remove them, and together we'll keep the web connected.

Restoring an account gives you a reference list of your workspaces in the Launchbar. You must download the content data for your workspaces from another computer that has your account, or from other workspace members.

Note: In order to restore an account, you must have access to a copy of the account file. For information, see Saving a backup copy of your account.

To restore an account from a backup copy, run the Account Configuration Wizard.

  1. Start SharePoint Workspace.

  2. Click the SharePoint Workspace icon in your task bar and then click New Account.

  3. Click Restore an existing account.

  4. Click Browse.

  5. Find and select the account backup file (for example, myaccountfile.grv).

  6. Click Open.

  7. Enter the password you entered to secure the account when you saved the account backup file, and click OK.

    If you have forgotten the password, you can click the Forgot your password? link to have an account reset code sent to your e-mail address.

    Note: The Forgot your password? link displays only if the Enable Account Recovery feature was enabled in your account preferences.

The account is added and the Launchbar opens. You can now proceed to download your workspace data.

Add a heading

Add a heading

Headings make text stand out and help people scan your document.

The simplest way to add headings is with heading styles. Using heading styles means you can also quickly build a table of contents, reorganize your document, and reformat its design without having to manually change each heading's text.

  1. Select the text you want to use as a heading.

  2. On the Home tab, move the pointer over different headings in the Styles gallery. Notice as you pause over each style, your text will change so you can see how it will look in your document. Click the heading style you want to use.

    The Styles gallery is on the Home tab

    If you don't see the style that you want, click the More button More down arrow to expand the gallery.

Tip: You can change the font and formatting of a heading style. Just select the heading text you want to customize, modify its styles the way you want, and then on the Home tab, in the Styles group, right-click the heading style that you customized and click Update Heading to Match Selection. Every time you apply that heading style in your document, the heading style will include your customizations.

Styles can do a lot more, including a table of contents. Here's a short video on why to write first and format later using Styles.

Your browser does not support video. Install Microsoft Silverlight, Adobe Flash Player, or Internet Explorer 9.

Change the time zone and language settings in Outlook.com

Change the time zone and language settings in Outlook.com

Choose your version for instructions

The instructions are slightly different depending on whether or not you're using the Outlook.com beta. Choose which version of Outlook.com you're using to see the troubleshooting steps that apply to you.

IF YOUR MAILBOX LOOKS LIKE...

IF YOUR MAILBOX LOOKS LIKE...

A screenshot of the top left corner of the Outlook.com beta mailbox

See Instructions for the Outlook.com beta.

A screenshot of the top left corner of the classic Outlook.com mailbox

See Instructions for classic Outlook.com.

Instructions for the Outlook.com beta

Learn how to set your time zone, language, and the date and time format settings in the Outlook.com beta.

  1. Sign in to Outlook.com.

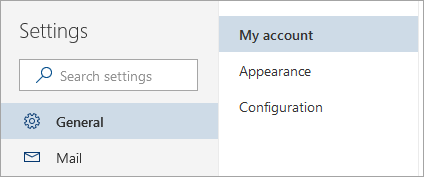
  2. At the top of the page, select Settings > View full settings.

  3. Select General > Language and time.

    A screenshot of the Full settings menu

  4. Select the language, date format, time format, and time zone you want to use.

  5. Select Save.

Instructions for classic Outlook.com

Learn how to set your time zone, language, and the date and time format settings in Outlook.com.

  1. Sign in to Outlook.com.

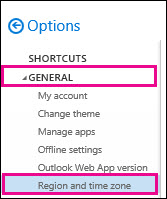
  2. At the top of the page, select Settings > Options.

  3. Under Options, select General > Region and time zone.

    Under General, click Region and time zone

  4. Under Region and time zones settings, select the language, date and time formats, and the time zone you want to use.

  5. Select Save.

Still need help?

Community Forum button Contact Support button

Manage document privacy

Manage document privacy

The OneDrive library provided for you is typically protected from public viewing by default. Only you can access personal documents and media files that you store in it unless you explicitly share a folder of documents or a single document with other people in your organization for reviewing or co-editing.

Note:  Features of and access to your library may differ from what is described in this article, depending your organization's customizations.

Built-in privacy for personal documents

All documents and files in the top-level OneDrive for Business library on your personal site are protected from public view by default, making it an apt location for storing confidential documents or original drafts that you want to save, for example. Only you can see this content, except for those documents that you explicitly indicate that you want to share.

Typically a Shared with Everyone folder is provided for documents that you want to share with everyone in your organization. Permissions on this folder are typically set for Can view.

Top of Page

Change sharing permissions for a document

You can change the permissions of people sharing a folder or document straight from a document library. Documents may inherit permissions from the folder that contains them and you can change those settings from the library also.

Note:  Changes to a folder apply to all documents within the folder unless you select a document and specifically set different permissions for the people with whom you've shared the document.

Note:  Features of and access to your library may differ from what is described in this article, depending your organization's customizations.

To change permissions for someone sharing a folder of documents or a single document:

  1. From the OneDrive for Business library, in the Sharing column for the folder or document, click Shared with some people Shared with some people icon . A details page appears with sharing options.

  2. For each person whose permissions you want to change, click the down arrow to the right of the name, and then click Can edit, Can view, or Stop sharing. To give someone else permission to share the document or folder or document, click INVITE PEOPLE, set their permissions and click SHARE.

  3. If you want to change inheritance settings, whereby a document may inherit permissions from a parent folder, click ADVANCED and use the ribbon options to reset inheritance.

  4. Click Save changes.

For more information about setting document-sharing permissions, see Share items in a library.

Top of Page

Share documents with other people in your organization

Your personal OneDrive for Business library lets you share a folder or document with other people for their reference or for co-editing. To share a folder of documents or a single document with more people, you can click the Shared with some people icon ( Shared with some people icon ) and invite people to share the document for viewing or editing. Or you can click the ellipsis (…) to the right of a folder or document in your library, and then type the name of someone with whom you want to share the item for viewing or editing.

Top of Page

Create, read, and respond to messages in Mail for Windows 10

Create, read, and respond to messages in Mail for Windows 10

With the Mail app on Windows 10, you can quickly read and respond to messages from multiple accounts, send files and pictures, and set up an automatic reply when you're away. You can access the Mail app on any Windows 10 computer or device, including phones.

For information on setting up your email accounts, see Set up email in Mail for Windows 10. If you're having problems sending or receiving messages, or you can't see some or all of your messages or calendar entries, see Where are my email messages or events?

Compose and send messages

When you create a new message, you can change fonts, add files, images, tables, and links, set the message importance, check spelling, zoom in or out, or find text within the message.

Notes: 

  • You cannot set the default font or text color for all new messages. Any changes you make apply only to the message you're currently composing.

  • Mail for Windows 10 doesn't allow you to set read receipts on your outgoing messages.

Create a new message

To create a new message in Mail for Windows 10, choose New mail. If you don't see New mail, choose the + symbol.
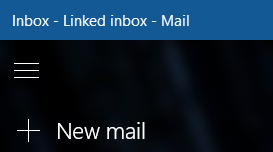
Choose New mail to compose a new message Choose the + to compose a new message

If you have use Mail for Windows 10 with multiple email addresses and you haven't linked your inboxes, choosing New mail will open a new message with whatever email account you're currently viewing.

If you have linked the inboxes from multiple email addresses, choosing New mail will display a list of your linked email addresses for you to choose from. Pick your preferred email address to open a new message.
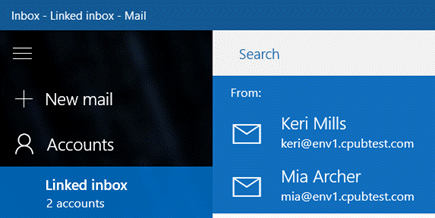
Choose your account to send a new message

To add recipients, you can type an email address in the To field or choose the Add recipients icon Add recipients to your email message to see a list of your contacts. If you want to Cc or Bcc someone, choose the Cc & Bcc option.

When you're done composing your message, choose Send. If you decide not to keep your message, choose Discard. If you don't choose one of these options and move to another message in the message list, Mail for Windows 10 will save your new message in the Drafts folder. If you want to return to it later, just choose the Drafts folder and then pick your message from the list of drafts. Finish composing your message and then choose Send.

Change fonts, check spelling, and add images, files, tables, and links

Mail for Windows 10 supports a full range of fonts, font sizes, colors, and special formatting options. You can also insert files, pictures, links, and tables. Finally, you can check your spelling, set an importance, zoom in or out, and search within your message.

  • Change fonts and highlight text

    To change your font in a new message, use the bold, italic, and underline buttons on the Format tab or use the drop-down to the right of the underline button to choose a specific font and font size, add highlighting, or change your font color.

    Format tab in Outlook Mail app

    Note: You cannot set the default font or text color for all new messages. Any changes you make apply only to the message you're currently composing.

  • Insert files, tables, pictures, and links

    Use the Insert tab to add a variety of different types of content to your message.

    Insert tab in an email

    Note: The Insert tab won't let you add tables, pictures, or links unless your cursor is in the message body. If you're still editing the To field or the message subject, these options won't be available.

    Choose the Files option to add an attachment to your email message.

    To insert a picture so that the recipient sees the picture in the body of the email message, choose Pictures.

    Note: You can insert pictures as either files or pictures. If you choose files, the picture may not be displayed when the recipient opens the email message, however the recipient can still open the picture by double-clicking on the attached file.

    To add a table, choose Table. By default, a table with three rows and three columns is inserted in your message. You can choose Delete to delete a row or a column or Insert to insert a row or a column. Use the other buttons that appear on the toolbar to customize the look and feel of your table.

    If you want to add a hyperlink to a website, choose Link. If you want to display something other than the URL or address for the link, fill out the Text to display field. Otherwise, you can leave that field blank. Once you've filled out the Address field with the URL of the link, choose Insert.

  • Check spelling, set an importance for your email, zoom, or search within your message

    Options tab in Outlook Mail app

    To check spelling, choose the Spelling button. Spell check uses your default language in Windows, but you can choose the drop-down next to Spelling to pick a different spell check language.

    If your message is very important, you can choose the exclamation point. Many email programs will display high priority messages differently than those without the high priority designation. If your message is not important, for example, an FYI that your recipient doesn't need to read quickly, you can choose the down arrow to mark your message as low priority.

    Do you need to search within your message for a word or phrase? Choose Find, then type the word or phrase. Every instance of the word or phrase will be highlighted.

    Choose Zoom to change how your new message is displayed while you're composing it. This doesn't affect your font size in any way.

    Note: Mail for Windows 10 doesn't allow you to set read receipts for your outgoing messages or create rules that automatically forward or move messages into folders.

Read and respond to messages

Once you've added an account to Mail for Windows 10, you can start using the app to read and respond to messages. All new messages appear in the message list to the left of the reading pane.

Note: You can't hide the message list or the reading pane in Mail for Windows 10.

You can reply, reply all, forward, delete, and flag an email message from the toolbar at the top of the message. If you select More More icon , you can take additional actions, such as marking the message as unread, moving the message to another folder, searching within the message, navigating between messages, saving the message as an .eml file, and printing the message.

Reading messages

All of your messages are displayed in the message list. When you first set up your email, your messages are grouped by conversation (subject) and the first few words of the email message are displayed in the message list below the subject. To read a message, select it in the message list and the message will open in the reading pane. You can't turn off the reading pane, move the reading pane, or open the message in a new window.

  • Mark messages as read

    When you move from one message to the next in the message list, Mail for Windows 10 automatically marks the message as read. You can turn this off or choose a different behavior by choosing Settings > Reading and selecting one of the options for marking an item as read.

  • Turn off group by conversation or hide the first few words of the message

    Choose Settings > Reading. Scroll down to the Conversation section and use the sliders to turn Show preview text and/or Show messages arranged by conversation either on or off. If you have multiple accounts, your choice for Show messages arranged by conversation applies only to the account shown in the Select an account drop-down.

  • Download content

    If you see an X or a placeholder where an image should be or you see a notice that some content in your message wasn't downloaded, you can scroll down to the bottom of the message to choose Download messages and pictures. To change this setting for all messages so all content downloads automatically, choose Settings > Reading.Under External content, choose your account and then turn Automatically download external images and style formatson.

  • Use caret browsing

    Caret browsing allows you to click in the reading pane and place your cursor anywhere on a line of text. You can then use your arrow keys to navigate up or down line by line or side to side character by character within your message. Caret browsing is turned off by default. To turn it on, choose Settings > Reading. Under Caret browsing, use the slider to turn the feature on.

Responding to messages

When you reply, reply all, or forward a message, the original message is included. You can't change this behavior, but you can select all of the text in that message and delete it.

Note: When you reply to a message, the original message is included in the reply, but any attachments are not. If you forward the message, the entire message, including attachments, is sent to the recipient.

Type your reply, add any necessary attachments, tables, pictures, or links, and then choose Send in the upper right to send your message. If you decide you don't want to send your message, choose Discard.

Flagging your messages

You can set a flag on messages you want to be able to easily find. To set a flag, choose the Set flag option in the reading pane. Choose Clear flag to remove a flag.

You can filter your message list to only show flagged items by choosing the drop-down next to All in the message list and choosing Flagged.

Working with drafts

If you don't send or discard your message, it's automatically saved in your Drafts folder. To return to your draft, select the Drafts folder, then select your message. When you're done editing your message, choose Send.

If your inbox shows messages by conversation, any draft replies and forwards will also show up in your inbox grouped with the original message. If you turn off arrange by conversation, these drafts will only be visible in the Drafts folder.

Handling junk

Junk email, or spam, is a common problem. If you receive an email message that's obviously junk mail, you can right-click the message in the message list and choose Move to Junk. This removes the message from your inbox and sends it to a Junk folder. You can only choose one message at a time to move to junk.

Tip: Not all email accounts support Move to Junk.

Customizing your view

Mail for Windows 10 doesn't support moving, hiding, or resizing the reading pane or the message list. You can expand or collapse the folder pane by choosing Show or hide the folder pane

If you collapse the folder pane, you can create a new message by choosing the + symbol.

My emails take too long to arrive or I can't find older messages

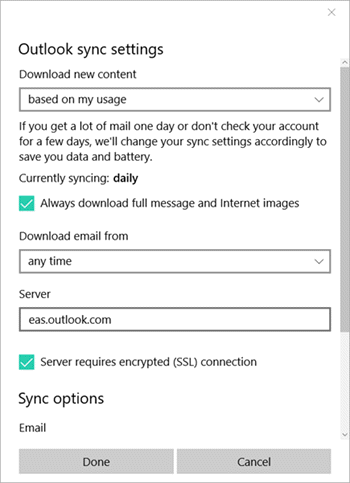
Mail for Windows 10 checks for email at regular intervals. If you want to check for mail more frequently or access older messages, you can change your sync settings.

  1. Choose Settings Settings > Manage Accounts, and select the account you want to change.

  2. Choose Change Mailbox sync settings.

    Change your sync options for your account
    • To check for new messages more frequently, under Download new content, select the interval that's right for you.

      Note: The default setting is based on my usage, which takes into account the number of messages you receive, your internet connection, and your battery life.

    • To see older messages, under Download email from, choose any time.

Having problems or need more information?

Send us your feedback

We value your opinion. If there's a feature you think is missing from the Mail and Calendar apps, or if a feature in isn't working properly, you can provide feedback directly to the Mail and Calendar team.

BITAND function

BITAND function

This article describes the formula syntax and usage of the BITAND function in Microsoft Excel.

Description

Returns a bitwise 'AND' of two numbers.

Syntax

BITAND( number1, number2)

The BITAND function syntax has the following arguments.

  • Number1    Required. Must be in decimal form and greater than or equal to 0.

  • Number2    Required. Must be in decimal form and greater than or equal to 0.

Remarks

  • BITAND returns a decimal number.

  • The result is a bitwise 'AND' of its parameters.

  • The value of each bit position is counted only if both parameter's bits at that position are 1.

  • The values returned from the bit positions progress from right to left as powers of 2. The rightmost bit returns 1 (2^0), the bit to its left returns 2 (2^1), and so on.

  • If either argument is less than 0, BITAND returns the #NUM! error value.

  • If either argument is a non-integer or is greater than (2^48)-1, BITAND returns the #NUM! error value.

  • If either argument is a non-numeric value, BITAND returns the #VALUE! error value.

Example

Copy the example data in the following table, and paste it in cell A1 of a new Excel worksheet. For formulas to show results, select them, press F2, and then press Enter. If you need to, you can adjust the column widths to see all the data.

Formula

Description

Result

How it works

=BITAND(1,5)

Compares the binary representations of 1 and 5.

1

The binary representation of 1 is 1, and the binary representation of 5 is 101. Their bits match only at the rightmost position. This is returned as 2^0, or 1.

=BITAND(13,25)

Compares the binary representations of 13 and 25.

9

The binary representation of 13 is 1101, and the binary representation of 25 is 11001. Their bits match at the rightmost position and at the position fourth from the right. This is returned as (2^0)+ (2^3), or 9.

Decimal number

Binary representation

13

1101

25

11001

Top of Page

Call forwarding and simultaneously ring (iOS)

Call forwarding and simultaneously ring (iOS)

You can set up call forwarding and simultaneously ring so calls don't get missed. You forward incoming calls by setting up forwarding rules. Call forwarding options are available only if your organization is configured to support them. If you're not sure about which Skype for Business features are enabled, contact your organization's technical support team.

If call forwarding options are enabled, you can forward calls to another number or to another contact. Call forwarding is especially useful if you're traveling or working from home because calls can be forwarded to your current location. If you're out of the office, calls can be automatically forwarded to a coworker.

The simultaneously ring option is handy for people on the go. When you get a call, it rings on two phone numbers at the same time. You can set your incoming calls to simultaneously ring your phone and another number or contact in case you're busy or momentarily unavailable.

What do you want to do?

Forward call to voice mail or another number

Stop call forwarding

Set up simultaneously ring

Forward call to voice mail or another number

The Call Forwarding option is typically used to forward calls to voice mail or to a number other than your mobile number. When you set call forwarding settings in Skype for Business, all incoming calls are automatically forwarded to the destination you choose.

To set call forwarding, do the following:

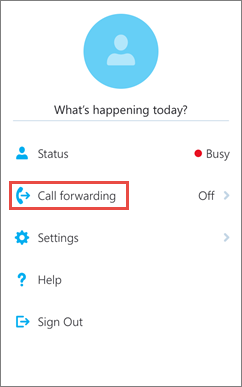
  1. Tap your picture, and then tap Call forwarding.

    Skype for Business for iOS home screen call forwarding option
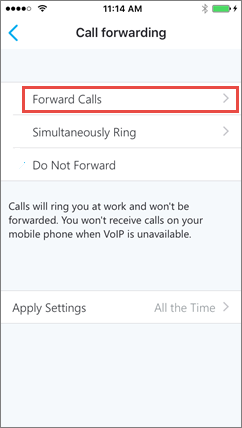
  2. Tap the arrow next to Forward Calls.

    Skype for Business for iOS Call forwarding screen
  3. On the Select Number screen, select one of the following:

    • Tap Voice mail to have the call sent to your voice mail where you can retrieve it later.

    • Click New Number, and type in a new phone number.

    • Tap New Contact, and then search a contact in the dialog box that is displayed.

  4. (Optional) Tap Apply Settings, and then select when this setting should apply.

Stop call forwarding

To stop call forwarding, do the following:

  1. Tap your picture, tap Call forwarding, and then tap Do Not Forward.

  2. (Optional) Tap Apply Settings, and then select when this setting should apply.

Set up simultaneously ring

Unlike call forwarding where your work phone doesn't ring, you can set your incoming calls to simultaneously ring your phone and another number or contact. This setting can help ensure that callers don't get the busy signal and their calls don't get missed. At the same time, they won't be aware that their call was forwarded.

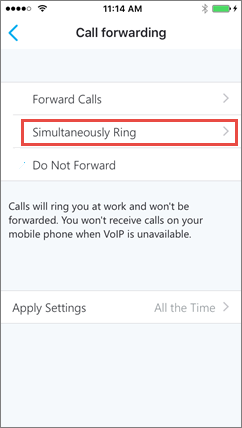
  1. Tap your picture, tap Call forwarding, and then tap the arrow next to Simultaneously Ring.

    Skype for Business for iOS - Simultaneously ring screen
  2. On the Select Number screen, tap New Number, type in a new phone number, and then tap Done.

If the Call Forwarding option isn't set to Simultaneously Ring on your mobile phone, you won't receive incoming Skype for Business calls on your mobile phone when Voice over IP isn't available.

Insert, change, or delete a table in Outlook.com or Outlook on the web

Insert, change, or delete a table in Outlook.com or Outlook on the web

You can insert a table in your Outlook.com or Outlook on the web email messages or calendars to help you organize your data.

Insert a table

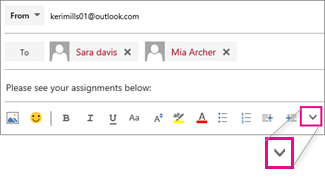
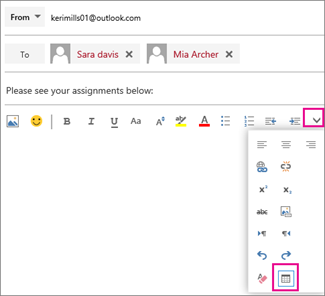
  1. In the body of the email message or calendar item, choose the More down arrow.

    Click the More down arrow

  2. Choose Insert table, drag the pointer to select the number of columns and rows you want in your table, and then click to insert the table.

    Insert a table

  3. Add content to your table.

Change, apply style, or delete a table

You can use the table mini formatting toolbar to change its layout and appearance. Click inside the table you created to view the toolbar.

Table Formatting Bar

Tip: If you don't see the formatting bar, click outside and then back inside the table.

Toolbar options

Select the cells you want to change and then choose a toolbar option.

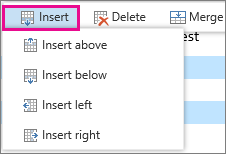
  • Insert
    Use to insert a row or column.

    Insert rows or columns

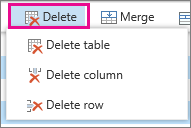
  • Delete
    Use to delete the table, a row, or a column.

    Delete

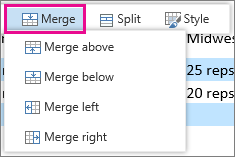
  • Merge
    Use to merge cells.

    Merge cells

  • Split
    Use to split a row or column horizontally or vertically.

    Split vertically or horizatally

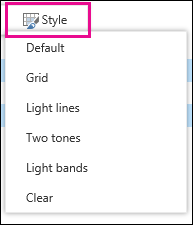
  • Style
    Use to embellish your table.

    Apply style to your table

Keyboard shortcuts in OneDrive for Business on the web

Keyboard shortcuts in OneDrive for Business on the web

Many users find that using keyboard shortcuts in OneDrive for Business helps them work more efficiently. For users with mobility or vision disabilities, keyboard shortcuts can be easier than using the touchscreen and are an essential alternative to using a mouse. This article itemizes the keyboard shortcuts for OneDrive for Business on the web.

Notes: 

  • The shortcuts in this topic refer to the US keyboard layout. Keys on other layouts might not correspond exactly to the keys on a US keyboard.

  • Commands that require you to press and release multiple keys together are indicated with a plus sign (+). Commands that require you to press multiple keys in order are indicated by a comma sign (,).

In this topic

Frequently used shortcuts

The following table itemizes the most frequently used shortcuts in OneDrive for Business on the web.

Note: If Office Web Apps Server isn't installed, a Folder icon appears instead of the New menu.

To do this

Press

Display keyboard shortcuts

?

Select all

Ctrl+A

Clear all or navigate to the previous folder

Esc

Select the adjacent item

Up arrow, Down arrow, Right arrow, or Left arrow key

Select and deselect a file

Spacebar

Open a selected item

O. To select Open in Word Online or Open in Word, press the Down arrow key and then Enter.

Open a document from an Internet site

Ctrl+O. The Open dialog box opens with the focus on the Open edit combo box. Type or select a URL, press the Tab key to move to the OK button, and then press Enter.

Upload an item

U. The Choose file to upload dialog box opens with the File name edit combo box selected. Type the name of the file, and press Alt+O.

Download a selected item

Shift+F10. When you hear "Download," press Enter. (In Narrator, press the Down arrow key until you hear "Download," and then press Enter.) When you hear "Do you want to save" and the name of your file, tab to the Save button and press Enter. The file is saved to your Downloads folder.

Delete a selected item

Delete

Share a selected folder or file

S

Rename a selected file

F2

Refresh

F5

Open the New menu

N and then an arrow key. To select an option, like Folder, Word document, Excel workbook, PowerPoint presentation, OneNote notebook, or Excel Survey, press Enter.

Create new folder

Shift+F, Spacebar, and then type the folder name.

Display or hide the Details pane

I

Toggle between the List and Grid view

V

Navigate OneDrive for Business on the web with only the keyboard

You can navigate OneDrive for Business on the web with just the keyboard. The page includes the following regions: the OneDrive for Business header (with access to the App launcher, Notifications pane, Settings menu, Help menu, and Account menu), the Search box and Command bar, the Navigation pane, and the Files list. OneDrive for Business on the web opens with the focus on the App launcher.

To do this

Press

Move between the browser bar and OneDrive for Business.

F6 or Ctrl+F6

Move between OneDrive for Business regions: the OneDrive for Business bar, Search box, Command tabs, Navigation pane, and Files list.

Tab key or Shift+Tab

Move to the Command tabs, and move through them. (The Command tabs that are available depend on the focus. They may include New, Upload, Sync, Share, Get a Link, Delete, Copy to, Move to, Rename, Version History, and Sort.)

To move to the New button, press the Tab key. Then, to move between tabs, press the Right arrow or Left arrow key.

Open the Open submenu.

To move to the Open button, press the Tab key. Press the Down arrow key until you hear the selection you want, and then press Enter.

Open the Sort submenu.

To move to the Sort button, press the Tab key. Press the Down arrow key until you hear the selection you want, and then press Enter.

In the Navigation pane, move through the list.

Up arrow or Down arrow key

In the Files list, move through the list.

Up arrow or Down arrow key

In the Files list, select a file or to clear a file selection.

Spacebar

In the Files list, read information about a selected file (for example, the name, date modified, the person it was modified by, file size, and sharing information).

Right arrow or Left arrow key

In the Files list, open the context menu of available commands for a selected item (for example, Download, Get a Link, Delete, Move to, Copy to, Version History, and others).

To move to the ellipsis (…), press the Right arrow key until you hear "Open context menu for selected item," and then press Enter.

Technical support for customers with disabilities

Microsoft wants to provide the best possible experience for all our customers. If you have a disability or questions related to accessibility, please contact the Microsoft Disability Answer Desk for technical assistance. The Disability Answer Desk support team is trained in using many popular assistive technologies and can offer assistance in English, Spanish, French, and American Sign Language. Please go to the Microsoft Disability Answer Desk site to find out the contact details for your region.

If you are a government, commercial, or enterprise user, please contact the enterprise Disability Answer Desk.

Pmt Function

Pmt Function

Returns a Double specifying the payment for an annuity based on periodic, fixed payments and a fixed interest rate.

Syntax

Pmt( rate, nper , pv [, fv ] [, type ] )

The Pmt function syntax has these arguments:

Argument

Description

rate

Required. Double specifying interest rate per period. For example, if you get a car loan at an annual percentage rate (APR) of 10 percent and make monthly payments, the rate per period is 0.1/12, or 0.0083.

nper

Required. Integer specifying total number of payment periods in the annuity. For example, if you make monthly payments on a four-year car loan, your loan has a total of 4 * 12 (or 48) payment periods.

pv

Required. Double specifying present value (or lump sum) that a series of payments to be paid in the future is worth now. For example, when you borrow money to buy a car, the loan amount is the present value to the lender of the monthly car payments you will make.

fv

Optional. Variant specifying future value or cash balance you want after you've made the final payment. For example, the future value of a loan is $0 because that's its value after the final payment. However, if you want to save $50,000 over 18 years for your child's education, then $50,000 is the future value. If omitted, 0 is assumed.

type

Optional. Variant specifying when payments are due. Use 0 if payments are due at the end of the payment period, or use 1 if payments are due at the beginning of the period. If omitted, 0 is assumed.


Remarks

An annuity is a series of fixed cash payments made over a period of time. An annuity can be a loan (such as a home mortgage) or an investment (such as a monthly savings plan).

The rate and nper arguments must be calculated using payment periods expressed in the same units. For example, if rate is calculated using months, nper must also be calculated using months.

For all arguments, cash paid out (such as deposits to savings) is represented by negative numbers; cash received (such as dividend checks) is represented by positive numbers.

Example

Note: Examples that follow demonstrate the use of this function in a Visual Basic for Applications (VBA) module. For more information about working with VBA, select Developer Reference in the drop-down list next to Search and enter one or more terms in the search box.

This example uses the Pmt function to return the monthly payment for a loan over a fixed period. Given are the interest percentage rate per period (APR / 12), the total number of payments (TotPmts), the present value or principal of the loan (PVal), the future value of the loan (FVal), and a number that indicates whether the payment is due at the beginning or end of the payment period (PayType).

Dim Fmt, FVal, PVal, APR, TotPmts, PayType, Payment
' When payments are made.
Const ENDPERIOD = 0, BEGINPERIOD = 1
Fmt = "###,###,##0.00" ' Define money format.
FVal = 0 ' Usually 0 for a loan.
PVal = InputBox("How much do you want to borrow?")
APR = InputBox("What is the annual " & _
"percentage rate of your loan?")
If APR > 1 Then APR = APR / 100 ' Ensure proper form.
TotPmts = InputBox("How many monthly " & _
"payments will you make?")
PayType = MsgBox("Do you make payments " & _
"at the end of month?", vbYesNo)
If PayType = vbNo Then
PayType = BEGINPERIOD
Else PayType = ENDPERIOD
End If
Payment = Pmt(APR / 12, TotPmts, -PVal, FVal, PayType)
MsgBox "Your payment will be " & _
Format(Payment, Fmt) & " per month."

Avg Function

Avg Function

Calculates the arithmetic mean of a set of values contained in a specified field on a query.

Syntax

Avg ( expr )

The expr placeholder represents a string expression identifying the field that contains the numeric data you want to average or an expression that performs a calculation using the data in that field. Operands in expr can include the name of a table field, a constant, or a function (which can be either intrinsic or user-defined but not one of the other SQL aggregate functions).

Remarks

The average calculated by Avg is the arithmetic mean (the sum of the values divided by the number of values). You could use Avg, for example, to calculate average freight cost.

The Avg function does not include any Null fields in the calculation.

You can use Avg in a query expression and in the SQL property of a QueryDef object or when creating a recordset object based on an SQL query.